CS349: User Interfaces
This course uses a Front-end web development technology stack with TypeScript. Don’t know how I feel about web dev to be honest. (Jan 27, 2024)
Course website: https://student.cs.uwaterloo.ca/~cs349/1241/
Lecture Demo Code Repo https://git.uwaterloo.ca/cs349/public/1241. I’ve upstreamed it on my own repo: https://github.com/avrilzchen/cs349-demos
4 assignments (each 13%), midterm exam (15%), and final exam (32%).
Assignments
- A1-Canvas
- A2-SimpleKit
- A3-Vanilla
- Release A4-Preact (start it on Saturday March 16) - it’s probably redo A2-A3 in using Preact … Yes it was.
Use https://docs.gitlab.com/ee/user/ssh.html to add ssh key to gitlab.
Final
Refer to Final CS349.
Thoughts on the final:
- It was horrendously long.
- Mostly trivia, things to memorize.
- HTML/CSS questions
- Tailwind crap
- MVC
- A lot of coding questions.
- Should have memorized the Undo/Redo Manager
- Drawing question
- Preact question
Midterm
Covers from Week 1 to 6. Feb28 7-8:50pm
I haven’t finished the midterm, but it’ll have things like:
-
Some short answer questions (on any topic, some concept, some code)
-
Some “fill-in-the-blank coding” questions
-
Some “short coding” questions (e.g. write a function)
Some “read code” questions (e.g. draw the result, what is logged to console, describe parts of the code)
A “write short program” question (low complexity, like one of the simple exercises) -
Go over the study questions CS349 Study Questions
-
HTML CSS lecture
-
Visual Design Lecture
-
Review MVC (very important)
-
Look over the assignment solutions posted on piazza
Concepts
- JavaScript
- TypeScript
- Vite
- Node.js
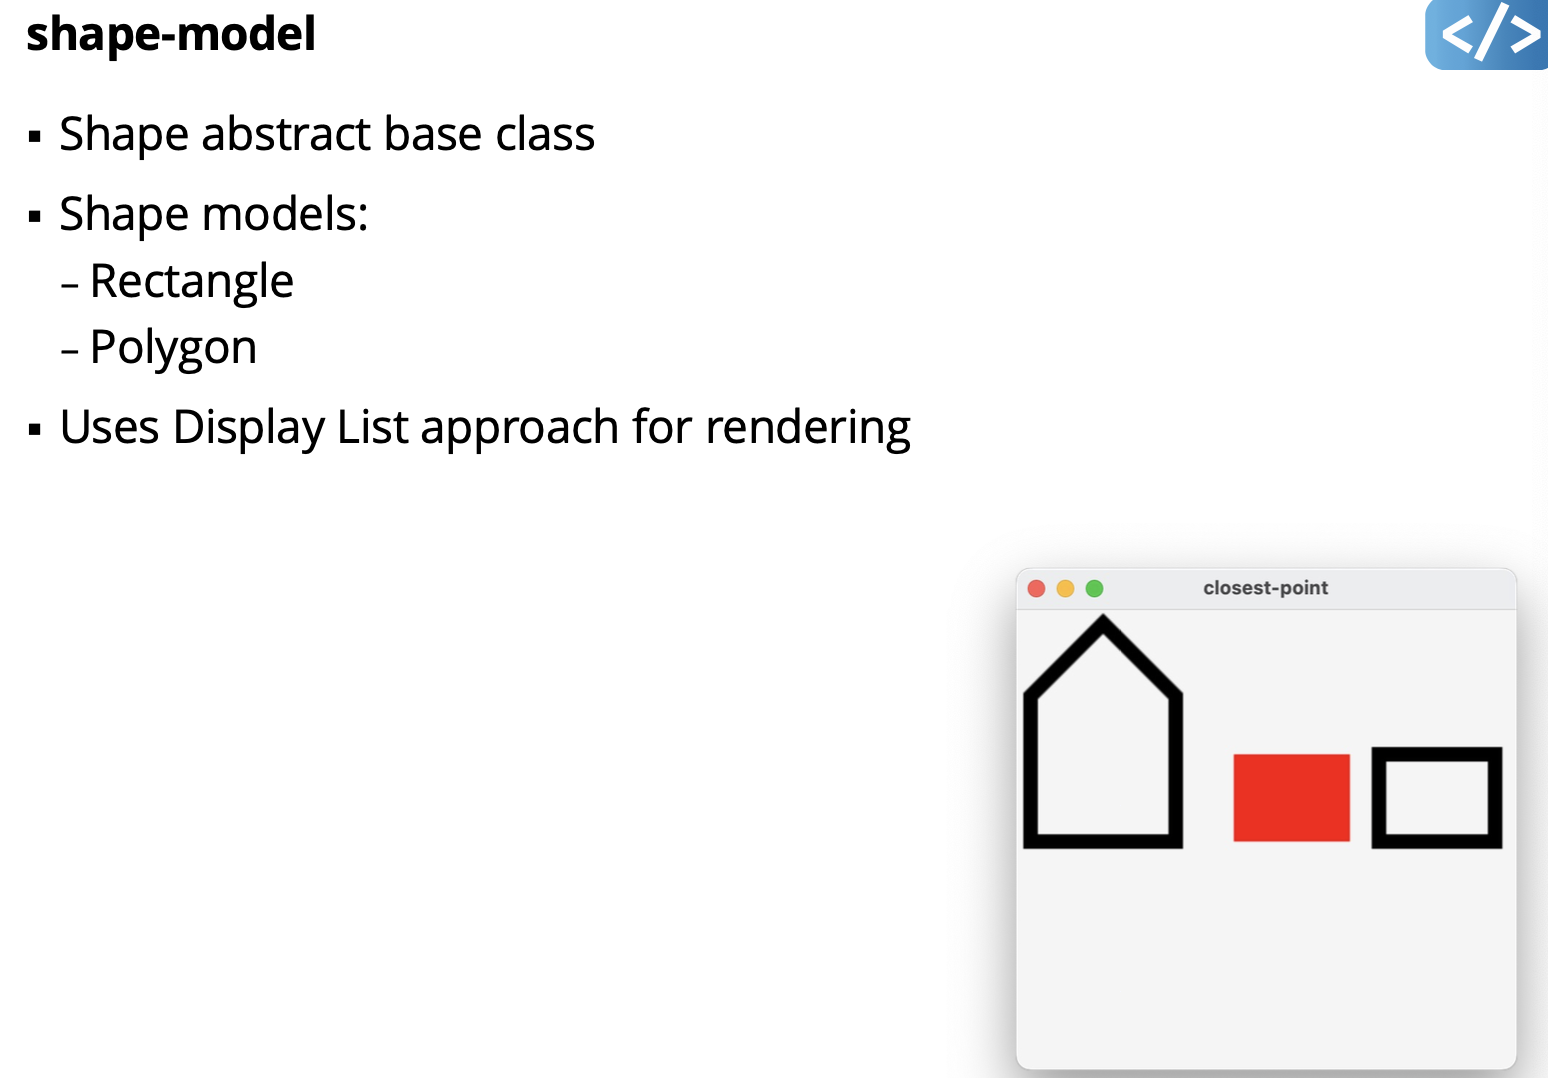
- Drawing
- Hit-Test
- MVC
- HTML
- CSS
- DOM
- Bootstrap
- Undo
- Asynchronous
- Signals
- Undo
- Preact
Lecture 1 - Web Applications
- Browser acts like an Operating System:
- handles input, provides canvas for drawing, etc.
- provides UI toolkit (HTML, CSS)
- provides “machine code” layer (i.e. JavaScript compiler)
- Web apps typically delivered to users from server
- can be designed to run offline
…
Lecture 4
Potential exam question on event translation. Look into the simplekit canvas-mode.ts implementation for it.
setSKEventListener(handleEvent);I don’t really understand what this does…
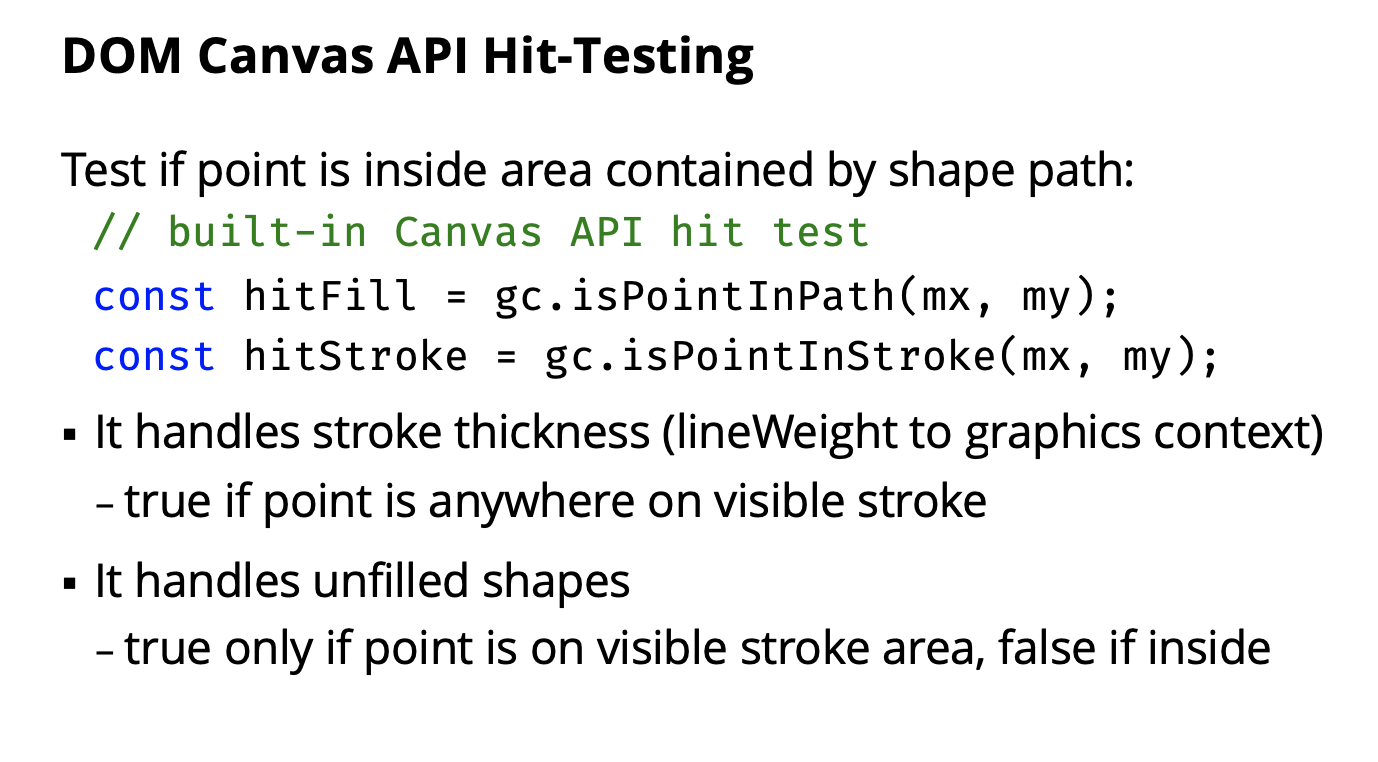
Lecture 5 - Hit-Testing
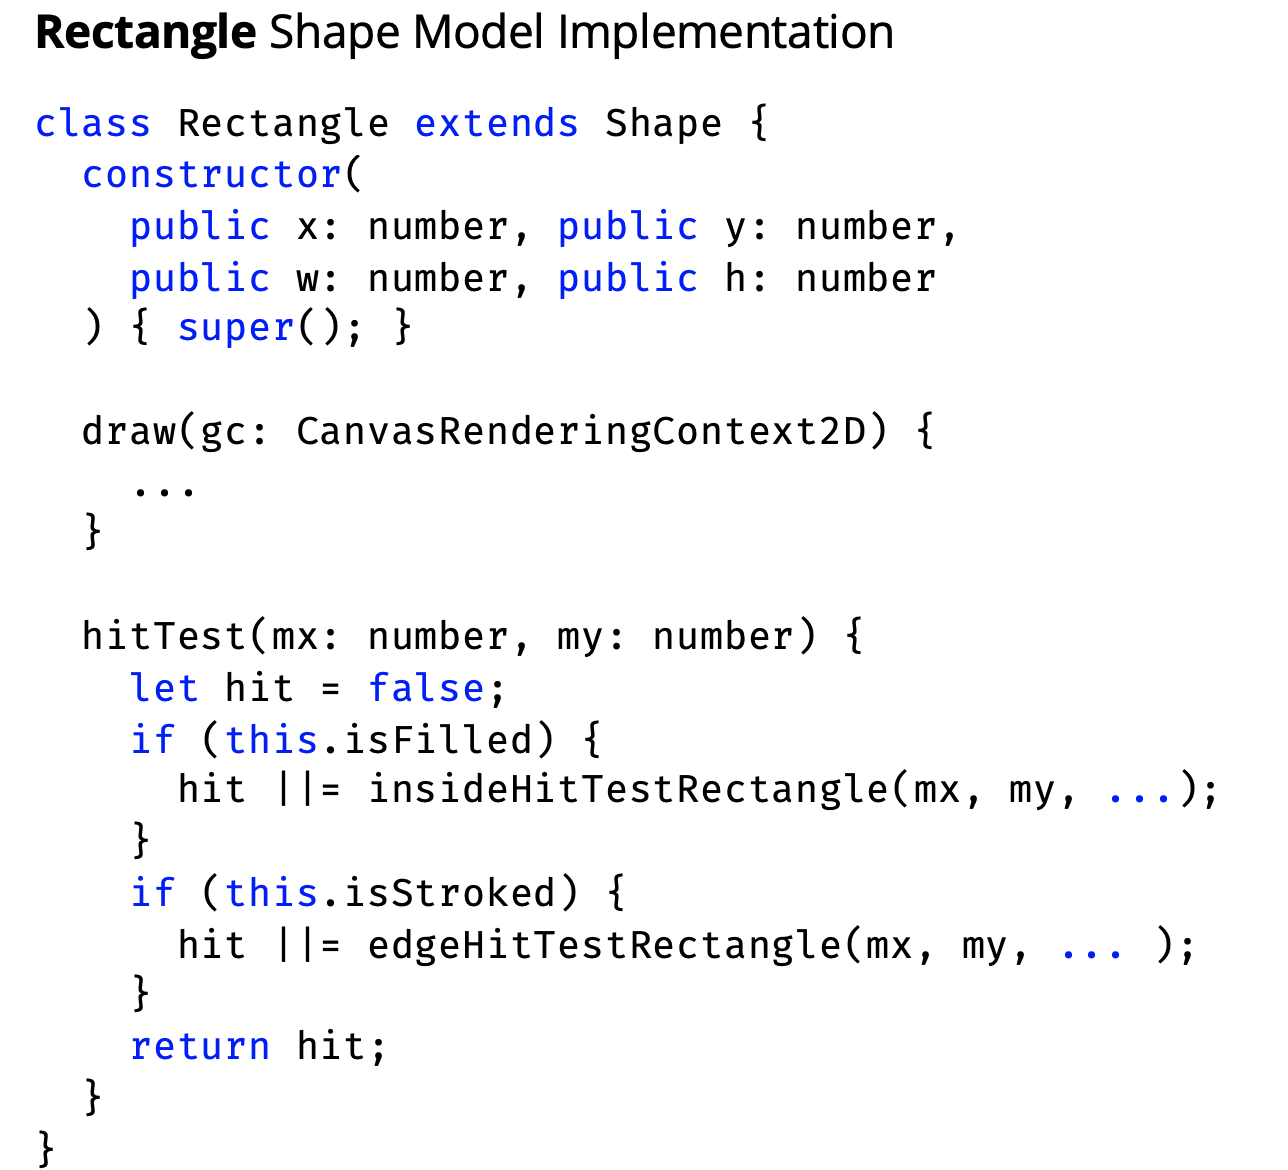
Helpful for assignment1 .
Showing inside of shape-demo/main.ts
- Look at how he bookmarked with
gc.save() and gc.restore() - Doesn’t matter where you call
startSimpleKit()but only call it once. - Good practice to
gc.clearRect()(clear the screen every time)
Put the logic in the card class
We don’t need to implement optimizations in any of our assignments.
Alternative Methods: Raster Hit Testing in a Buffer
- Draw the shape in an offscreen buffer
- Transform mouse coordinate, using standard transformation
- Examine pixel at mouse position in buffer
- return true if pixel is not #00000
- Can also use pixel alpha (transparency)
- Can also use different colours to hit-test different regions
- Not allowed to use in assignments
Lecture 6 - Animation
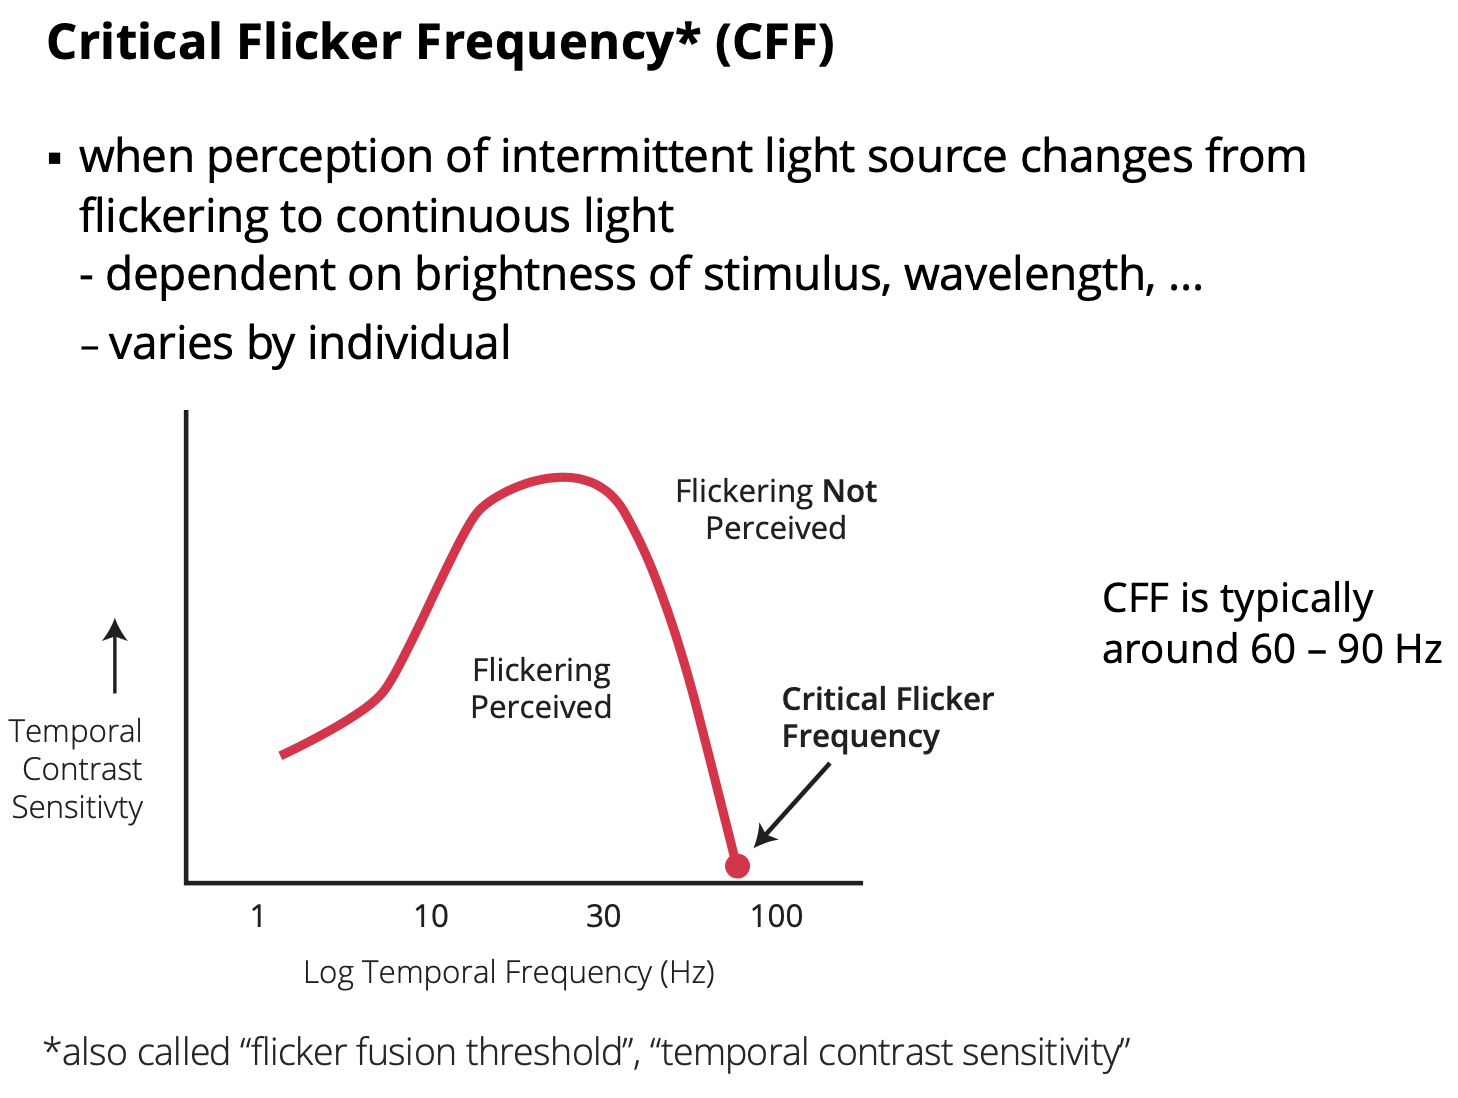
- 60Hz is the most safe
Animation in Simplekit
- Simplekit lets you define a single callback for animation
- callback will be passed current time in milliseconds
- in simplekit
type AnimationCallback = (time: number) => void;
function setSKAnimationCallback(animate: AnimationCallback)...- in your program
seSKAnimationCallback((time)=>{/* animate in here */});Animation by Simulation
- Animation can be created through real time simlulation
- using functions, conditionals, etc.
- Typically, no start and end, it just loops or continues
- conceptually simpler, just need a function and/or some rules
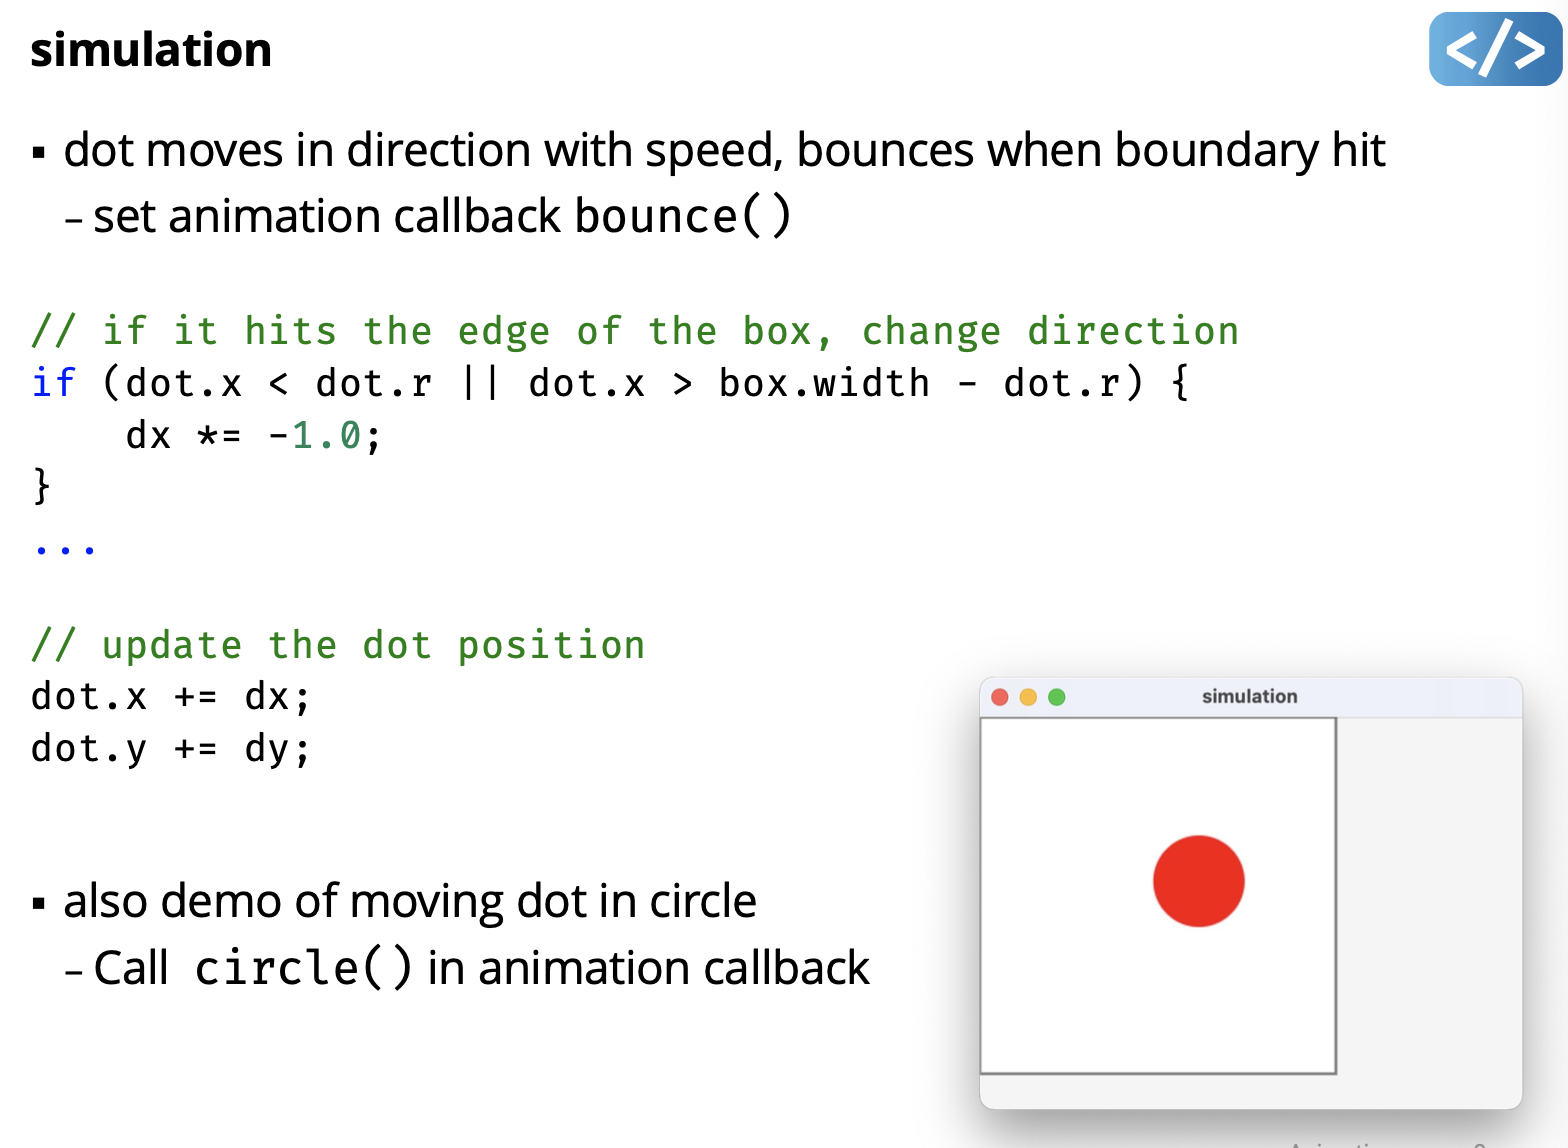
He has a dot, and draws a square. check if the dot’s position is within the square, otherwise, change the direction. It has two animations bounce() and circle(time).
- why is my demo not working?
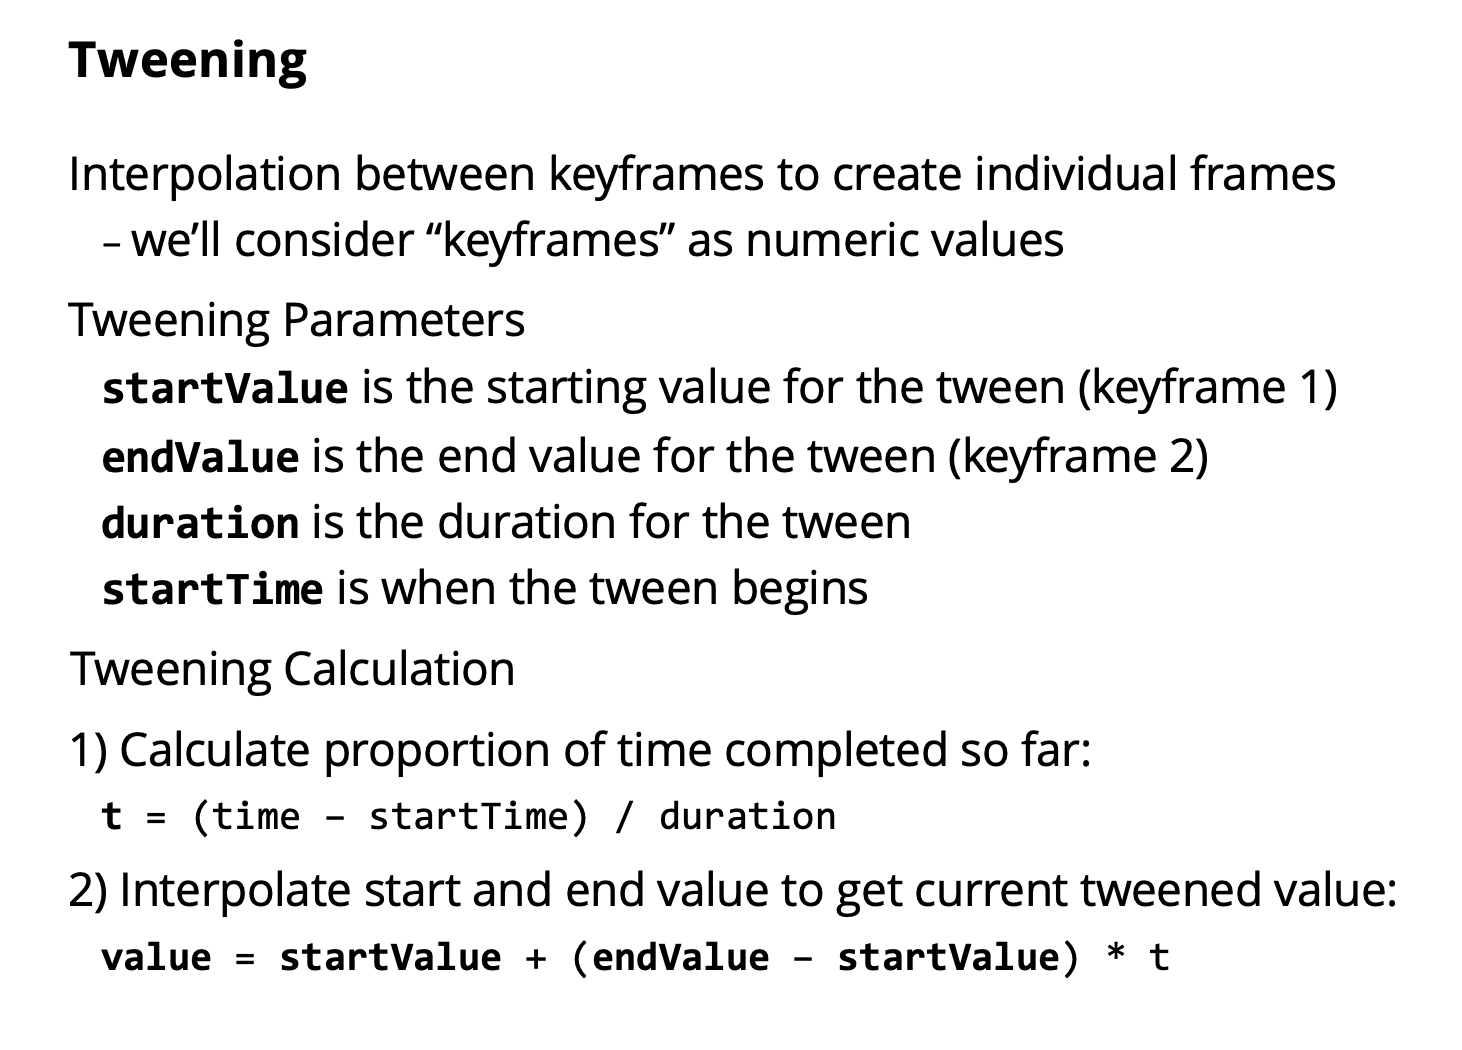
lerp function
linear interpolation
- smoothly interpolate changes from one value to another
- lerp is a fundamental part of animation tweening
// linear interpolation from start to end
// at normalized time t (in [0,1])
const lerp = (start: number, end: number, t: number) =>
	start + (end - start) * t:
In animator.ts
Similar to timer. update() is a bit more complex. It has a guard. Calculates the t value. call the callback every single frame because we want to update the frame.
Create a new one . tuck this in the shape object. put the animation object inside the shape object. all you can do is call update() method.
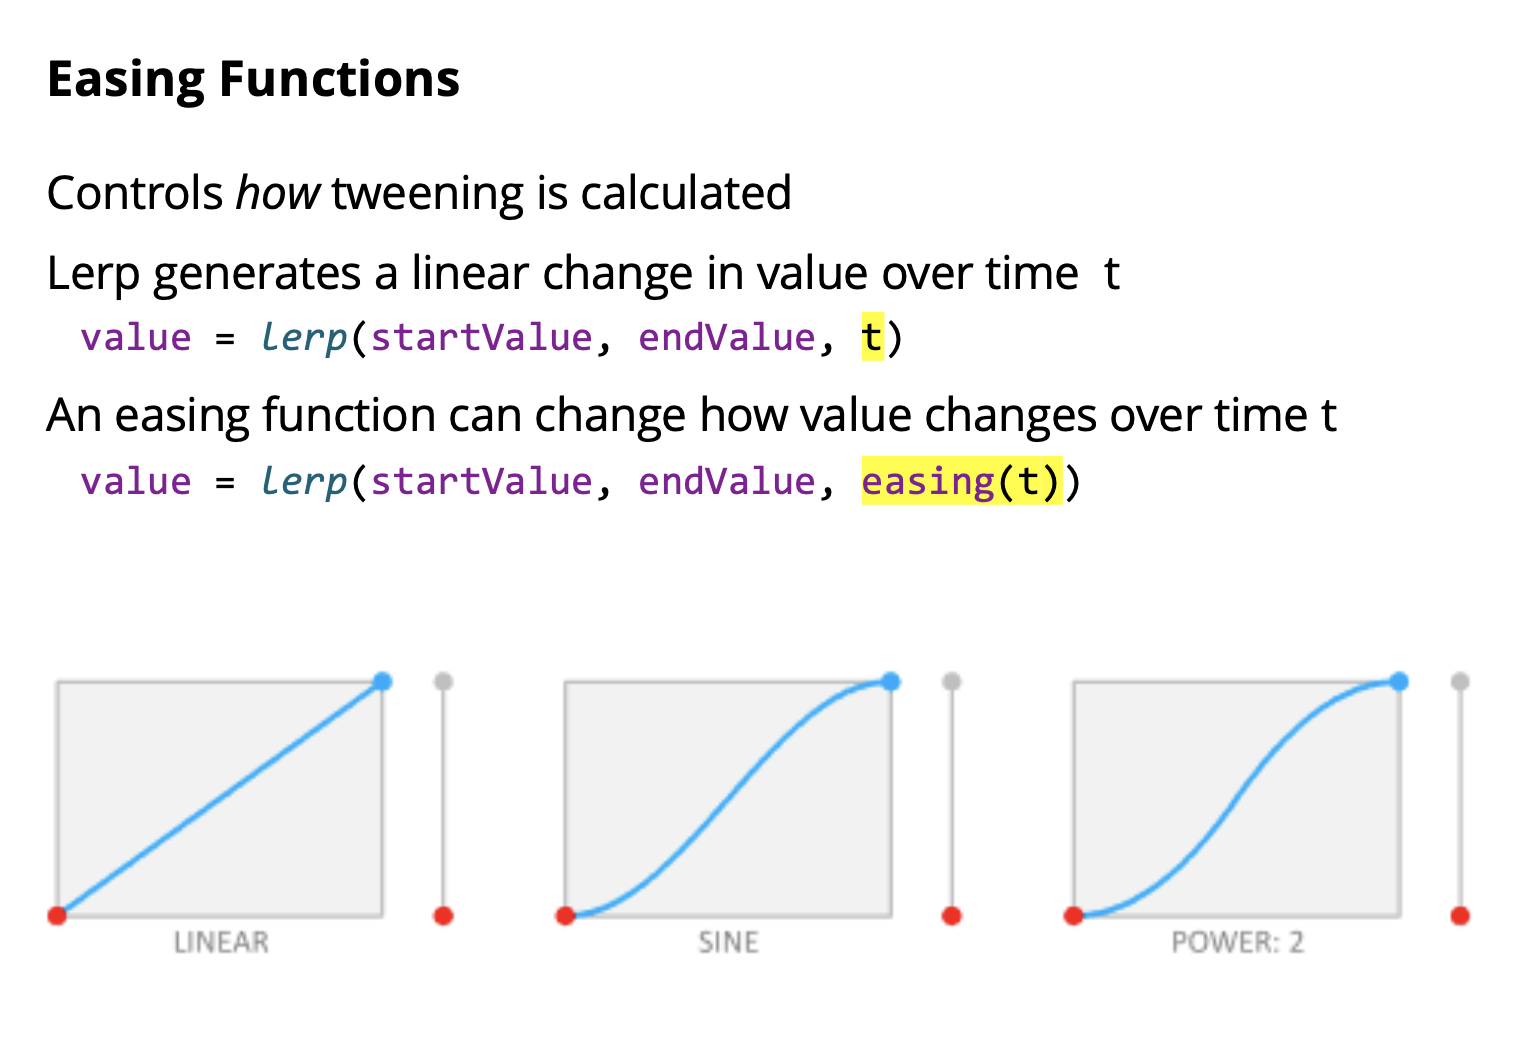
- Type
type EasingFunction = (t: number) => number;- Common functions
const flip = (t) => 1 - t;
const easeOut = (t) => Math.pow(t,2);
const easeIn = (t) => flip(esaseOut(flip(t)));
const easeInOut = (t) =? lerp(easeOut(t), easeIn(t), t);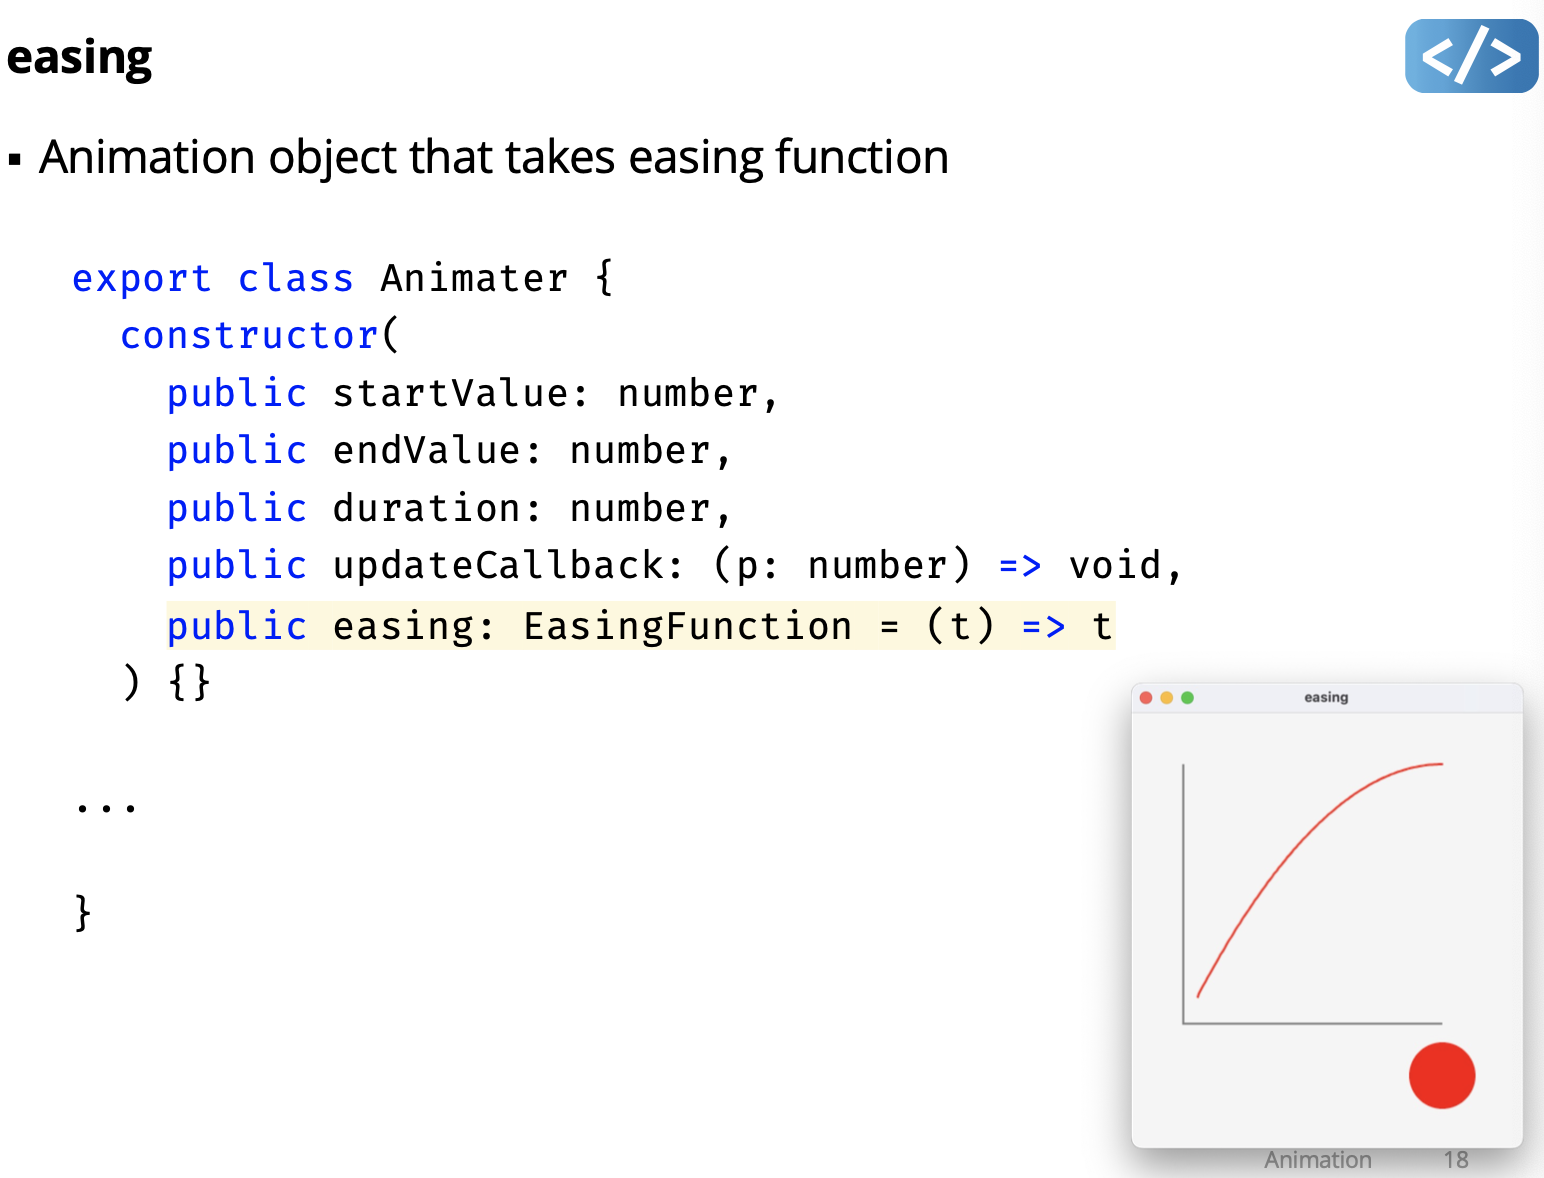
// setup the animation
const animateDotX = new Animator(
  50,
  300,
  1000,
  (value) => {
    dot.x = value;
    graph.add(value);
  },
  easeIn
);

// setup the animation
const animateDotX = new Animator(
  50,
  300,
  1000,
  (value) => {
    dot.x = value;
    graph.add(value);
  },
);

// setup the animation
const animateDotX = new Animator(
  50,
  300,
  1000,
  (value) => {
    dot.x = value;
    graph.add(value);
  },
  easeOut
);
To get different animations. Checkout bounce too.
Resources:
UI Toolkit Animation Architecture
- Some toolkits provide an animation manager
- keep a list of active animations
- update each animation every frame
- remove animations when they finish
- Programmer can set animation and not manage it themselves
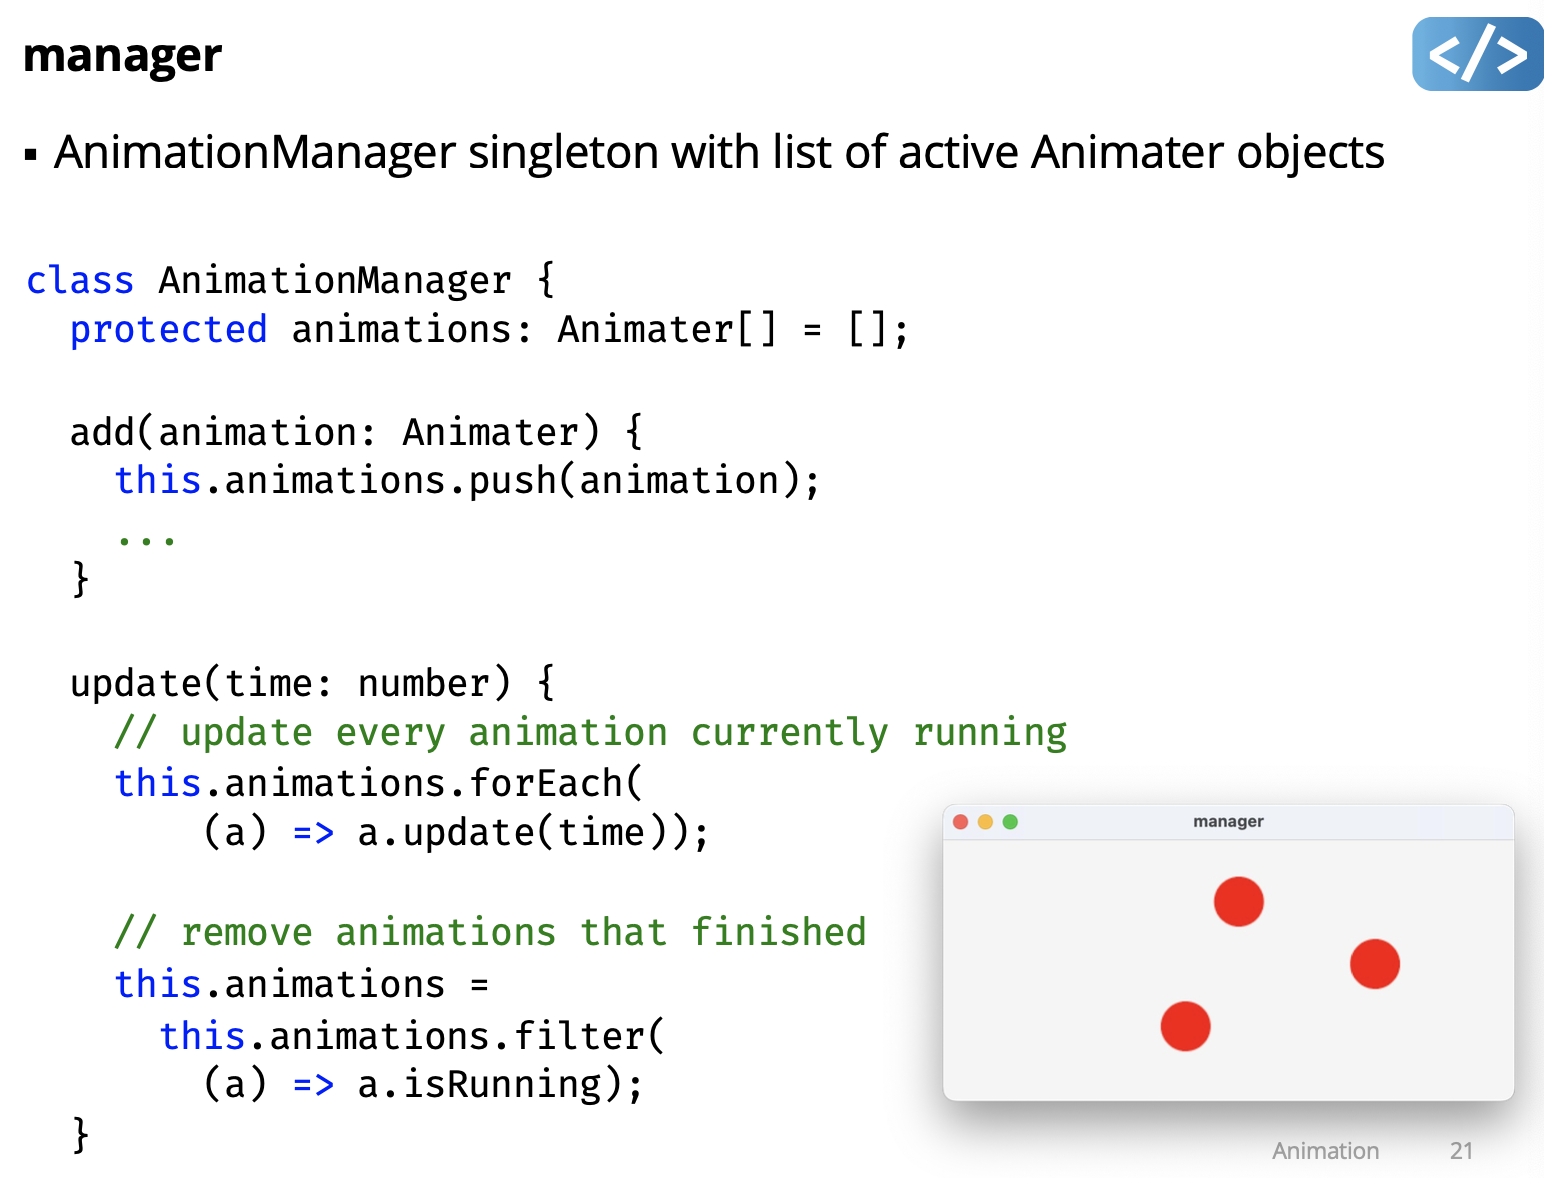
create a singleton animationManager.
Remember to do:
setSKAnimationCallback((time) => {
  animationManager.update(time);
});
No need to do this on A1, makes it more complicated.
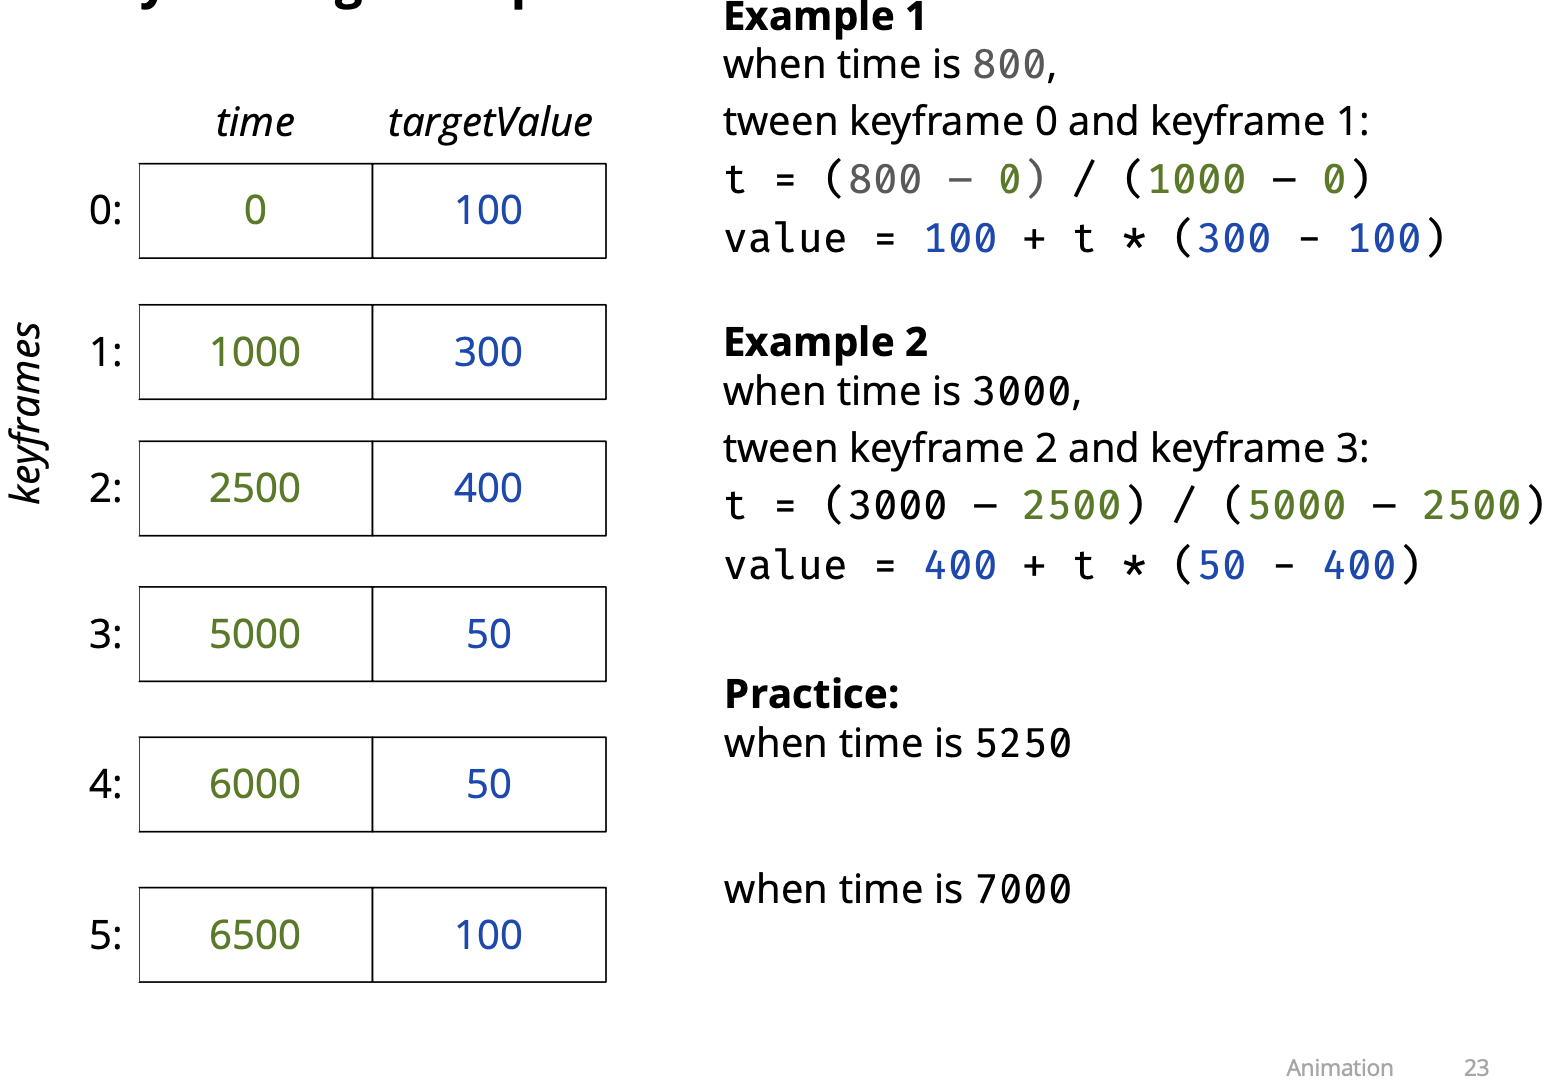
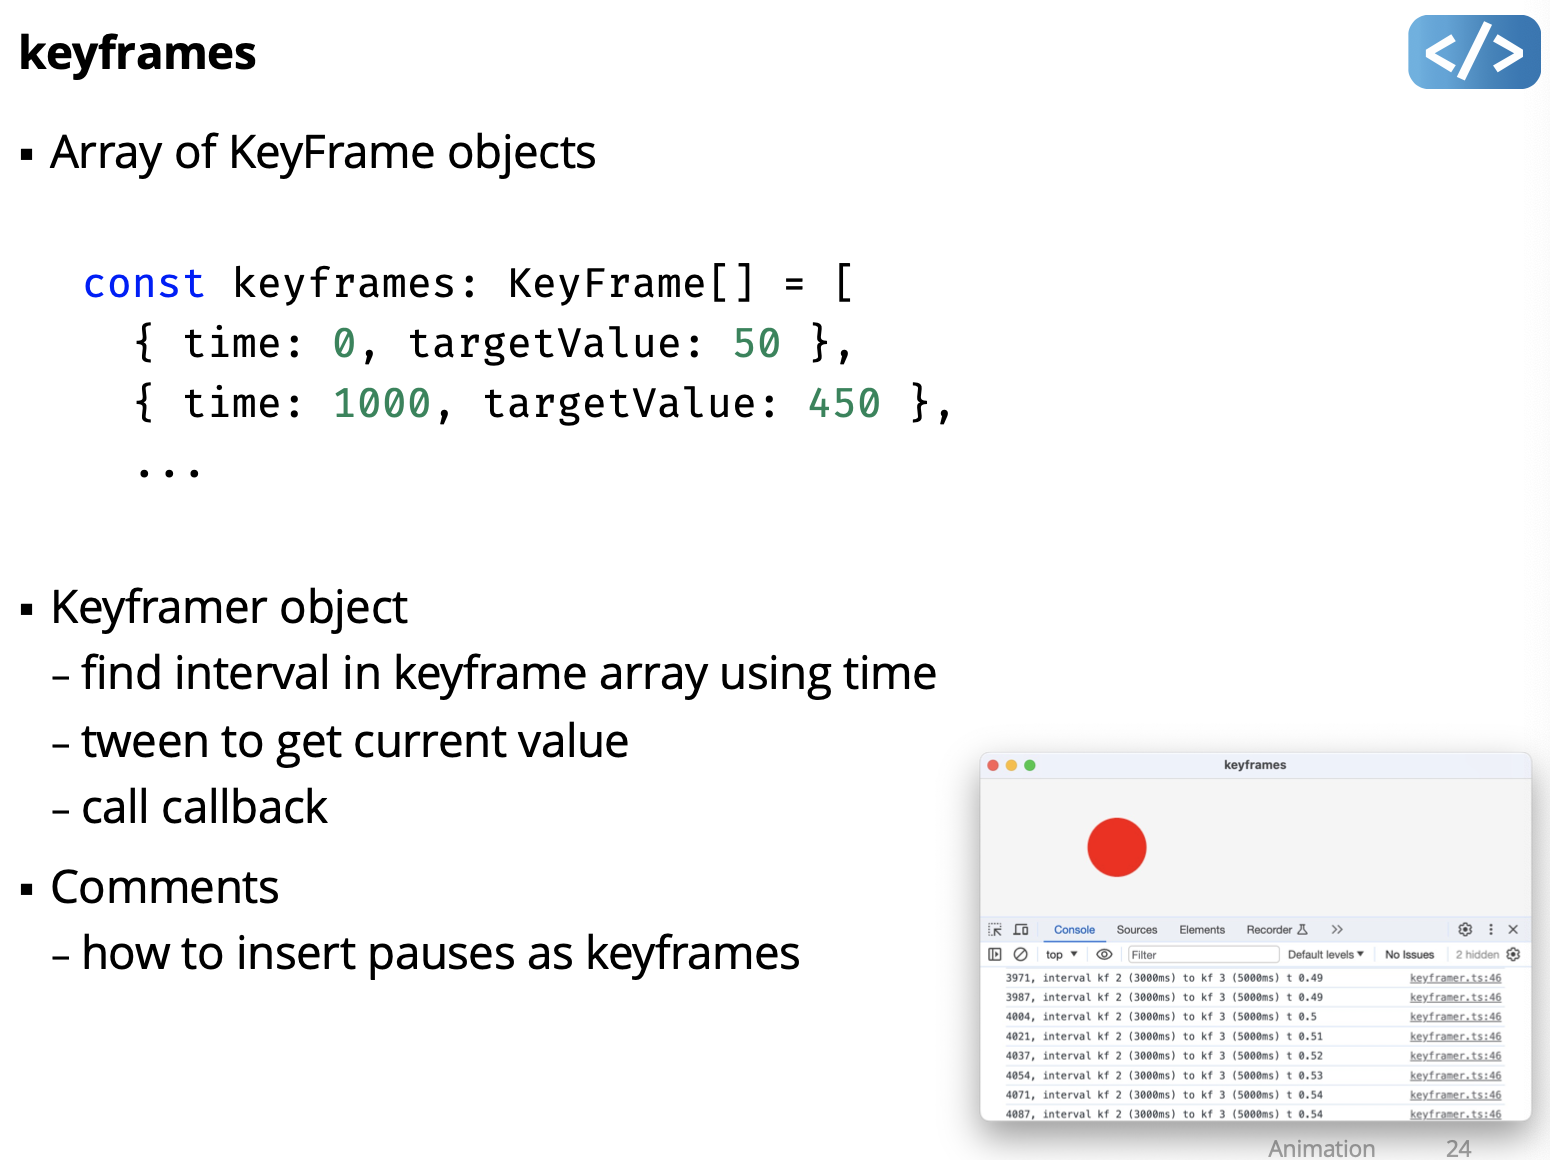
Key-framing
- A tween is essentially two keyframes:
- keyframe 1: start time, starting value
- keyframe 2: end time, ending value
- We can generalize this to a list of keyframes:
- keyframe 1: time1, value1
- keyframe 2: time2, value2
- keyframe 3: time3, value3
- …
- keyframe N: timeN, valueN
- A sequence of keyframes enables animations over time:
- find keyframe i and keyframe i + 1 for current time (time > keyframe[i].time) && (time < keyframe[i+1].time)
- tween value i and value i + 1
Keyframing example
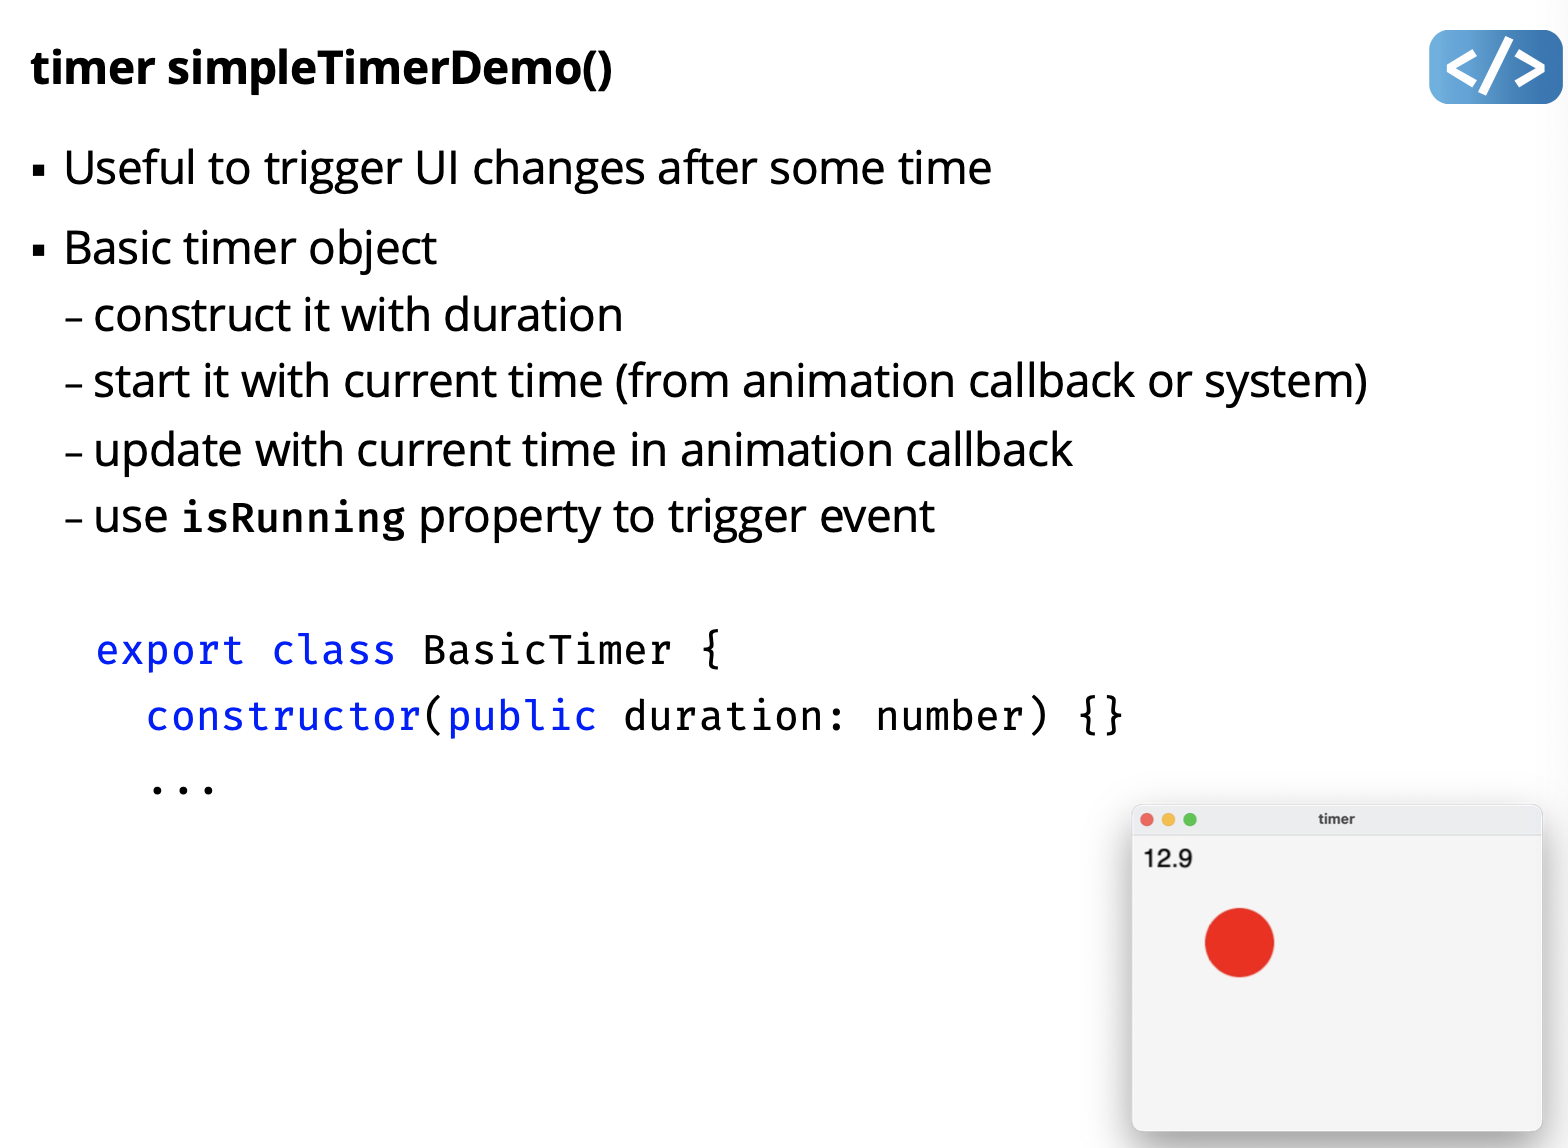
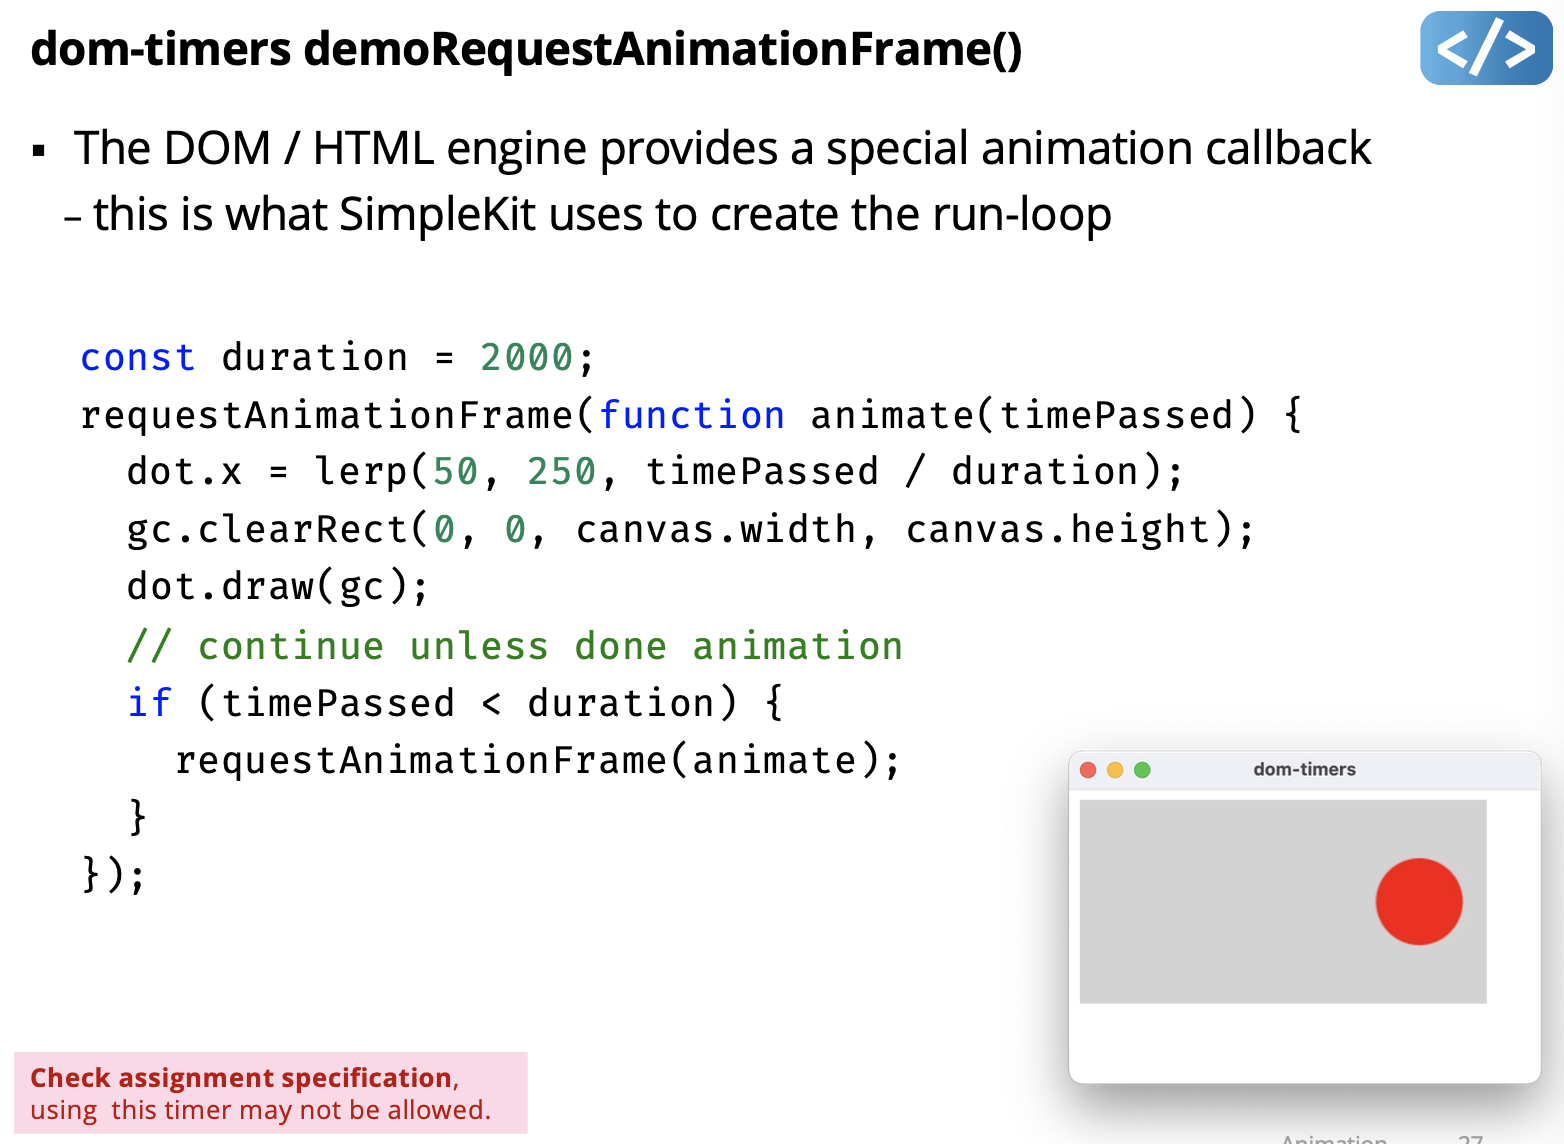
Animation Using Built-in Timers
A timer triggers an event after some time period
- Set time period to time interval for desired frame rate
e.g. 30 FPS has an interval of 1/30 seconds (~33 milliseconds) - In the timer “finished” event handler, do:
- update parameters you want to animate
- (optional) redraw an updated image for the frame
- restart the timer for the next interval
- some timers can repeat automatically at a set interval
timer = Timer(()=> {
x += 1 // animate parameter
draw() // redraw scene
})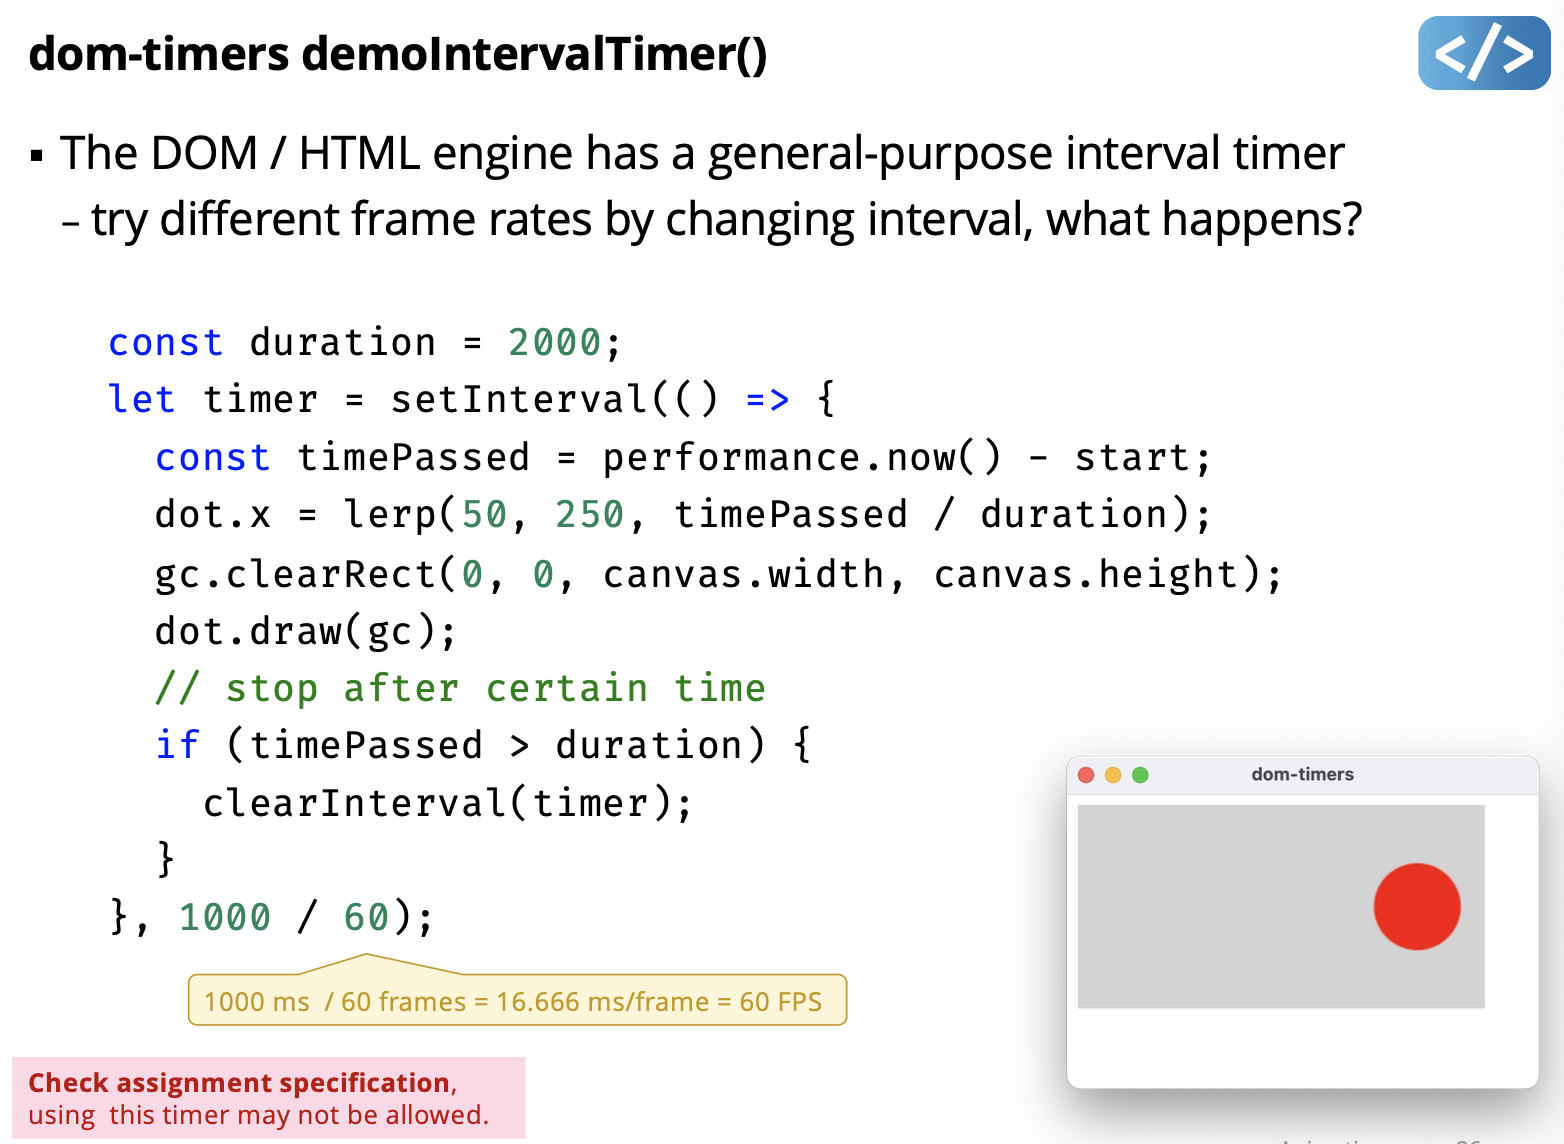 Not provided in SimpleKit.
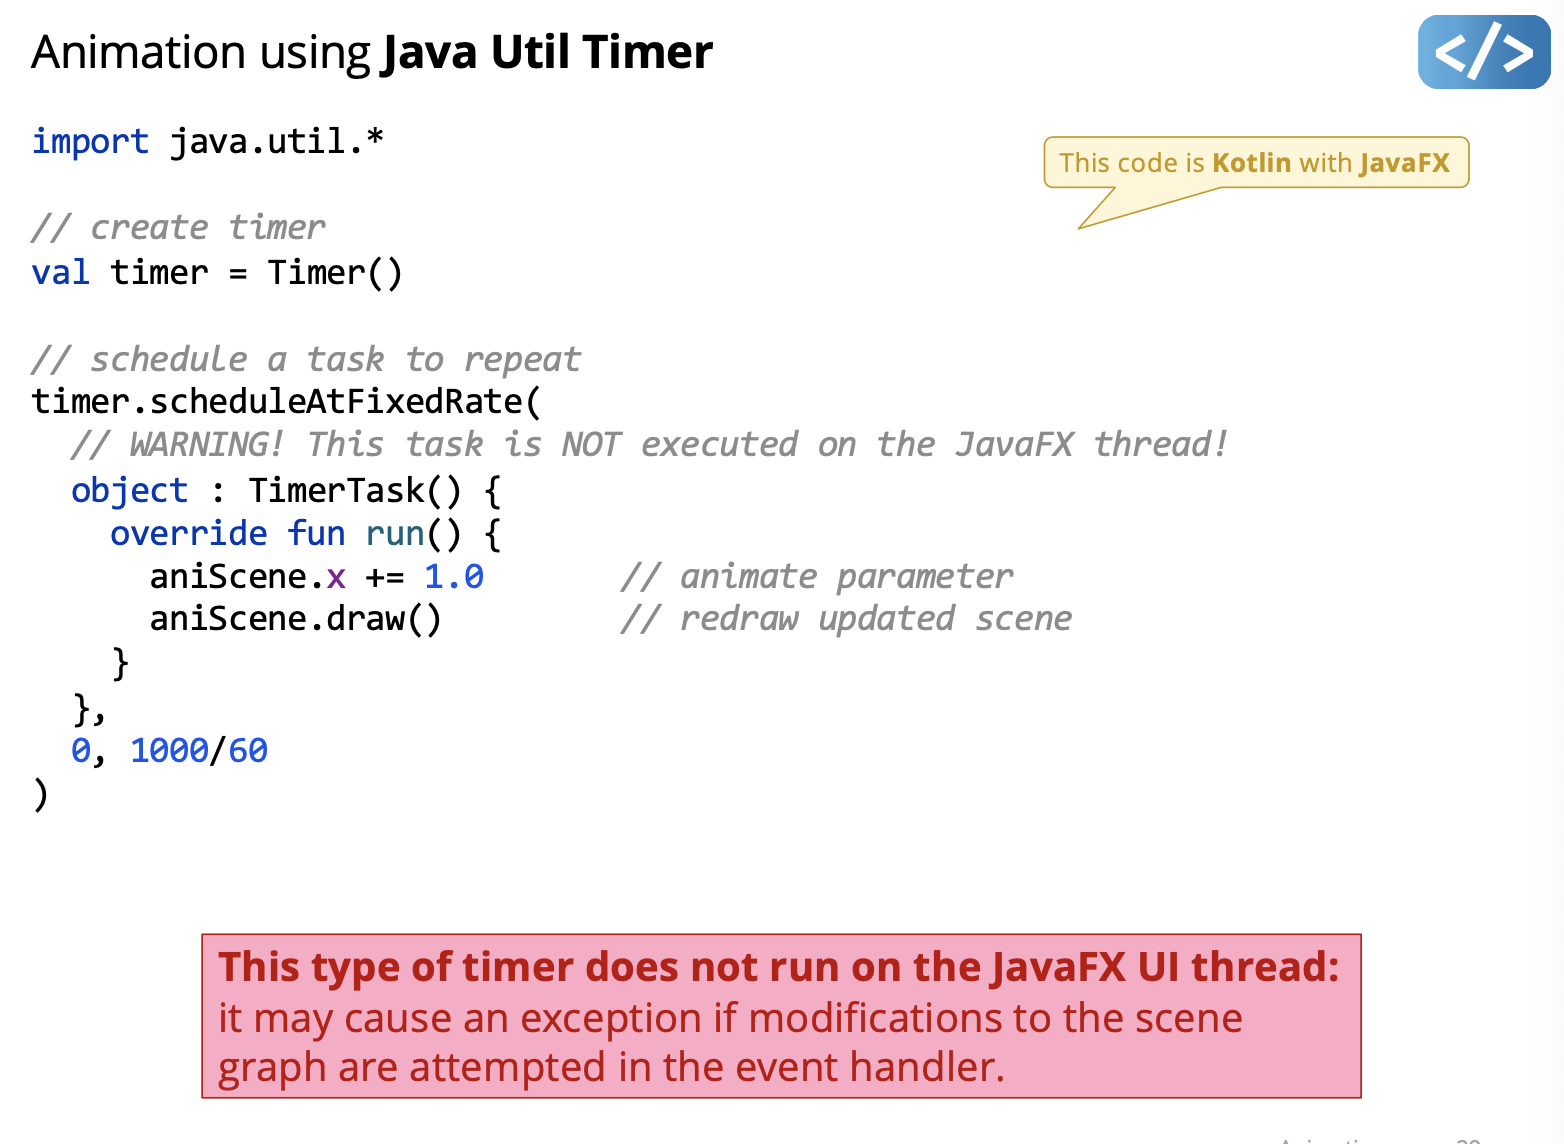
Timers and the UI Thread
- Most (all?) UI frameworks are single-threaded (e.g. JavaFX)
- partly because its simpler and multiple threads isn’t needed
- a single threaded dispatch queue avoids deadlocks and race conditions due to unpredictable user-generated events
- Most (all?) UI frameworks are typically not thread-safe
- to reduce execution burden, reduce complexity, etc.
- Most modifications to the UI must be on the UI execution thread
- otherwise, behaviour may be unexpected
- or in some cases, an exception is thrown
This has implications for animation timers in those frameworks
- HTML DOM interval and animation timers run on the UI thread
- Other platforms may have timers running on a non-UI thread
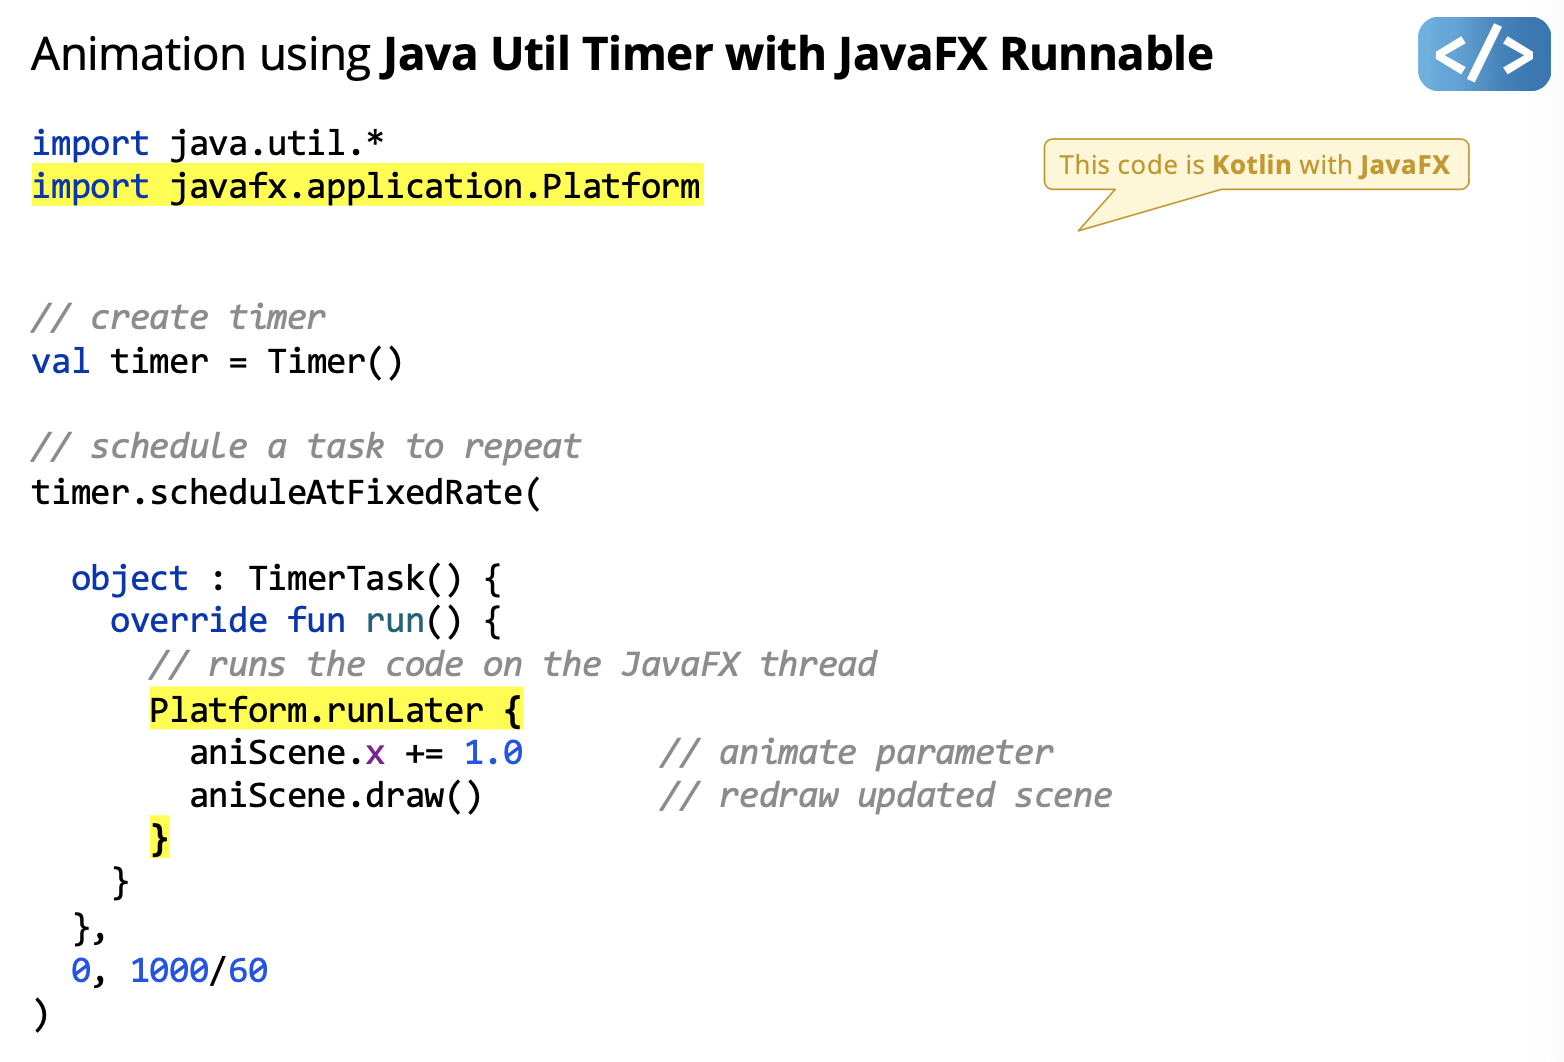 Added the Platform.runLater so the code runs on the JavaFX thread. Do we need to know this?question
FYI.
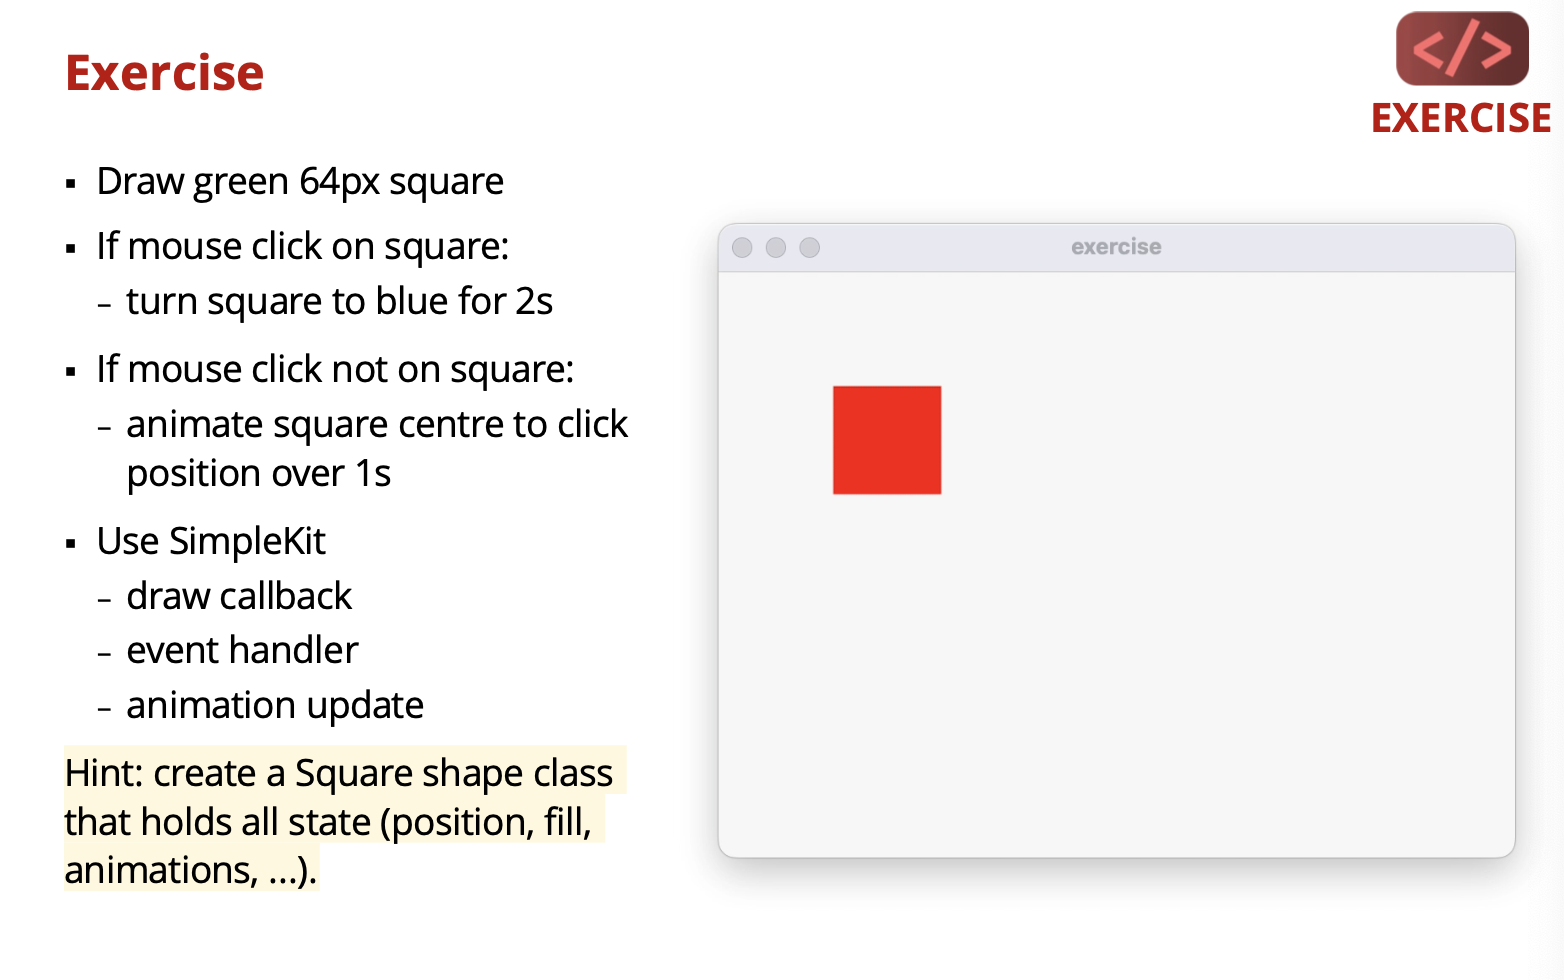
Exercise that can help for A1.
Lecture 7 - Widgets
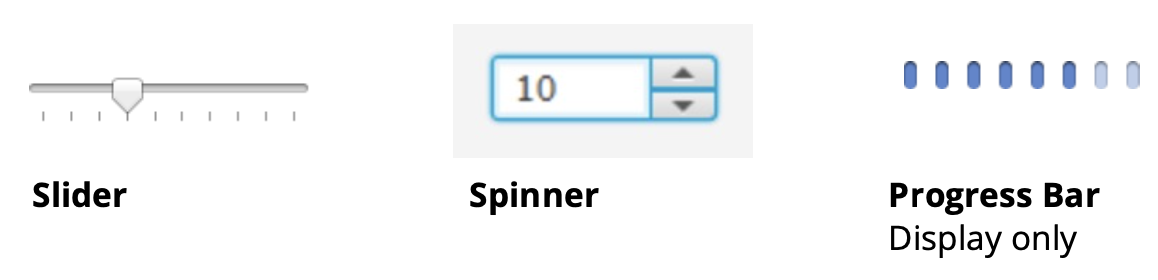
User Interface Widget:
Widget
A generic name for parts of an interface that have their own behaviour (e.g. buttons, drop-downs menus, spinners, file dialog boxes, progress bars, slider)
- Also called components or controls or elements or views…
Some standard widgets:
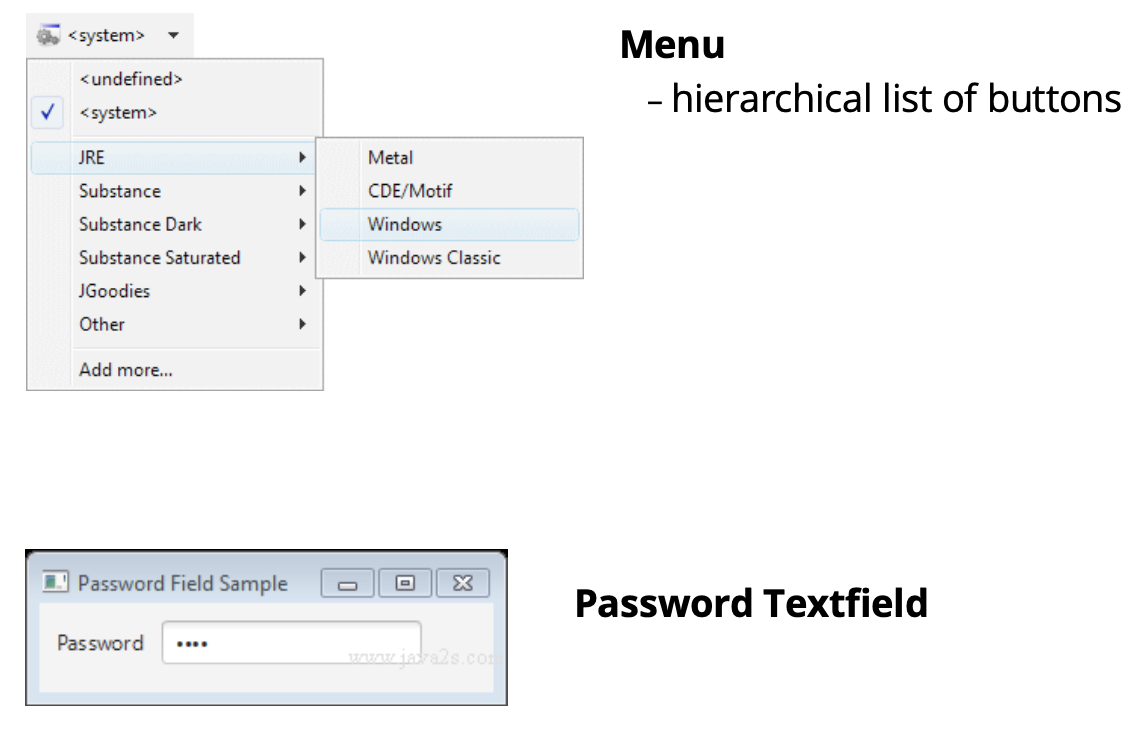
- Button, Menu, Radio, Checkbox, Slider, Textfield, Scrollbar, Spinner
Widget Functions
- Display user feedback
- Convey current state and when action is triggered
- e.g. button is “down”, button was “clicked”
- Handle user input
- Capture user input and generates events
- e.g. detect when button was clicked on, send Action event
Characterizing Widgets
- What essential function does it enable?
- logical input device
- Can it contain other widgets?
- simple widget vs. container widget
- What is its behaviour?
- events it generates, how it changes due to state
- What does it look like?
- look & feel and rendering options
Logical Input Devices
Describes a widget based on function (not appearance)
- a category of widgets based on a common functionality
- e.g. logical button devices generate “action” events
- A widget is a specific instance of a logical input device
- e.g. a Button widget is an instance of a logical button device
Logical Button Device
- Input a single action
- sends “action happened” event
- Example widget instances:

Logical Number Device
- Input and display a numeric value
- usually in certain range
- may support validation
- sends “value changed” event
- Example widget instances:
Logical Boolean Device
- Input and display a Boolean value
- sends “value changed” event
- Example widget instances:
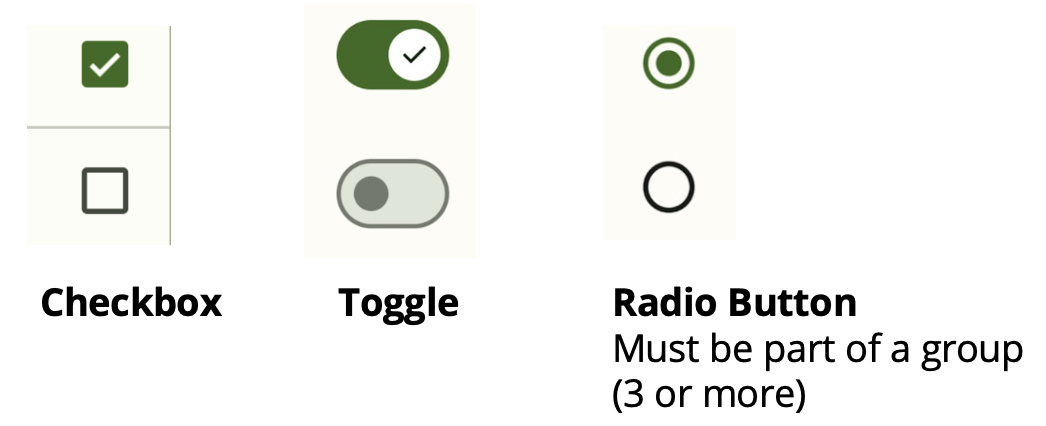
Why "Radio Button"?
Only one button can be pressed at any time.
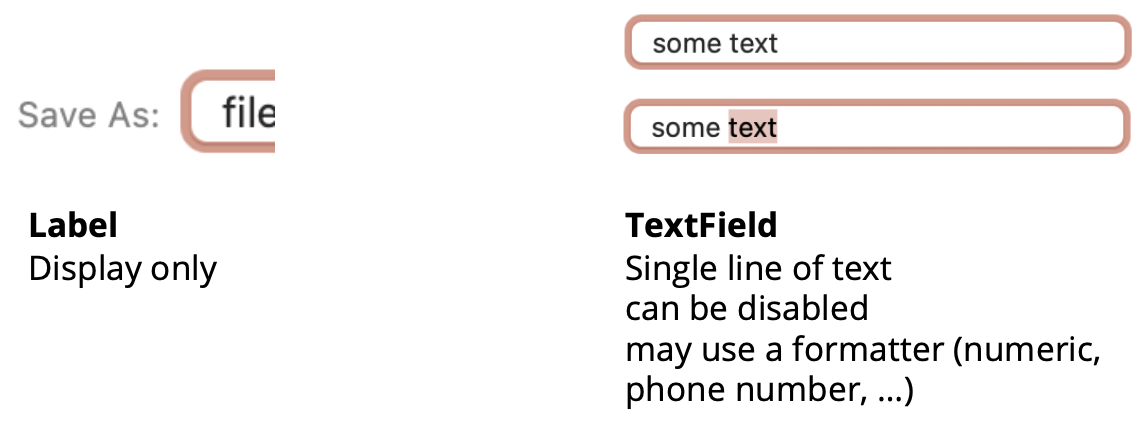
Logical Text Device
- Display a text value
- Edit a text value
- sends “value changed”
- Example widget instances:
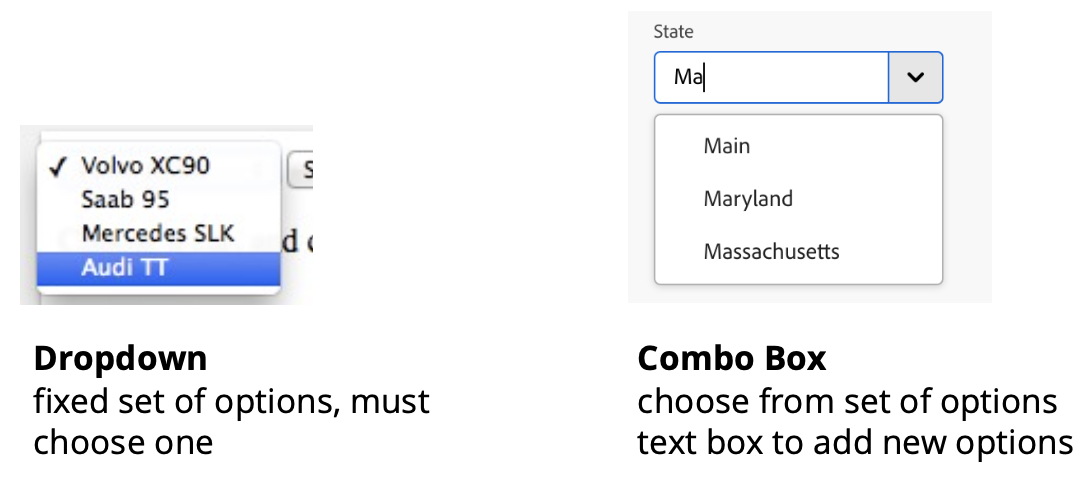
Logical Choice Device
- Input and display one choice among a list
- sends “selection changed” event
element / element.ts
- The base widget class
- location and size
- Inside rectangle
hitTest() - abstract
draw()
- Using “props” method for constructor arguments
- flexible options with named argument
- (see next slide and “props” demo)
Note:
The demos in this lecture are simplified versions of the widgets in SimpleKit.
props
- Review object type declaration
- Optional, default
- Creating local variables from props object
- Destructure local variables from props object
- Use props types as argument to function
- DEMO: when all props optional and used as function argument
- Need to provide default for props arguments as empty object {}

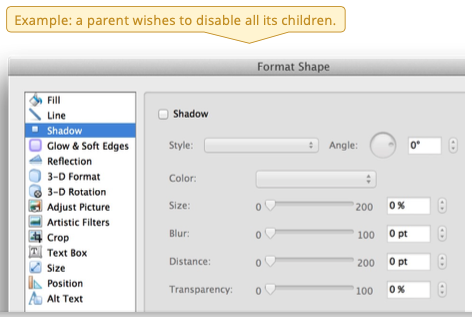
button
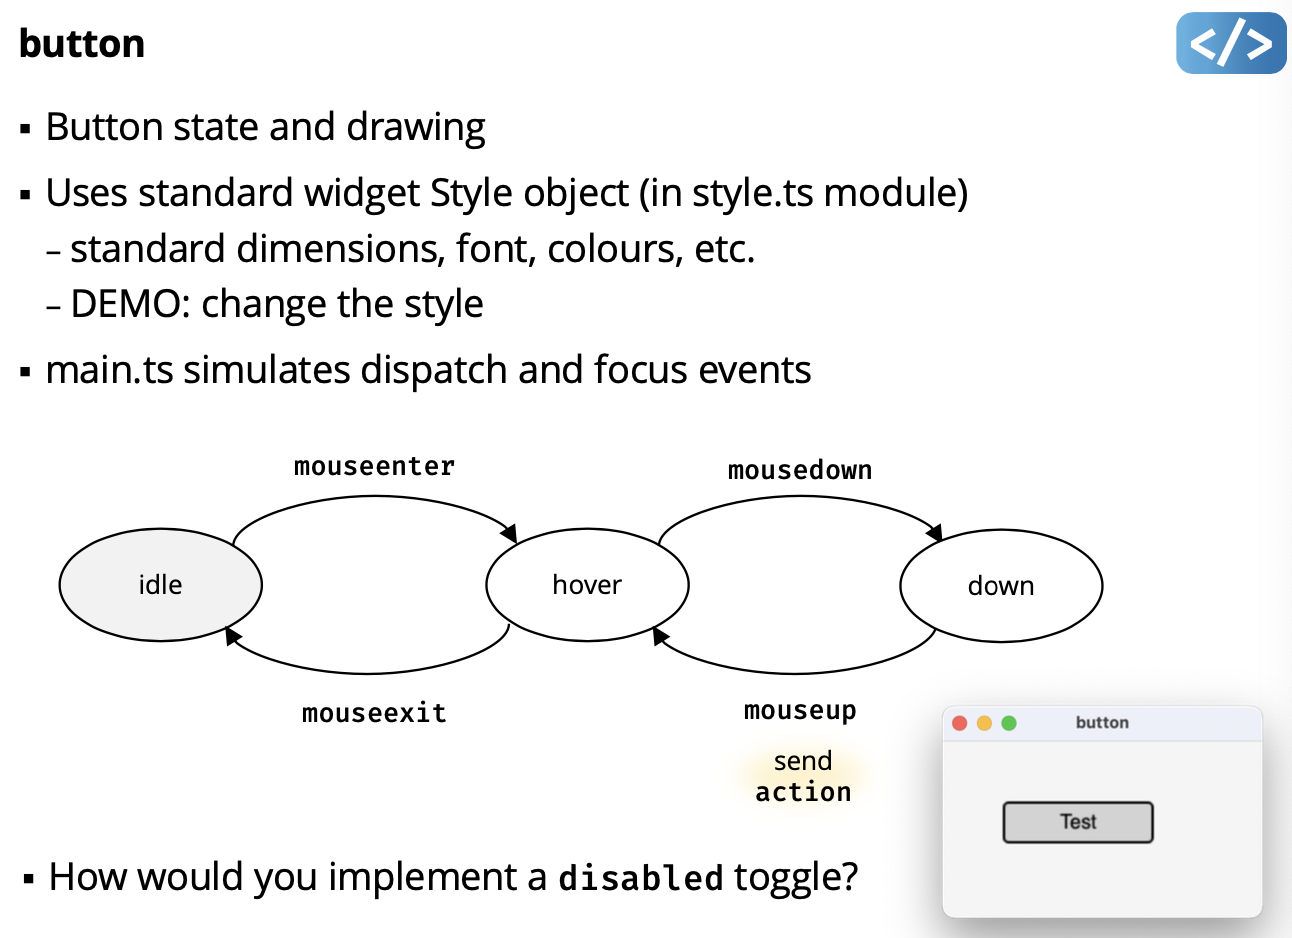
How would you implement a disabled toggle?
Add a boolean value.
label
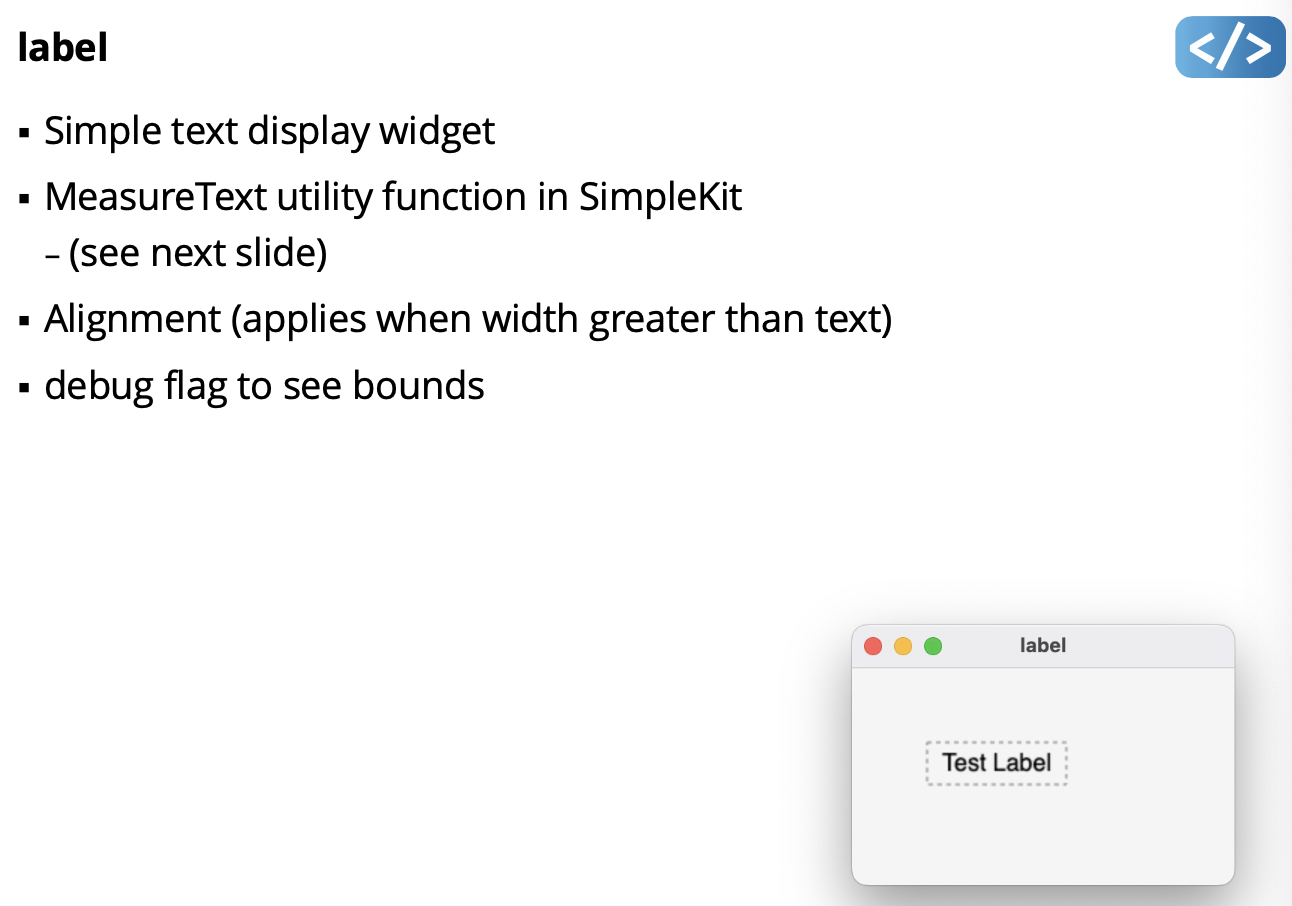
simplekit/utility/measuretext.ts
- Uses
gc.measureText()
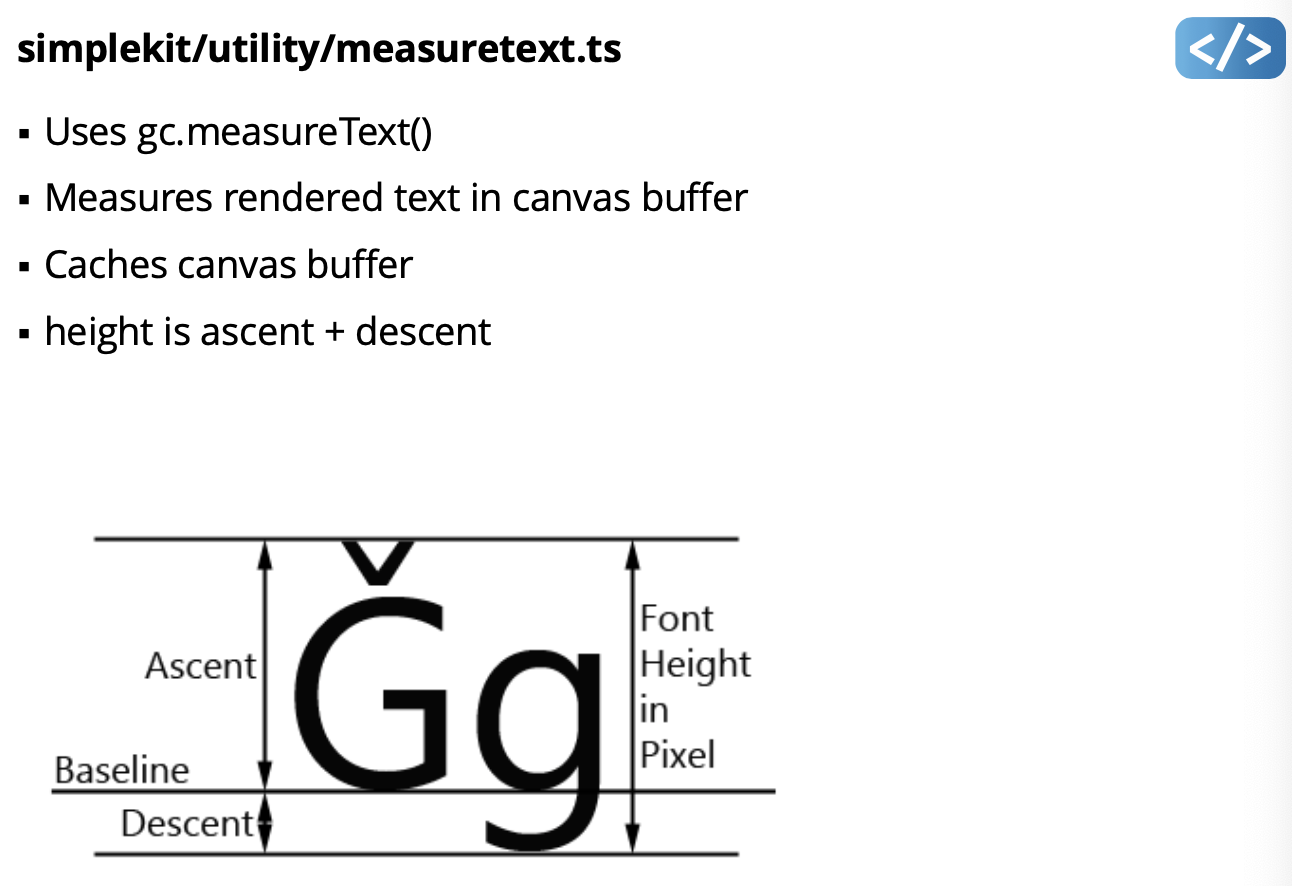
What does it mean by canvas buffer?question
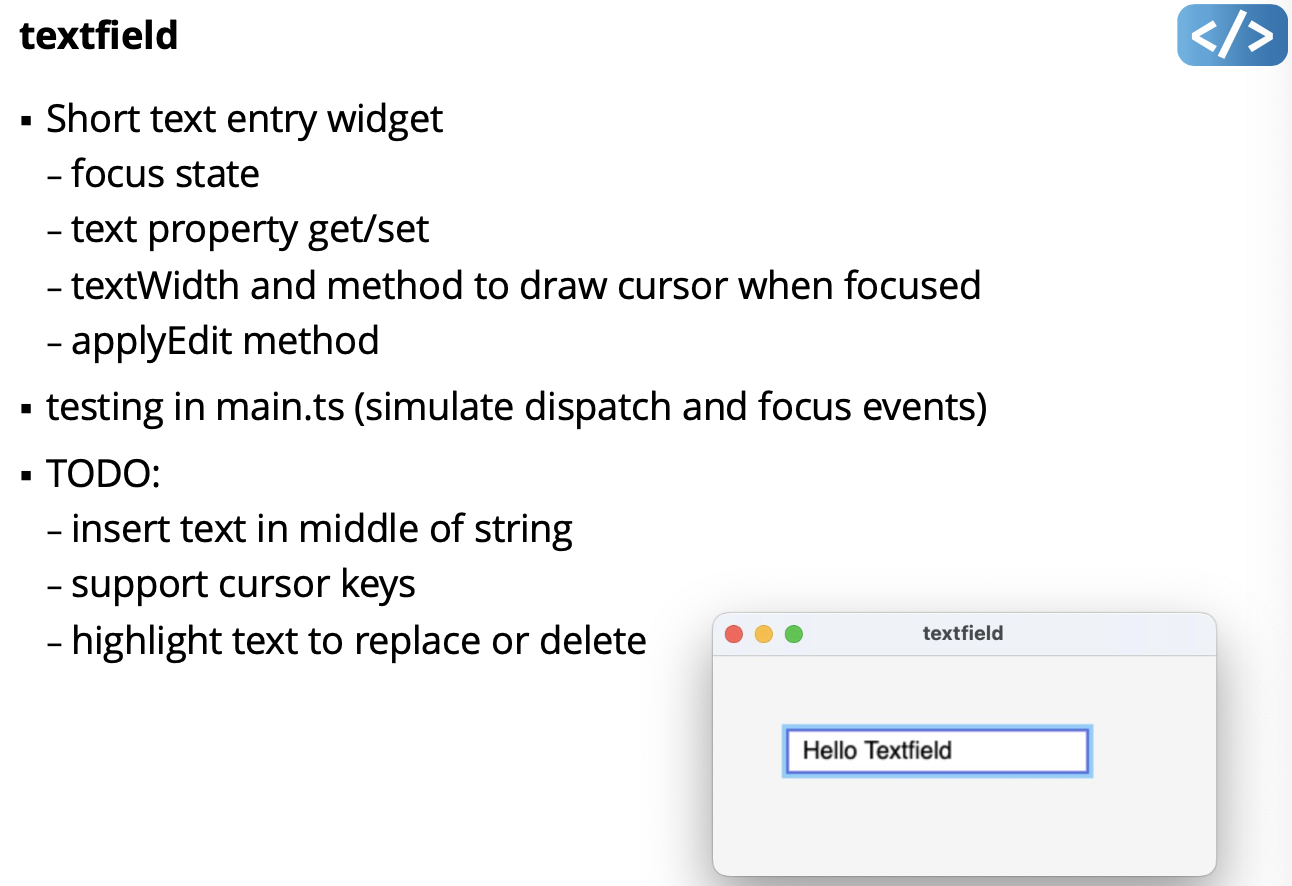
textfield
Widget Types
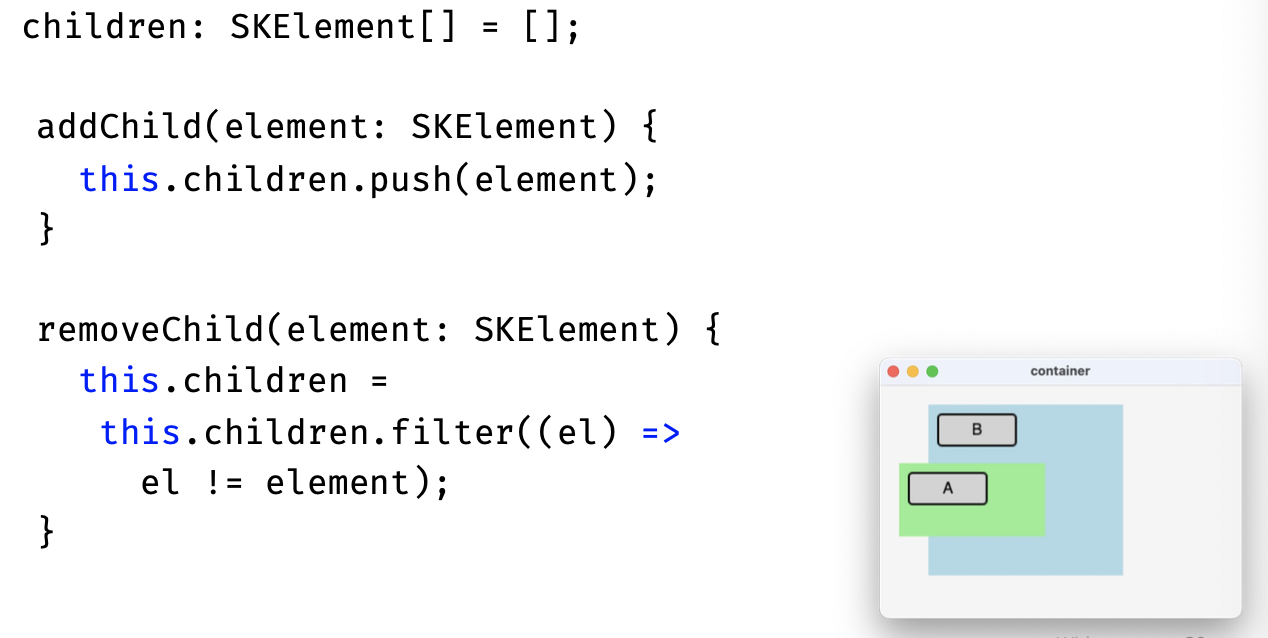
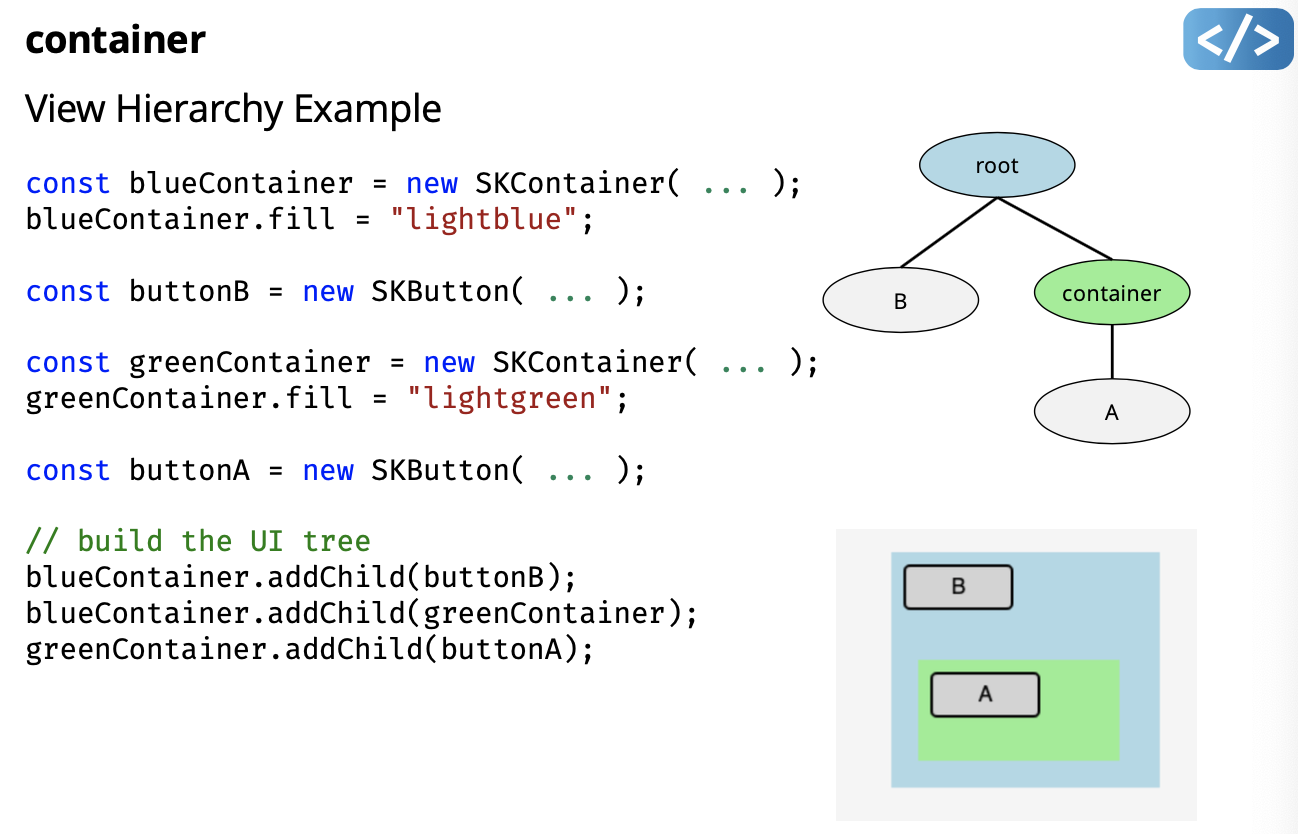
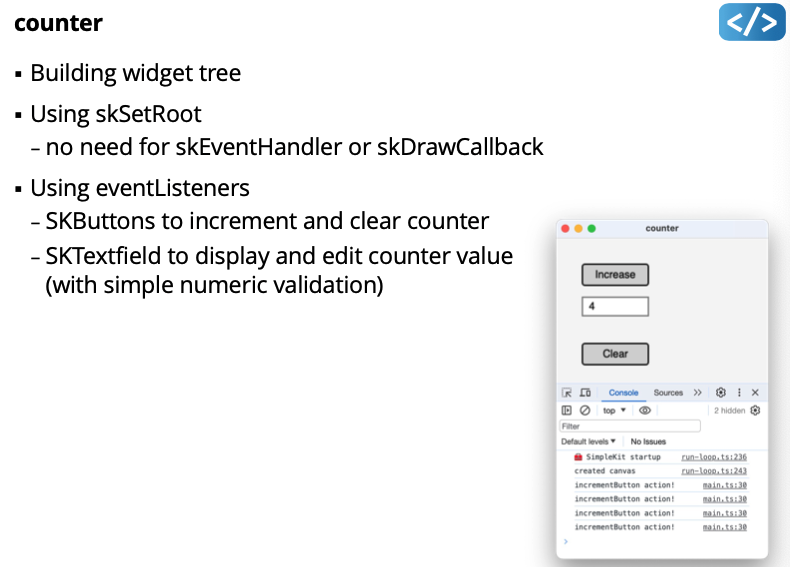
Container Widgets
container (DEMO)
- SKContainer to hold “child” widgets (i.e. SKElements)
- children are drawn relative to container position
- container create widget tree
Specialized Widgets
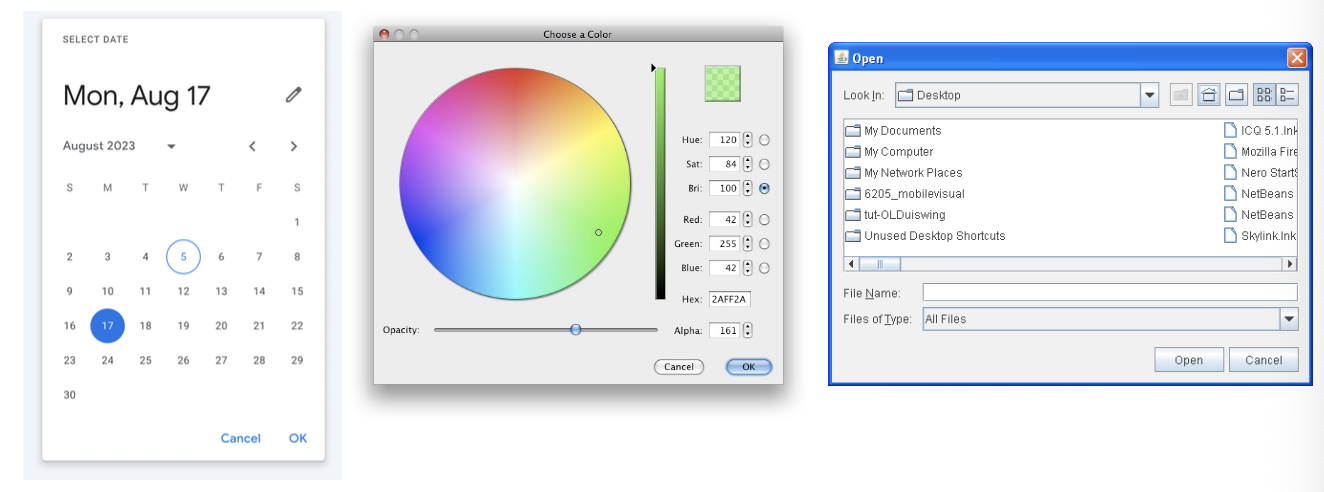
Special Value Widgets
- dat, colour, file, etc. pickers. Which we are to implement in A2.
Widget Implementation
Widget Toolkit Design Goals What widget features are desirable in a widget toolkit?
- Completeness
- GUI designers have everything they need
- Consistency
- Behaviour is consistent across components
- Customizability
- Developer can reasonably extend functionality to meet particular needs of application
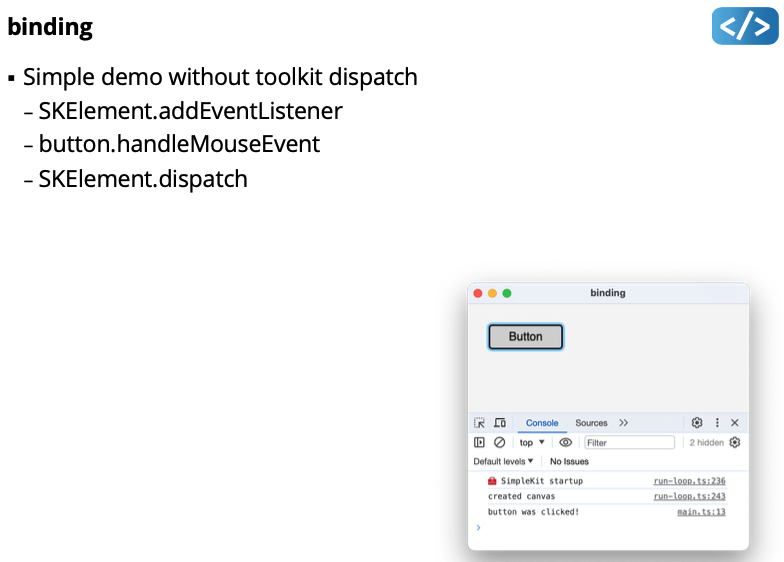
Lecture 8 - Dispatch
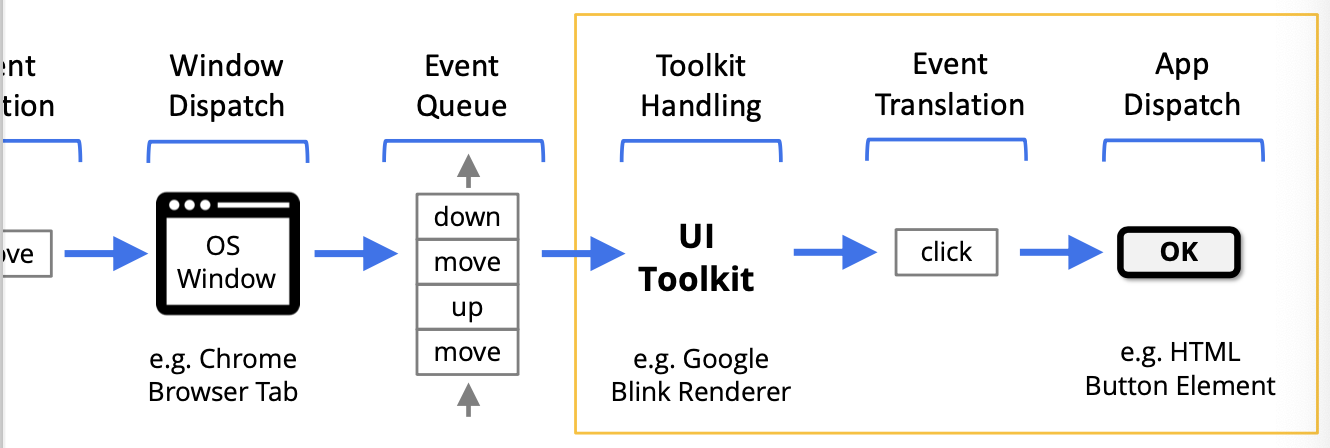
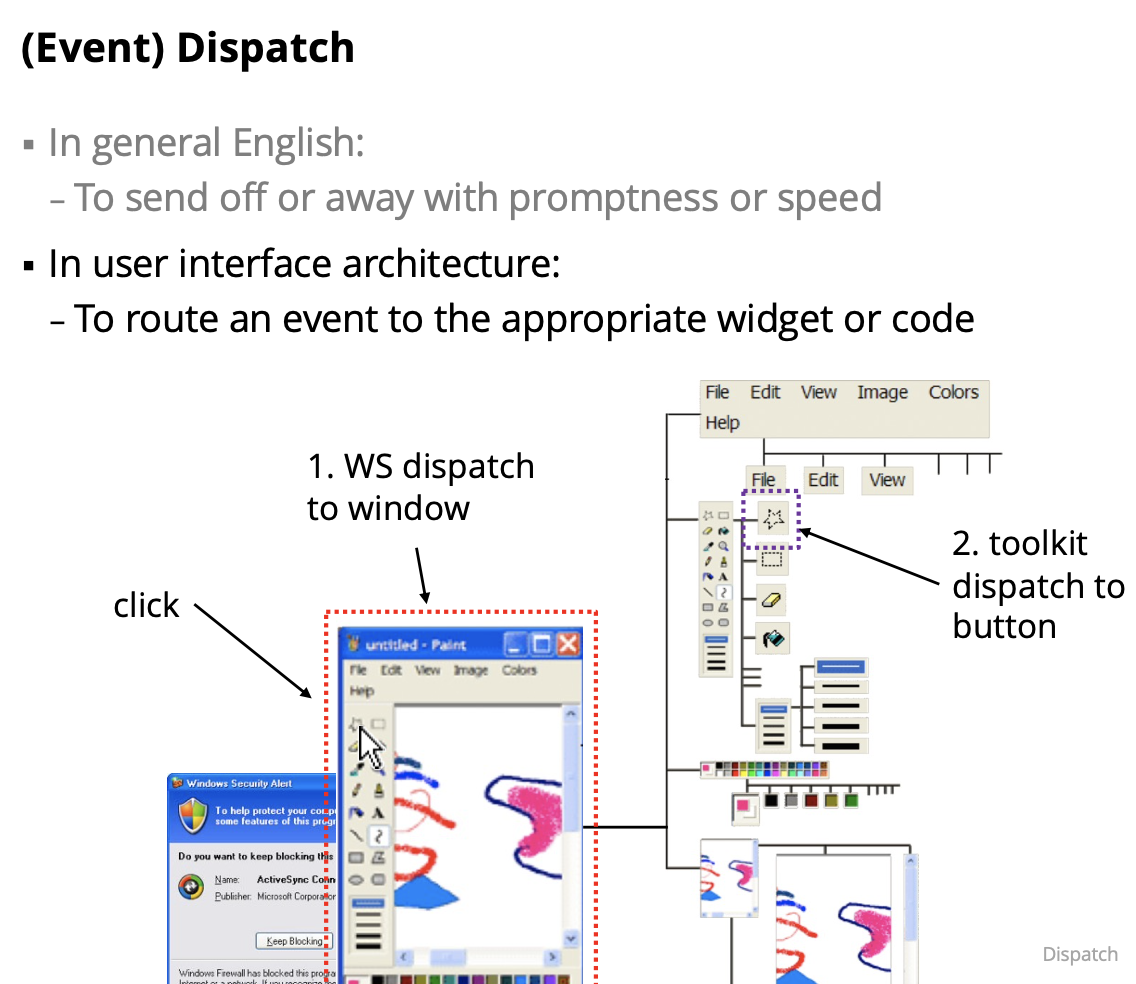
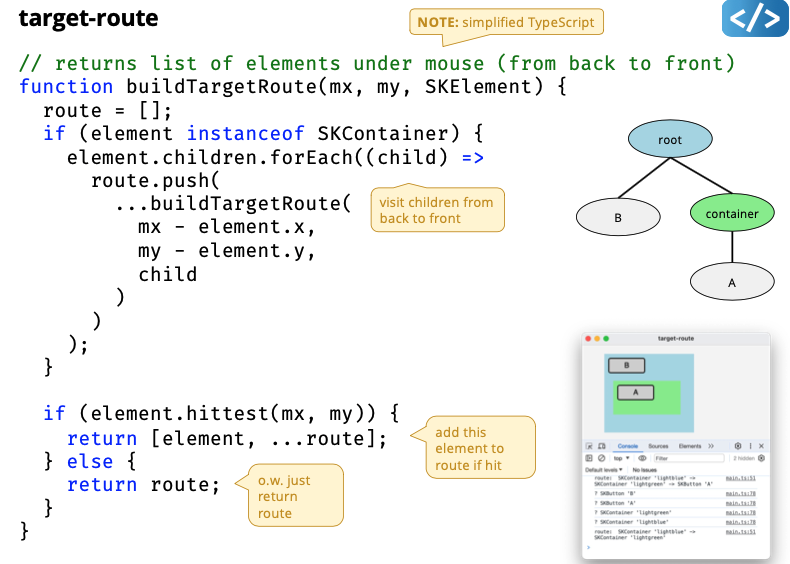
Event Translation in UI Toolkit The fundamental OS input events are translated by the UI Toolkit into higher-order events.
The UI Toolkit (e.g. web browser, web frameworks) translates OS events before dispatching them to the application
Our event pipeline model is extended as follows:
App Dispatch and Event Binding
- UI Toolkit events need to be sent to the app
- Typically sent to specific part of UI based on hit testing and the scene graph
- For now, we’ll use a simple dispatch method:
- all events are handled in a single app function, e.g.
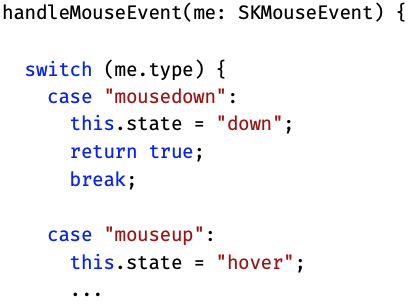
function handleEvent(e: SKEvent){ ... }
- all events are handled in a single app function, e.g.
- For now, we’ll also use a simple binding method:
- app code to handle each event is in event handing function, e.g.
switch (e.type){
	case: "mousemove":
	// app code here for mousemove
	break;
	case "click":
	// app code here for click
	break;
	...
}
Basically review from inputEvents lecture.
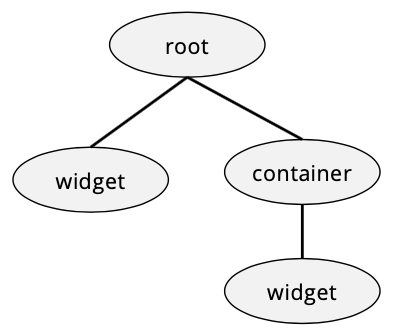
View Hierarchy
- UI toolkits typically organize widgets into a tree
- only one root element
- need container widgets for non-leaf nodes
- child order dictates draw order (e.g. draw left-to-right)
container
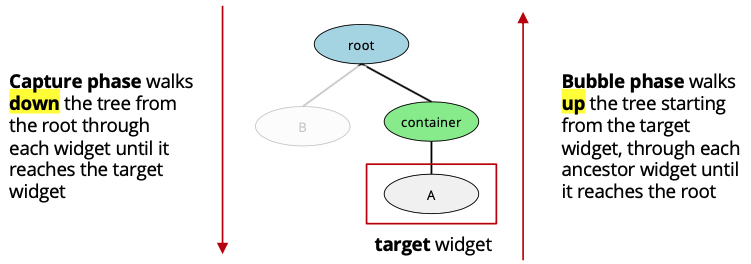
Event Dispatch Steps
- Target selection
- The frontmost widget under the mouse
- Route construction
- Path from root to target node
- Propagation
- capture DOWN from root to target
- bubble UP from target to root Route construction and propagation only apply to positional dispatch
Target Selection Determined by the type of event:
- mouse event: target is the node at the location of the cursor (typically, mousedown target used until mouseup)
- called Positional Dispatch
- key event: target is the node that has focus - focus typically assigned with mouse click (could also be code or key like TAB)
- called Focus Dispatch
- touch events: target selection may be more complex, e.g.:
- A continuous gesture (like pinch-to-zoom) might select the target node at the center point of all touches at gesture start
- A swipe (like swipe right) might select the target node at the center of the entire path of all fingers
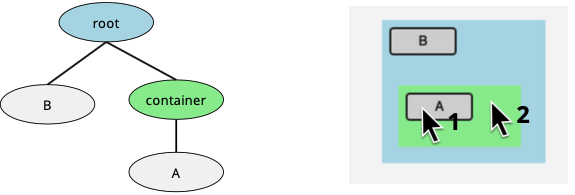
Target Selection in Positional Dispatch Target is last widget drawn under mouse
- mouse event at position 1:
- button A
- mouse event at position 2:
- greenContainer
Route Construction in Positional Dispatch
- Route is from root to target
- mouse event at position 1:
- blueContainer, greenContainer, button A
- mouse event at position 2:
- blueContainer, greenContainer
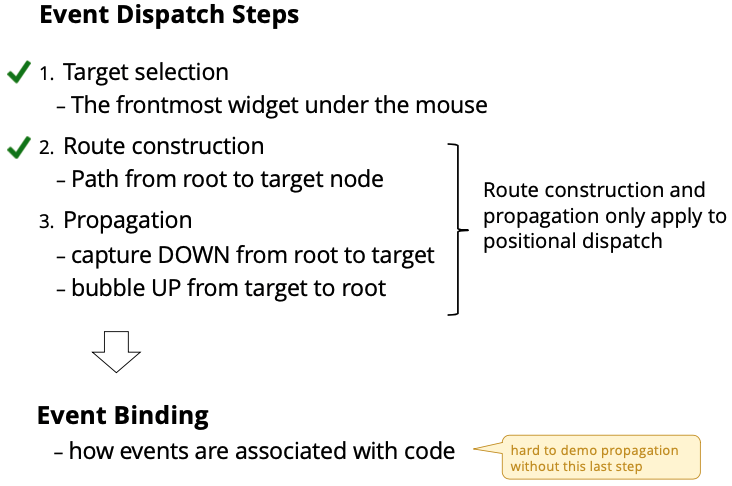
We have propagation left! But first answer the following question:
How events are associated with code?
Event Binding
- How to associate/route/send events with code?
- Design Goals of Event Handling Mechanisms:
- Easy to understand (clear connection between event and code)
- Easy to implement (binding paradigm or API)
- Easy to debug (how did this event get here?)
- Good performance
- We’ll examine common implementations of event-binding…
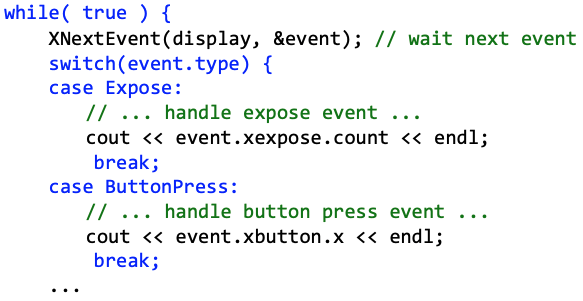
Switch Statement Binding in Run Loop
- All events consumed in one central application event loop
- Loop checks if any events
- Switch selects code to handle the event
- Used in Macintosh, Xlib, and many early systems
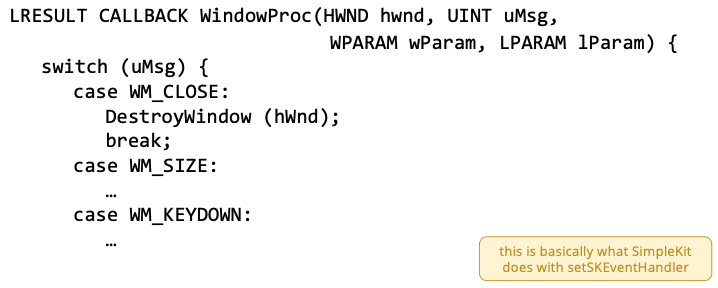
Switch Statement Binding in Global Event Callback
- Used in early Windows
- each app window registers a WindowProc function (Window Procedure) which is called each time an event is dispatched
- a switch statement binds event to code
- (there were over 100 standard events …)
Switch-Statement Binding Problems
- Difficult to maintain
- Dozens of different types of events that need to be managed
- Events are not delegated to an object
- Leads to code where events are handled in loop itself
- Better if widgets handled the events themselves
- e.g. a “click” event on widget is bound directly on method on that widget object
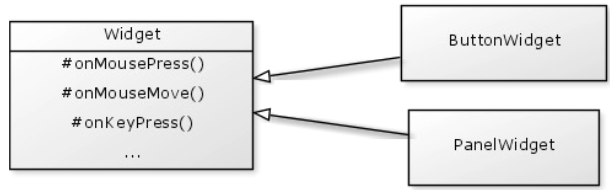
Inheritance Binding
Inheritance Binding
- Event is dispatched to a generic Object-Oriented (OO) widget
- widget extends from base class with all event handling methods
- Base Base class can choose specificity of event handling method
- general event types, e.g. onMouse, onKeyboard
- specific events, e.g. onMouseMove, onMouseClick
- which is what SimpleKit does in SKElement
- Used in Java 1.0
- Multiple event types are processed through each event method
- still a switch statement, but in the widget
- No filtering of events might introduce performance issues
- consider events like mousemove: all will be delivered
- If using specific event methods, it doesn’t scale well
- need to modify the base class to add new event types
- e.g. penButtonPress, touchGesture, …
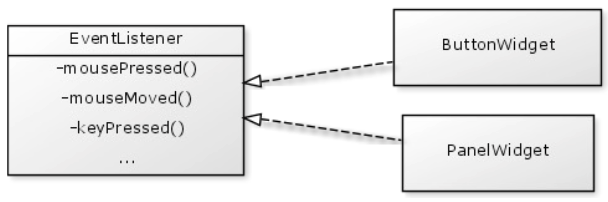
Listener Model Binding
Listener Model Binding
Define interfaces for specific event types (or device types)
- e.g. MouseListener, MouseMotionListener, KeyListener, …
Create object that implements interface to handle
- e.g. KeyListener for keyboard events
When event is dispatched, relevant listener method is called
- e.g. mousePressed, mouseMoved, …
Used in JavaFX
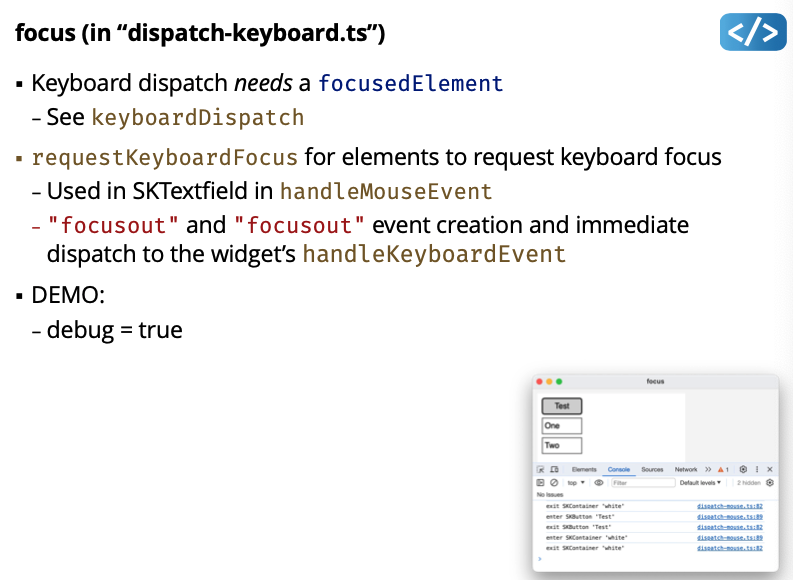
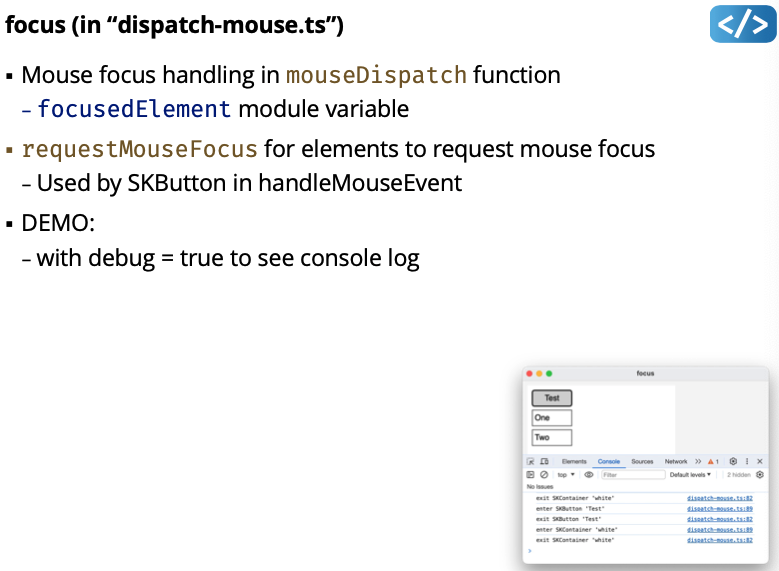
SimpleKit Event Bindingto-understand
-
Uses a form of Inheritance Binding
-
SKElement has methods for general event type, e.g.: handleMousEvent, handleKeyboardEvent
-
Widgets implement methods to handle toolkit events, e.g.:
-
SKElement has methods to bind widget events to event handlers
- “widget events” are events generated by the widget itself (e.g. “action” when a SKButton is clicked)
-
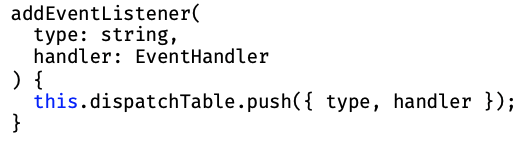
Defines a generic event handler function type
type EventHandler = (me: SKEvent) => void; -
Maintains a table of binding routes to event handlers
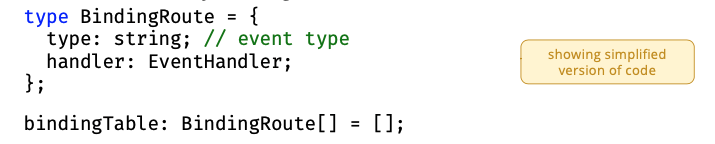
-
Exposes methods to add and remove event listeners
Demo:
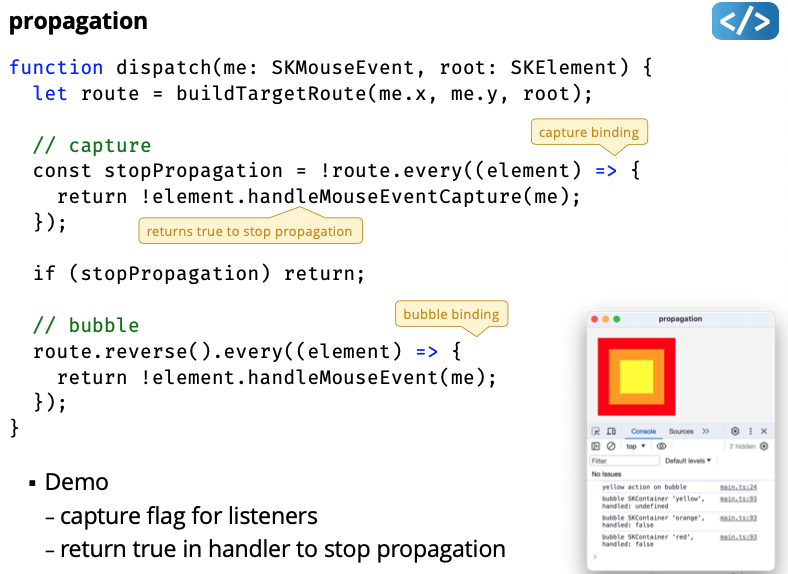
Event Propagation
- Most UI toolkits support top-down and bottom -up propagation
- top-down is called capture
- button-up is called bubbling
- Any widget in the path can use the event during either pass
- A handler can stop all following propagation (i.e. a capture handler can stop rest of capture and bubble phase)
Demo:
- captures flag for listeners
- return true in handler to stop propagation
Why Capture Phase?
- Events higher up in the widget tree can “filter” events
- use “handled” flag to stop propagation
Positional Dispatch Limitations
- Pure positional dispatch can lead to odd behaviour:
- Mouse drag starts in a scrollbar, but then moves outside the scrollbar: send the events to the adjacent widget?
- Mouse press event in one button widget but release is in another: each button gets one of the events?
- Must also consider which widget is “in focus”
Focus Dispatch
- Events dispatched to widget regardless of mouse cursor position
- Needed for all keyboard and some mouse events:
- Keyboard focus: click on text field, move cursor off, start typing
- Mouse focus: mousedown on button, move off, mouseup (also called “mouse capture”)
- Maximum one keyboard focus and one mouse focus
- why?
- Need to gain and lose focus at appropriate times
Focus Dispatch Needs Positional Dispatch
- A mousedown event sets mouse and keyboard focus to a widget
- Only text entry widgets should request keyboard focus
- Any widget could request mouse focus
- UI Toolkits have a dedicated focus managers
- As part of the dispatch method
- There are other ways to request focus
- TAB key to navigate a UI without a mouse (assumes the UI toolkit defines a “tab order” for widgets)
- An app can typically request focus itself (i.e. pressing ENTER moves keyboard focus to “next” textfield)
demo:
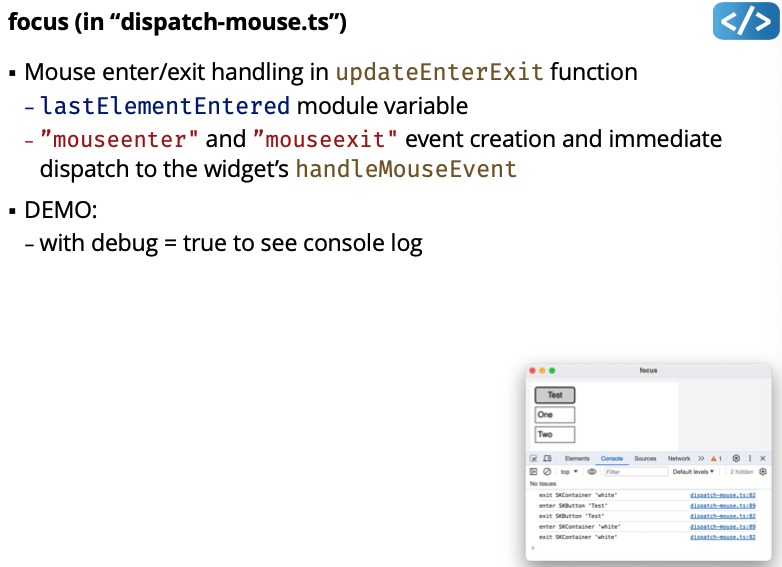
Mouse Enter and Exit Events
- UI Toolkits generate events when mouse enters and exits a widget
- These events are used by widgets for “hover” effects
- Approach:
- Get the element at very end of the target route (i.e. the front-most widget)
- If that element wasn’t the “last element entered”
- Send “mouseexit” event to the last element entered
- Send “mouseenter” event to the element at end of the route
- In practice, a widget can refuse an enter event, then the toolkit will check the penultimate element in the route (and so on)
- (But SimpleKit always sends enter/exit event to end element)
Demo:
Global Event Queue “Hooks” In some situations, applications can access system events
- Monitor fundamental events across all applications
- Inject fundamental events to another application
- This can be a very useful technique
- examples?
- e.g. jNativeHook global keyboard and mouse listeners for Java
Every instance of a widget has its own binding table.
The idea, is that the button has its own little dispatch system.
You can stop propagation in SimpleKit. Shown in demo:
- capture flag for listeners
- return true in handler to stop propagation
Lecture 9 - Layout
User Interface Layout
- In general English:
- The way in which the parts of something are arranged
- The way in which text or pictures are set out on a page
- In user interface architecture:
- The visual arrangement of widgets in a user interface
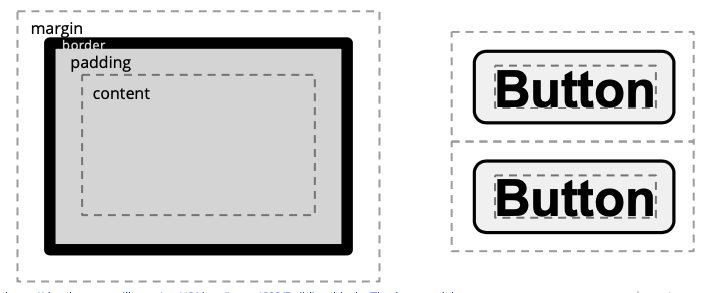
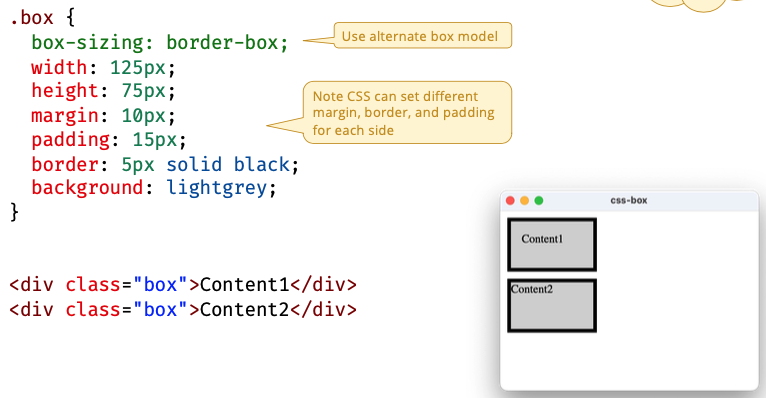
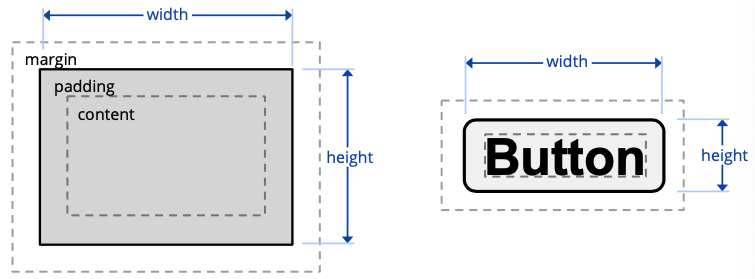
Box Model
- UI elements typically use a hierarchy of dimensions for size
- For example, the CSS Box Model has 4 dimensions:
- margin: “outside” space away from other elements
- border: thickness of stroke outlining element
- padding: “inside” space between border and content
- content: the actual content of the element
How does element width and height work with the box model?
- Standard CSS Box Model
- width and height defined by the content size
- actual rendered size is content size plus padding and border
- Alternative CSS Box Model
- width and height define the rendered element size
- content size is actual rendered size minus padding and border
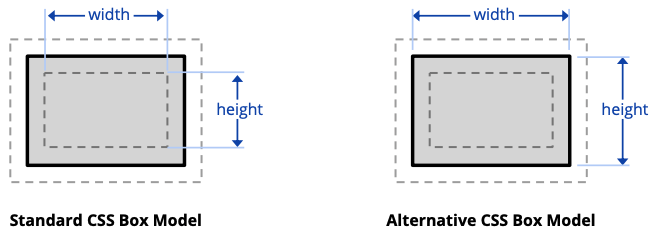
css-box
Change box model with box-sizing CSS attribute
In CSS, can set top, right, bottom, left dimensions
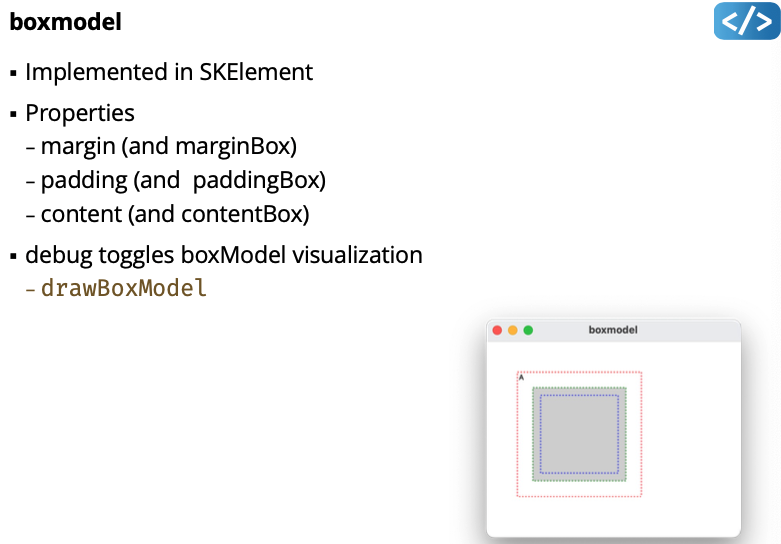
SimpleKit Box Model
- Uses only 3 dimensions:
- margin, padding, content
- top, right, bottom, left cannot be set separately
- Uses CSS alternate box model for width and size:
- width and height define the rendered element size
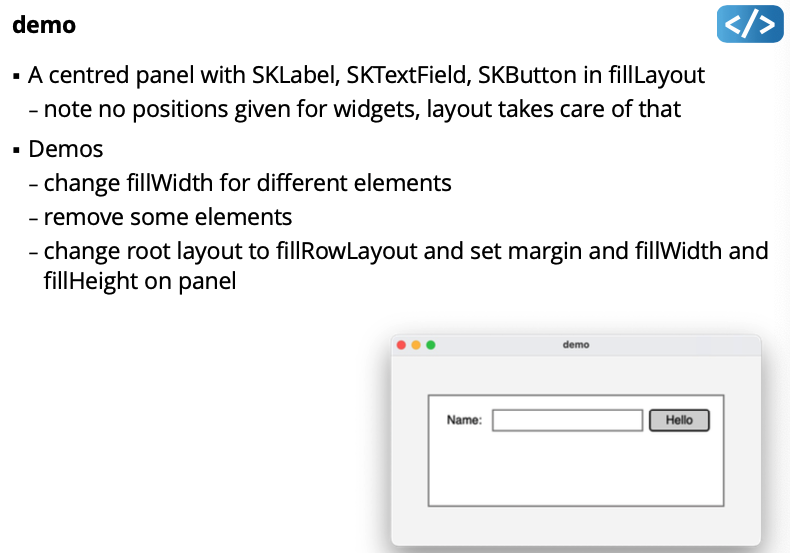
Demo:
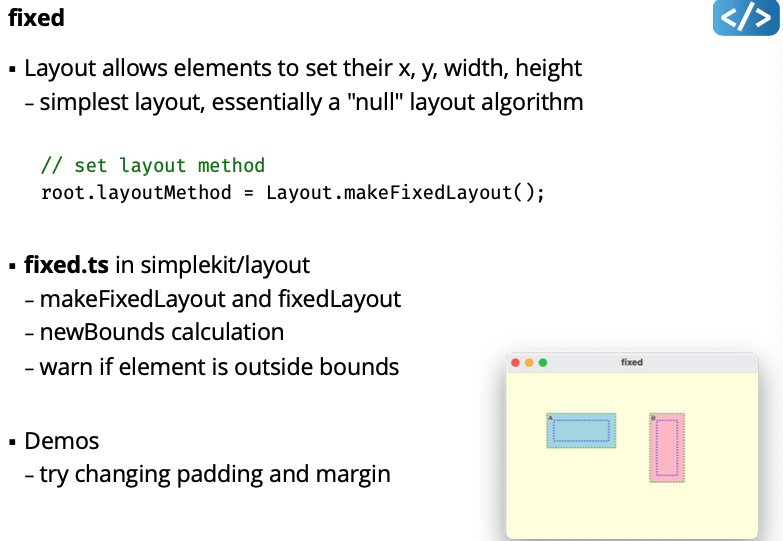
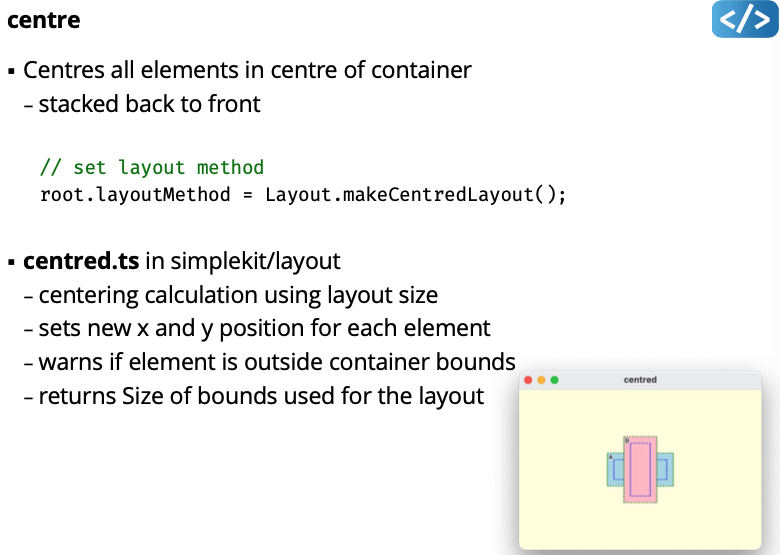
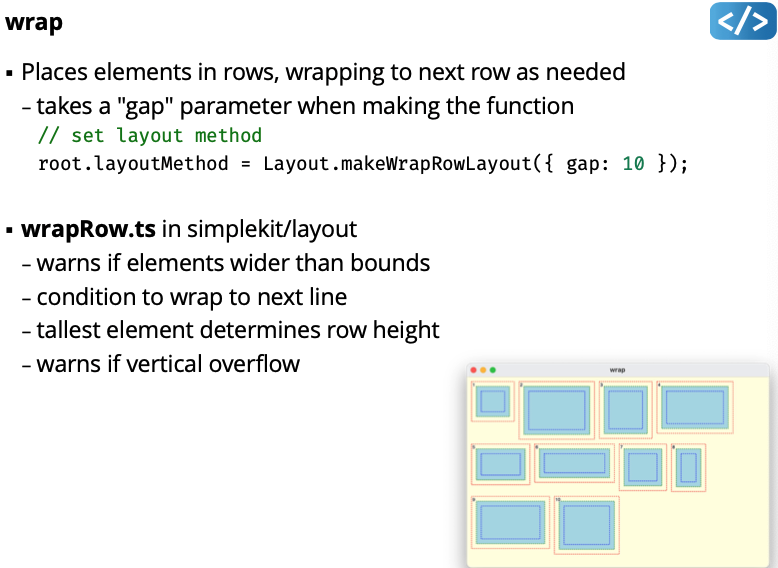
Layout Strategies
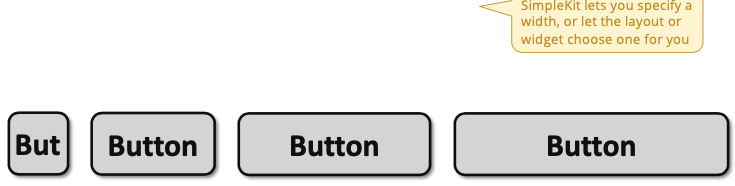
Basis Size and Layout Size
- An element may be rendered larger/smaller than its width, height
- e.g. when width or height are less than (2 * padding)
- e.g. layout may expand or shrink element
- Width and/or height do not even have to be defined
- i.e. let layout choose width and height instead
- The Basis Size is the elements “normal” size inside margins
- If width and height are undefined, then basis could be 0, 0
- If width is 15 and padding is 20, then basis width is 40 ???to-understand
- If width is undefined for Button widget, the basis width is the minimum width to fit the button text
- The Layout Size is the elements size after layout including margin
- How much space the element occupies in the layout
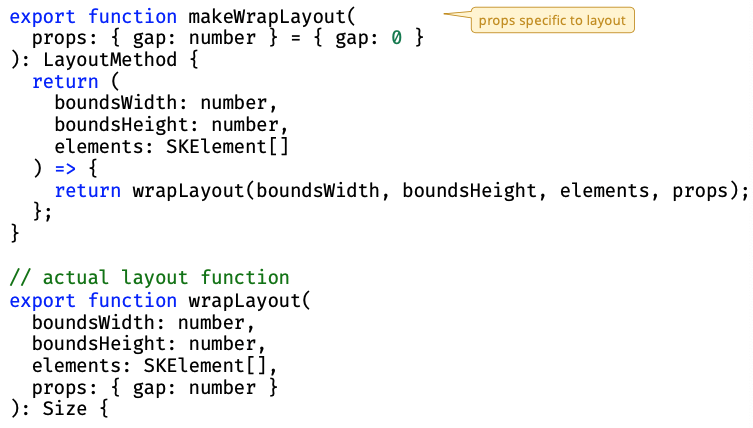
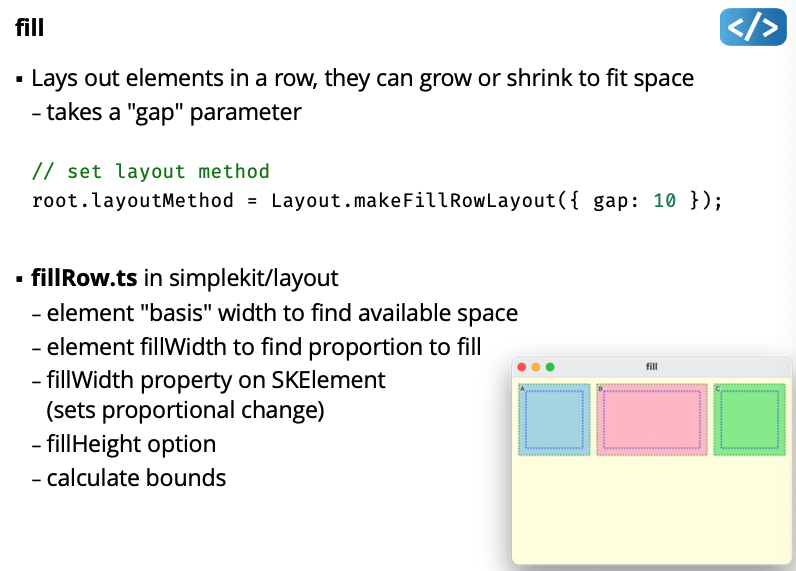
Strategy Design Pattern for Layouts
Factor out layout algorithm into a separate function, allow an element to choose algorithm
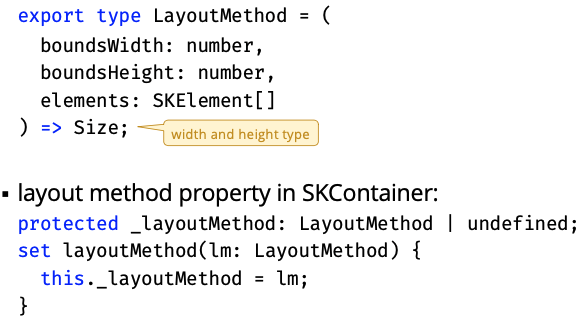
Factory pattern for “Making” Layout Function
Enables optional properties for layout algorithm. e.g. “gap” between elements
Demo:
Responsive Layout Dynamically reposition, resize, hide content in response to:
- Change in screen resolution (e.g. different computers or devices)
- Resizing the application window (e.g. user adjustments)
Widget Basis Sizes
- Widgets need to be “flexible” in size and position
- Widgets store their own position and width/height, BUT layouts can change widget width/height
- Other properties may also be changed by layouts (e.g. reducing font size for a caption)
- Some UI Toolkit support multiple basis size “hints”,
- e.g. CSS attributes:
min - width <= width <= max - width
- e.g. CSS attributes:
Variable Intrinsic Layout
The layout attempts to use the widget preferred basis sizes, but queries all the widgets first, and allocates space to them as a group.
Layout determined in two-passes
- Get each child widget’s preferred size (basis + margin)
- Decide on a layout that satisfies everyone’s preferences, then iterate through each child, and set its layout size and position
Demo:
Layout Invalidation
- Every time widget size or layout-related property changes, at least some of the UI must be laid out again
- There could be multiple changes each frame of the run-loop
- e.g. in response to events, model updates, etc.
- Best practice is to run layout at most once per run-loop frame
In “imperative-mode.ts”:
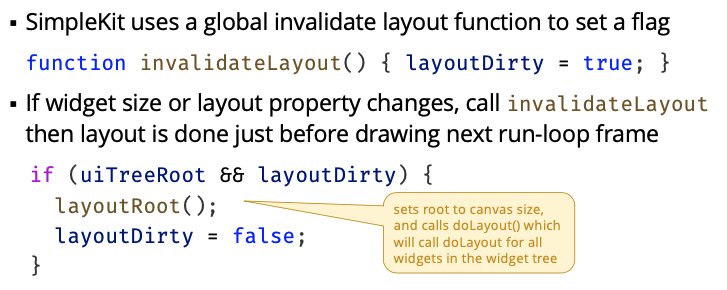
Note: I think the prof changed layoutDirty to something else.
Demo:
Tips and Strategies
- Break up the UI recursively into regions
- Consider how the controls are laid out within each region
- Expect to nest layouts!
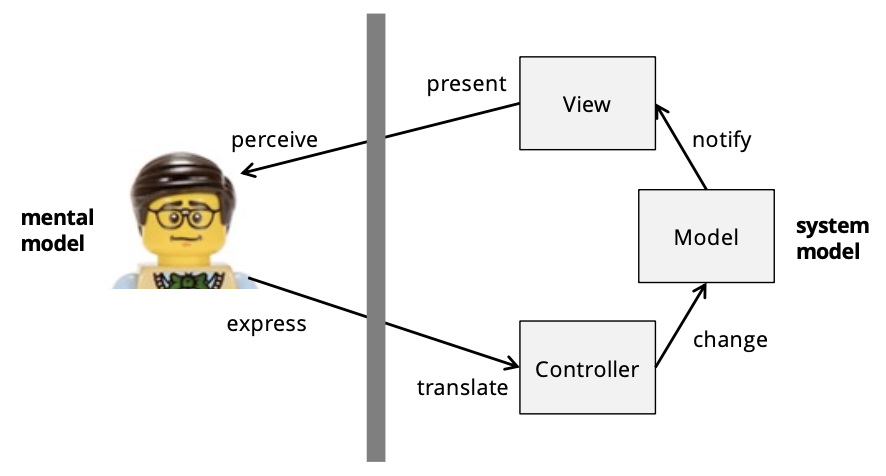
Lecture 10 - Model View Controller (MVC)
- Benefits of MVC
- Implementation
- MVC Variants
Model View Controller
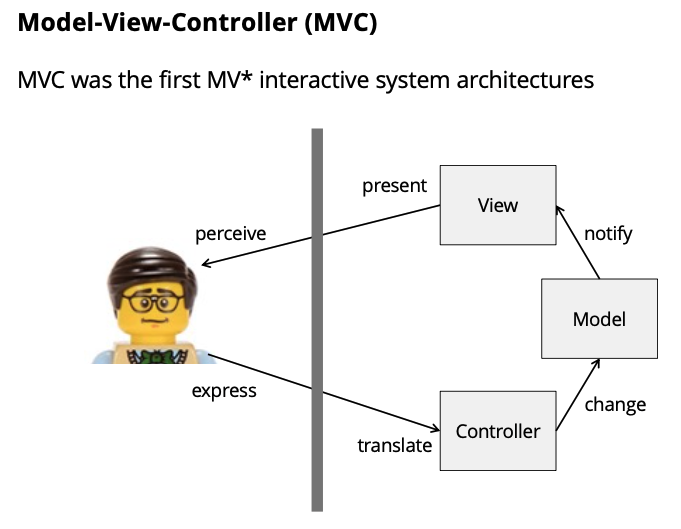
Why use MVC?
- Separate data, state, and “business logic” from user-interface
- Ideally, View and Controller implementations can change without changing Model implementation, e.g.:
- Add support for a new interface (e.g. different device)
- Add support for a new input device (e.g. touchscreen)
- Supports multiple views of same data, e.g.
- View numeric data as a table, a line graph, a pie chart, …
- Present simultaneous “overview” and “detail” views
- Distinct “edit” and “preview”
- Separation of concerns in code
- code reuse
- unit testing
Lecture 11 - HTML CSS
Make sure to make a separate css file instead of putting it in the html file → bad practice according to Emily
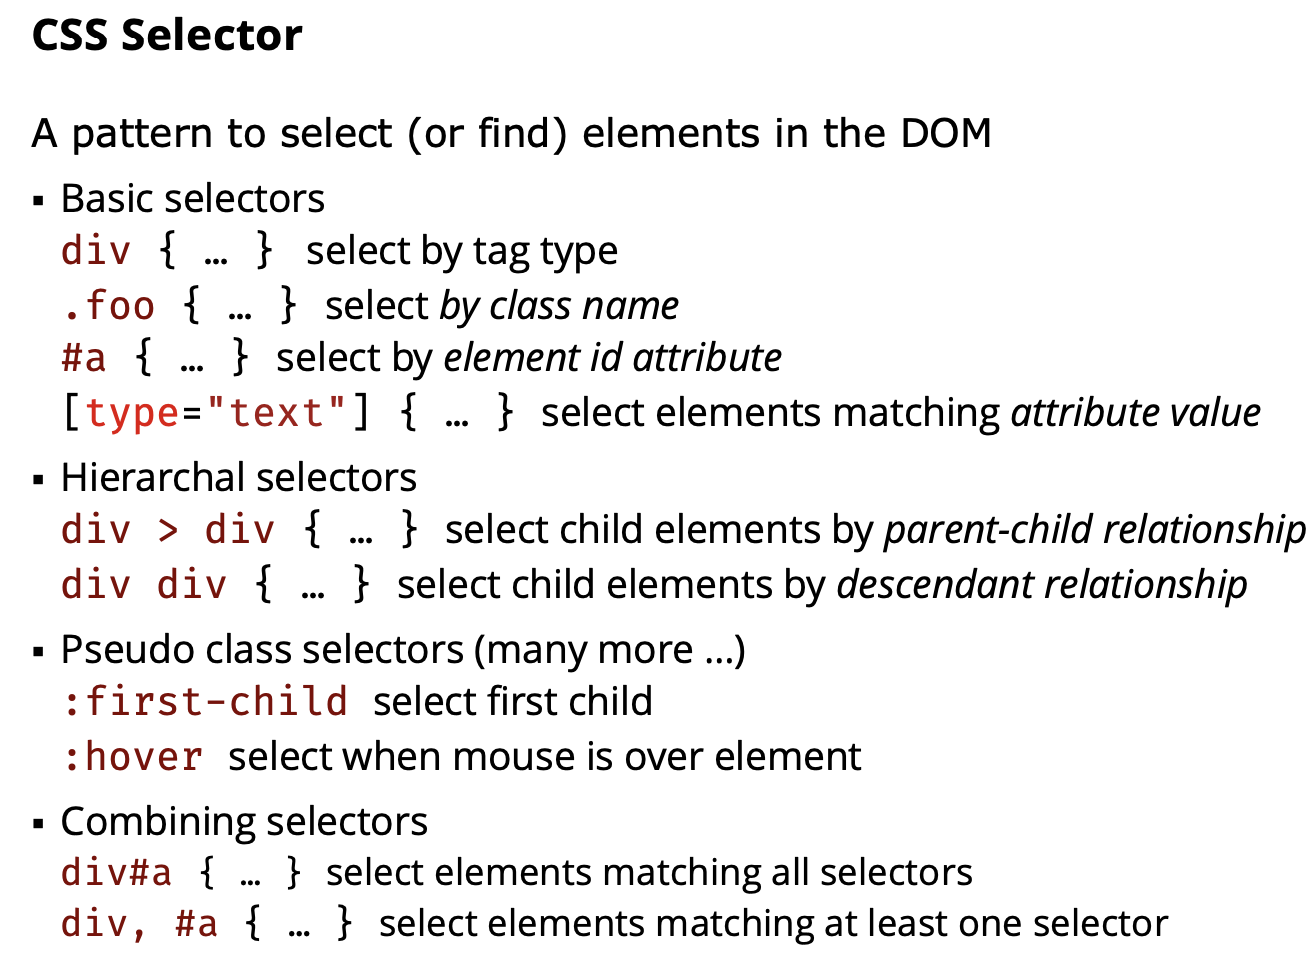
Note you don’t need to have div > div, they are independent selectors, you can have .foo > div, or #a > div…
Use hierarchal would make your code cleaner with DOM manipulation instead of making everything into a class.
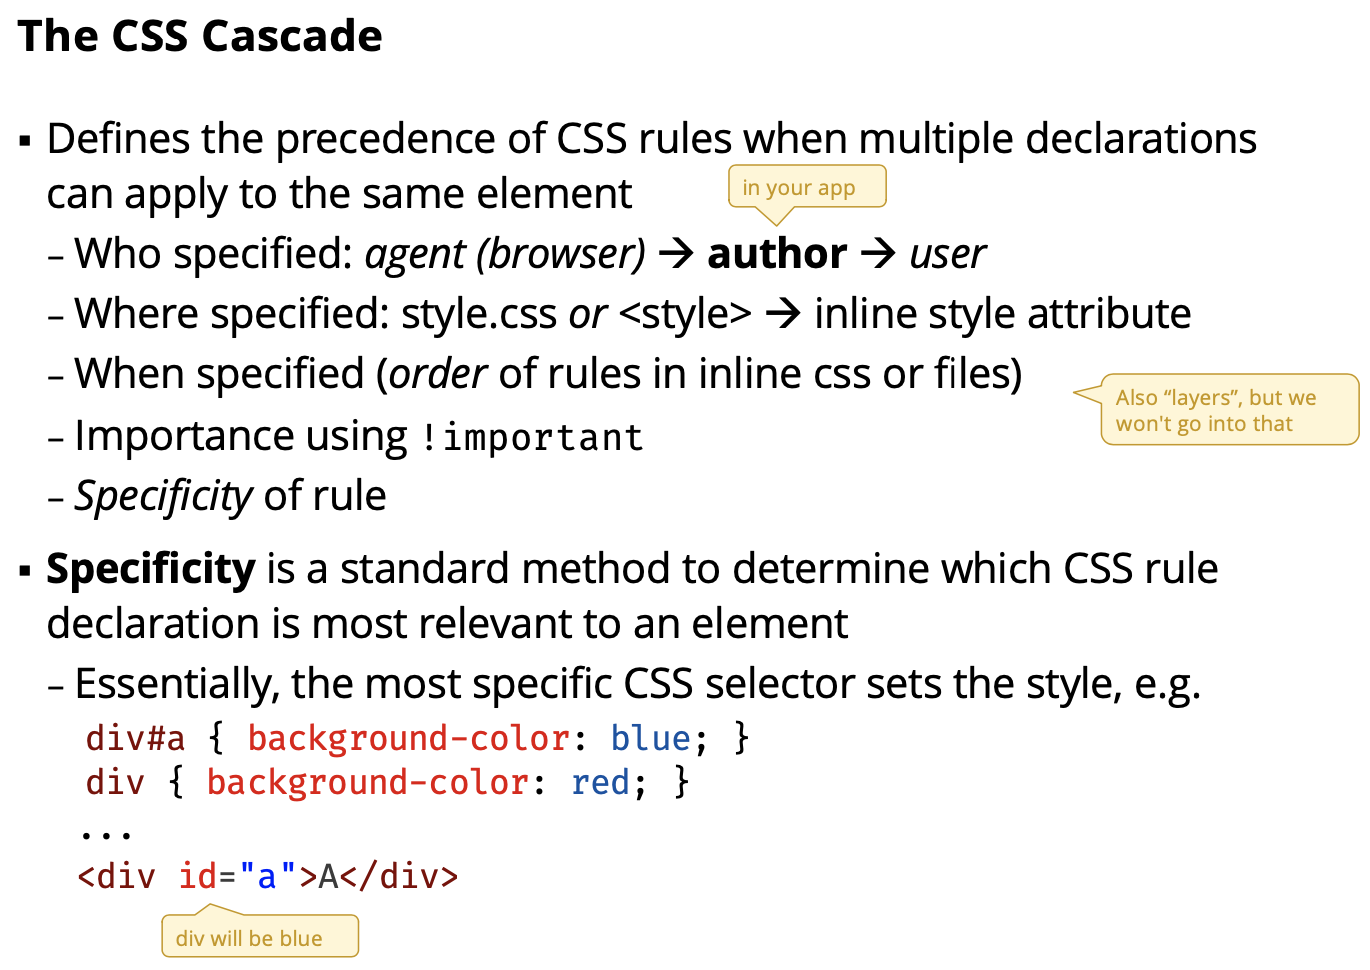
Specificity is a complicated algorithm. More stuff in selector, the most specific it is.
CSS Specificity
If there are two or more CSS rules that point to the same element, the selector with the highest specificity value will “win”, and its style declaration will be applied to that HTML element.
Think of specificity as a score/rank that determines which style declaration is ultimately applied to an element.
Demo css:
- Order matters!!
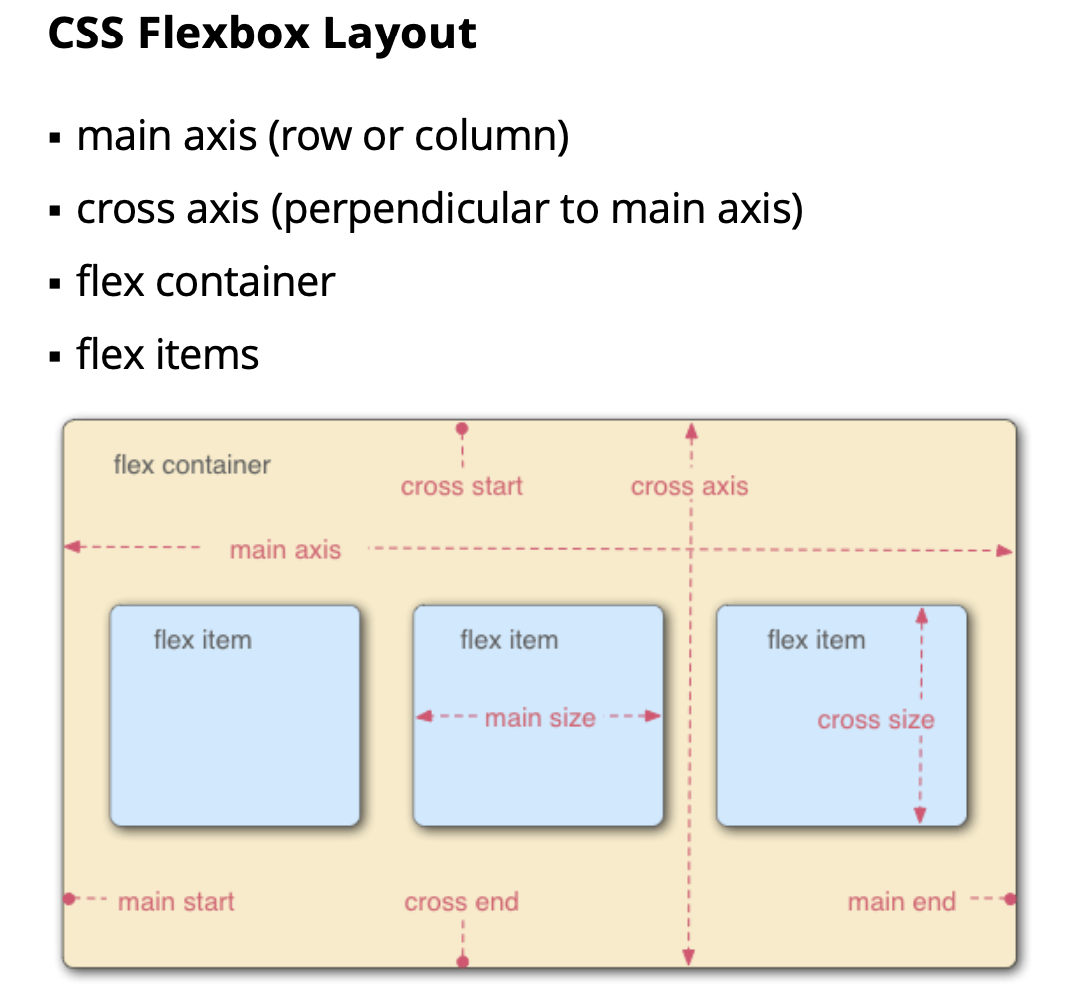
You can do layout in row, column. Don’t use right and left, instead start and end.
Need to create a flex container and flex items → CSS property
flexbox items: grow, shrink and basis
Demo flex:
- flex shrink allows you to shrink the flex items if you minimize window… cannot do that in simplekit
- flex-grow allows you to stretch your items
align-itemsto stretch-start or end or just stretch (Try it out!)
A3: You can use grow and shrink and auto basis.
”Vanilla” DOM Manipulation with TypeScript
- Mock-up HTML as static page
- think about how to identify each part using id, name, structure …
- Add CSS to create visual style, layout, etc.
- Divide up HTML for manipulation approach
- result could be separate strings, HTML templates, etc.
- Create Views for main parts of interface
- Divide up CSS into views (css file or inline
<style>) - build view from code or strings
- create controllers using event listeners
- attach everything to a root element for the view - implement Observer update method
- Divide up CSS into views (css file or inline
For A3 : start using HTML. Still use MVC>?????
Every view has a view that describes the functionality of the view, and then the and css Id for view, use css to apply some things to that specific id view.
Demo mockup: I start to understand the relationship between HTML and CSS Study it to how he uses flex box and everything.
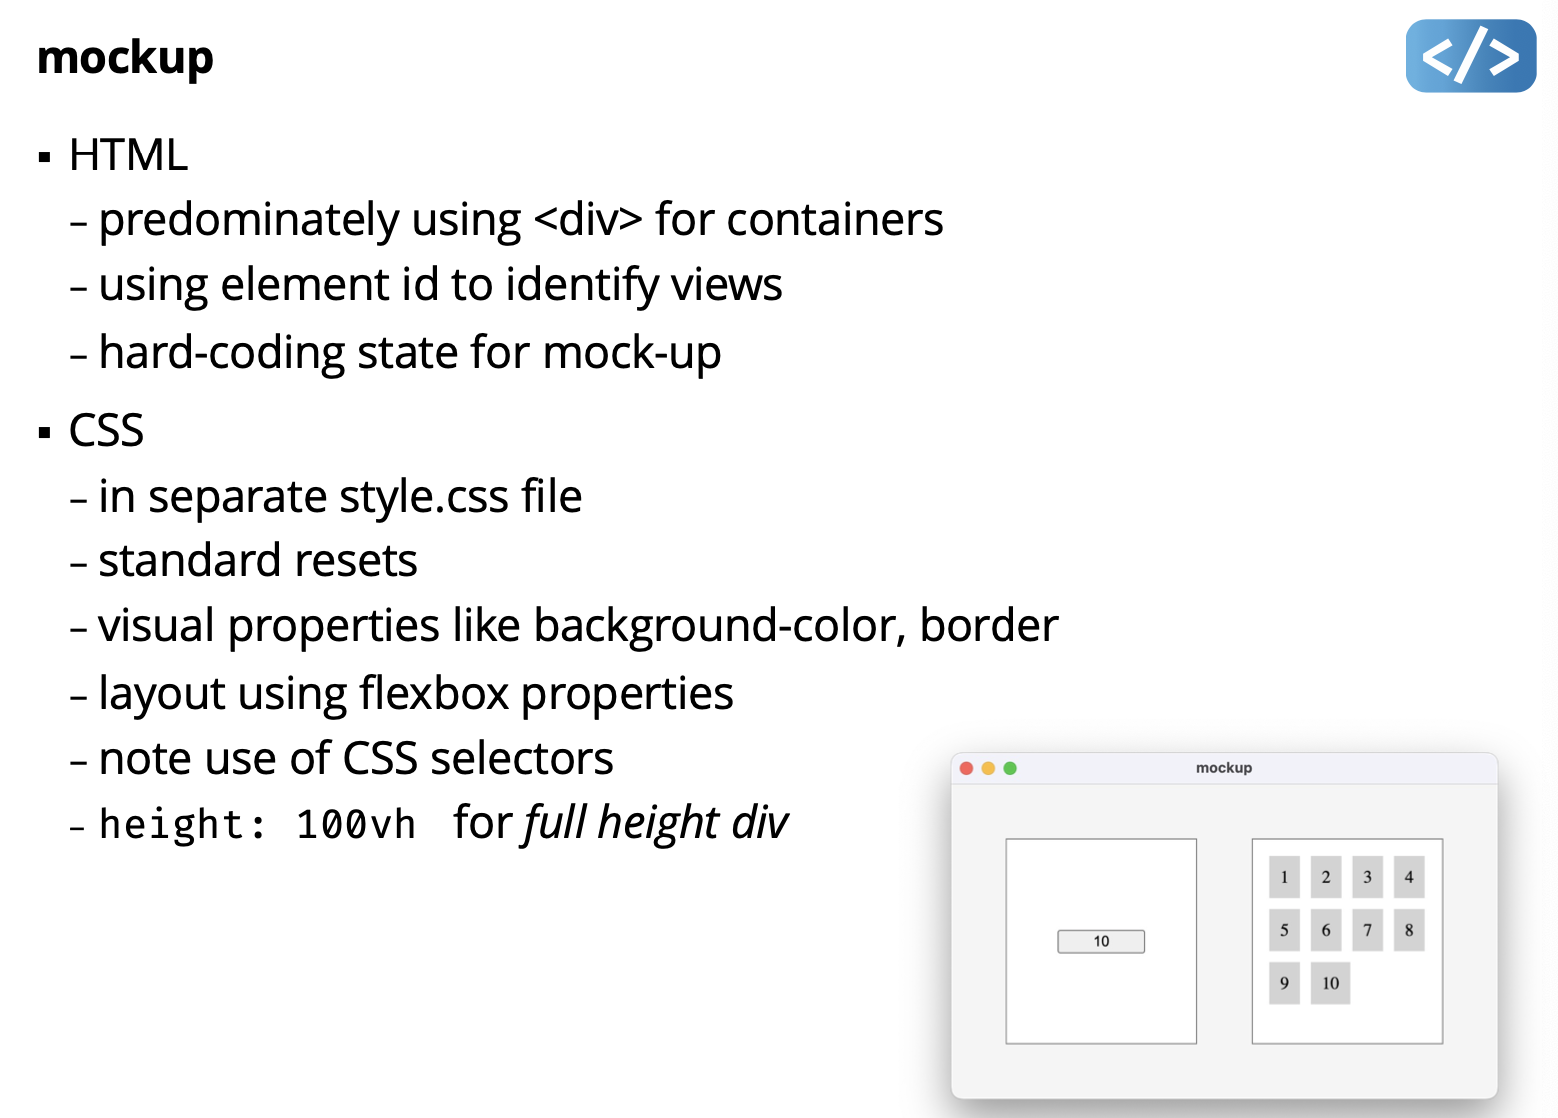
- Note in div#app, he uses height: 100vh; it’s just to set it to the whole window
- Check how he uses css selectors
div#leftfor example
Prof suggests on using querySelector("#my-id")!!! equivalent to finding the id.
Dom Events
- DOM events dispatch essentially the same as SimpleKit
- capture and bubble phases
event.stopPropagation()method
- Setting event handlers similar to SimpleKit
button.addEventListener("click", (e) => { ... });
- Basics of DOM events similar to SimpleKit
Eventbase class has propertiestimeStamp, typeMouseEventhas propertiesx, yKeyboardEventhas propertykey
(Vanilla) HTML Manipulation Approaches
- Build HTML in impertative steps (like SimpleKit)
- using
createElement,appendChild, etc.
- using
- Build HTML from string
- using
innerHTMLorinsertAdjacentHTML
- using
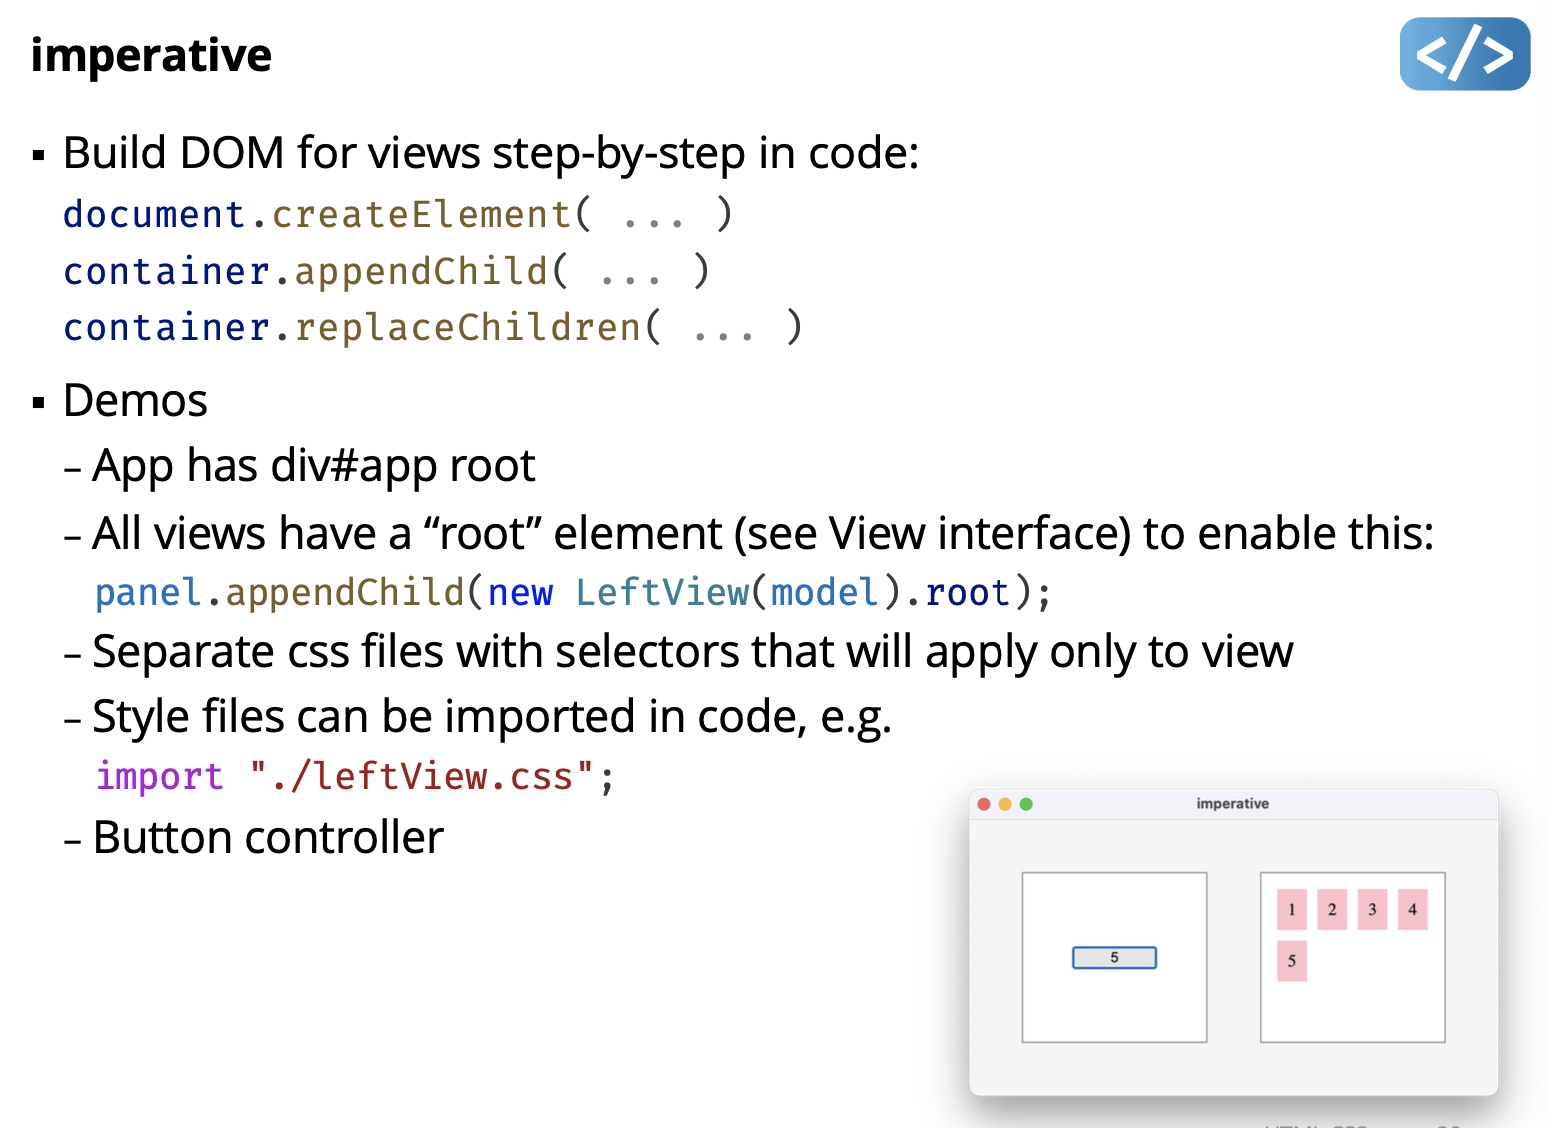
Demo imperative:
- Notice when you create a view to panel, you pass in the .root
- in button.addEventLIstener(click), you can add a timer. console.log()
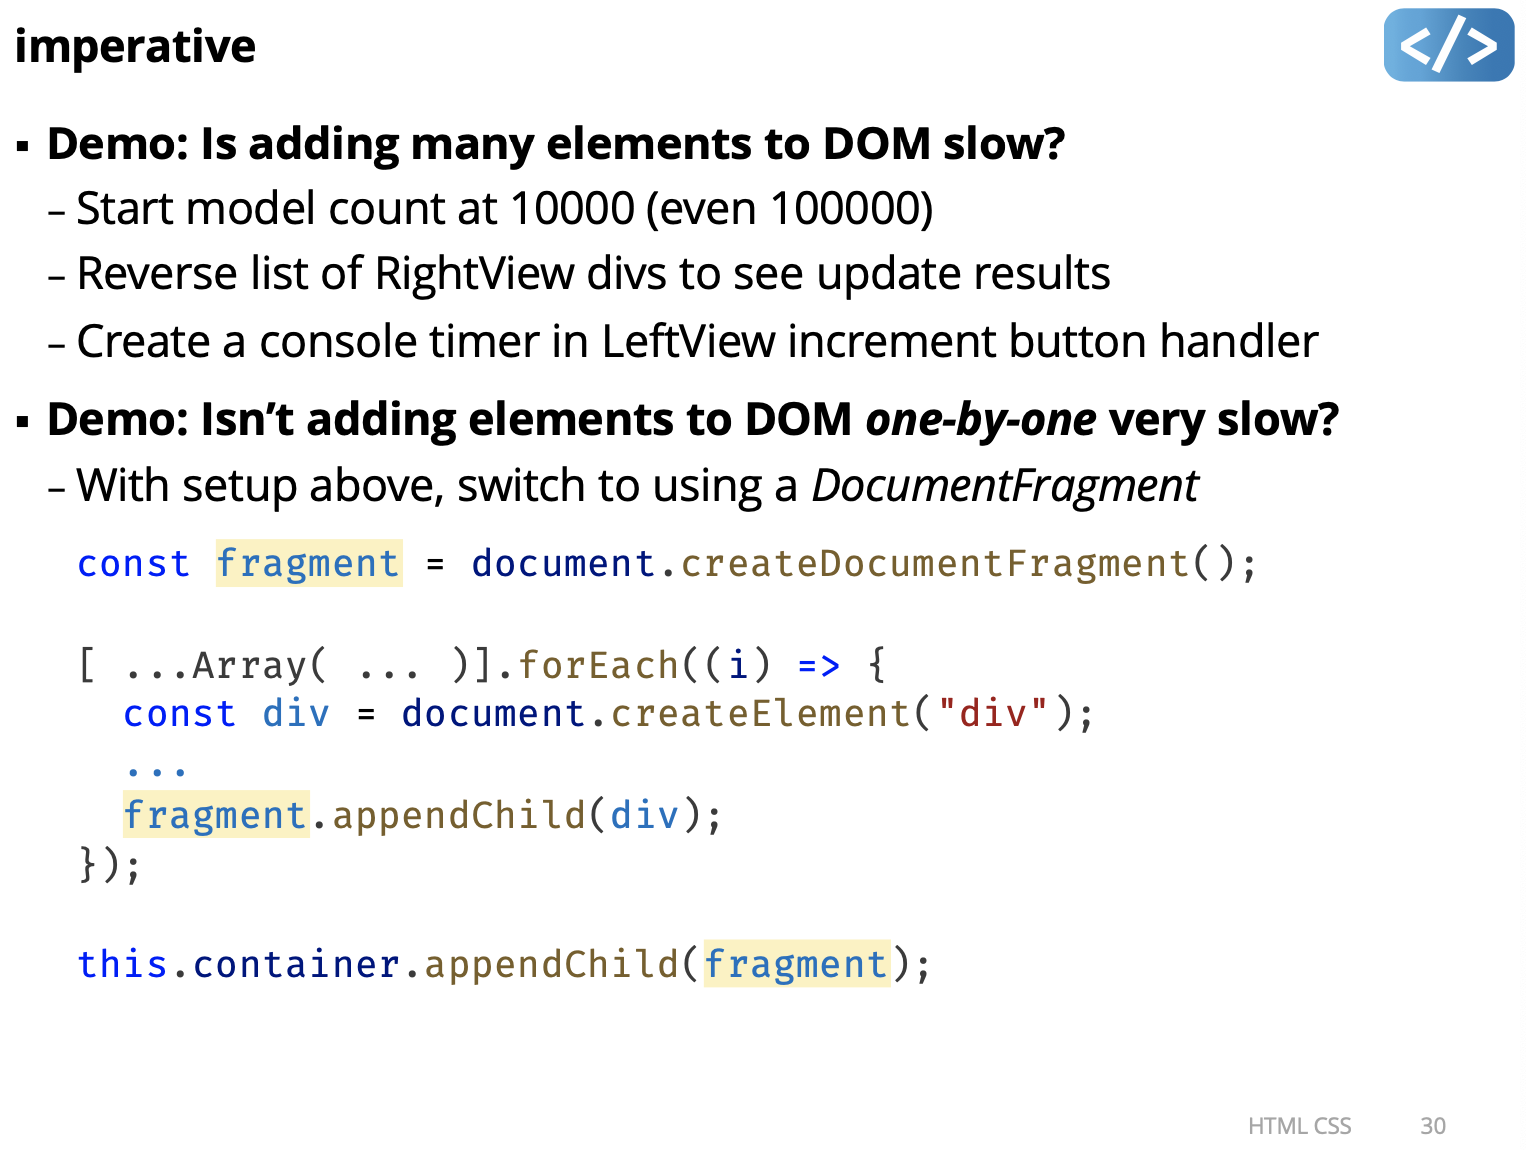
What is document fragment?
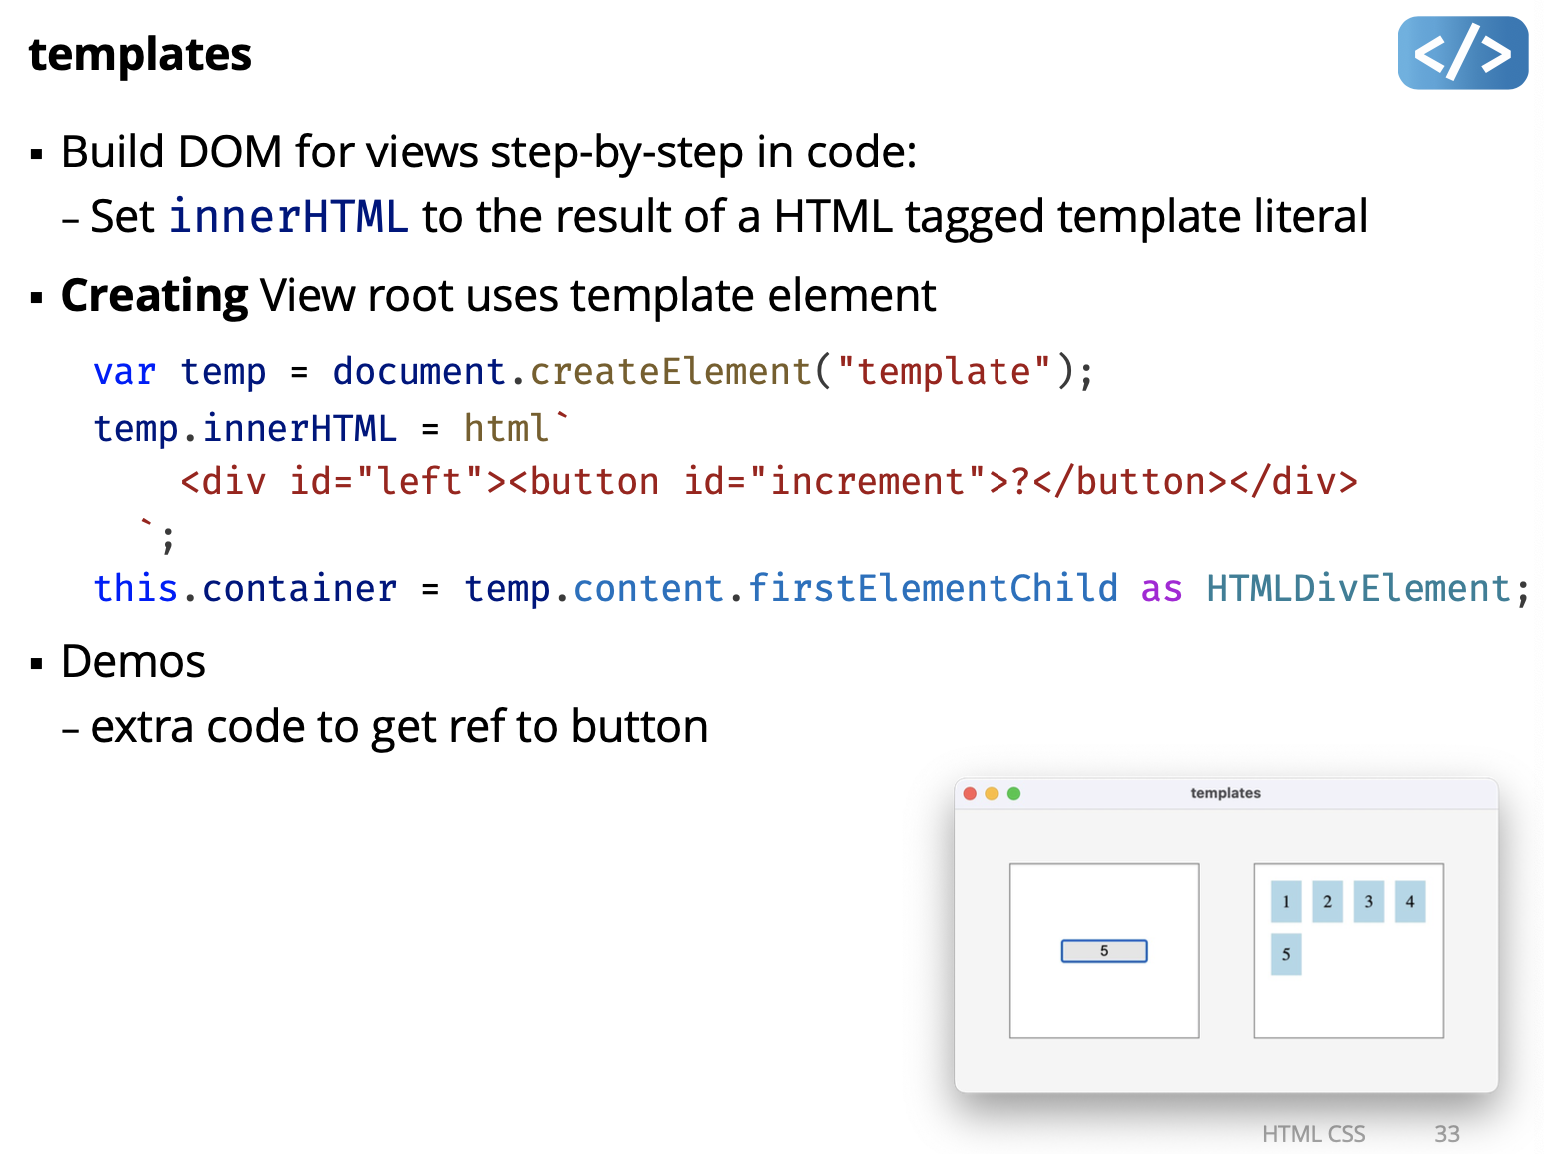
A document fragment is a lightweight container in the Document Object Model (DOM) that allows developers to group multiple DOM nodes together without adding them to the main DOM tree. Unlike typical nodes in the DOM, document fragments exist only in memory and are not part of the rendered document until explicitly appended to the DOM tree.
Using a document fragment can improve performance when manipulating the DOM because it enables batch operations on a set of nodes before inserting them into the document. This approach reduces the number of DOM manipulations, which can be slow and resource-intensive, especially when dealing with large numbers of elements. Overall, document fragments provide a more efficient way to manage and manipulate multiple DOM nodes at once.
HTML Tagged Template Literals
-
A tag transforms a template literal before creating a string

-
The tag is a function called with arguments from template literal:
- first argument is array of strings
- other arguments are strings created from template values
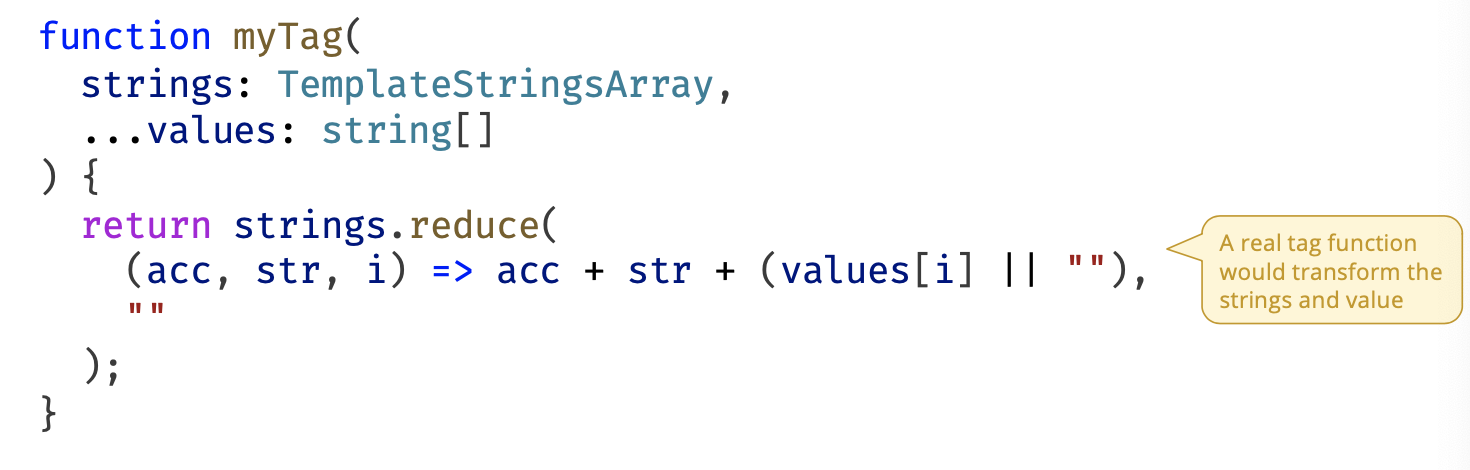
-
It’s best practice to pass HTML templates through an html tag
- to escape embedded HTML
- to sanitize HTML
-
VS Code recognizes template literals with an html tag
- Enables Emmet HTML shortcuts, HTML formatting, etc. (Almost like JSX!)
-
For Vanilla DOM projects, install an html tag function package, e.g.
npm install html-template-tag
- Some web frameworks (like Preact) include an html tag function
Demo: templates
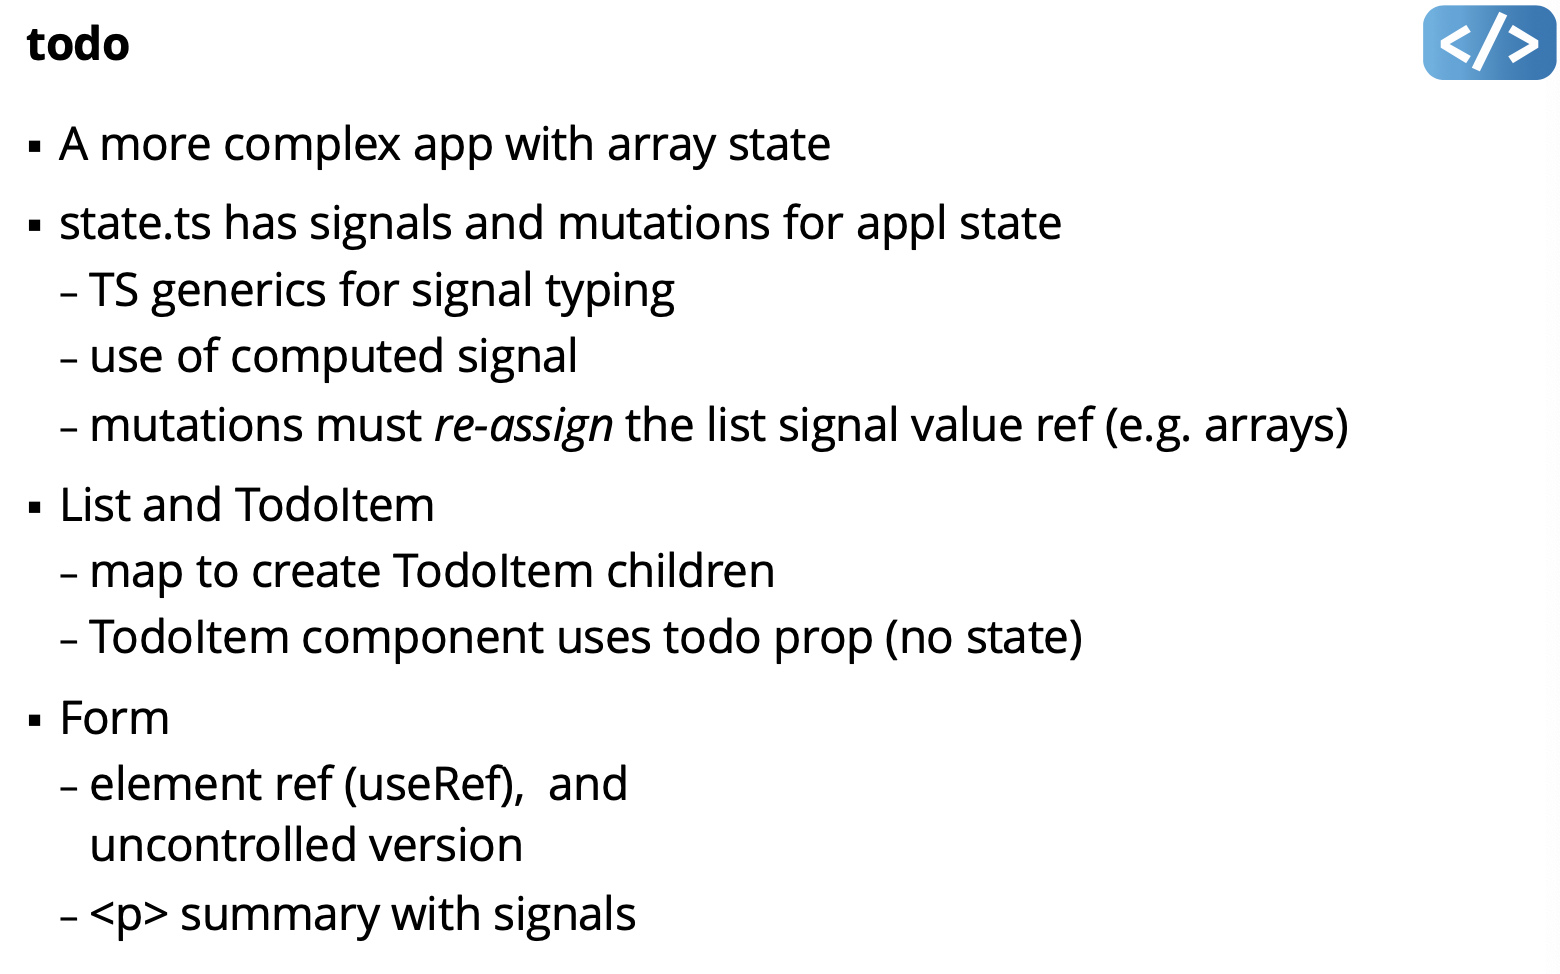
Demo: todo
- MVC todo app using Vanilla DOM manipulation - Using imperative DOM manipulation
- Exact same Model as SimpleKit todo demo
- Exact same nested View structure: FormView, ListView (with TodoView children), InfoView
- Demo
- mockup.html to work out the layout and styles
- Advanced CS selectors for strike through text when todo finished
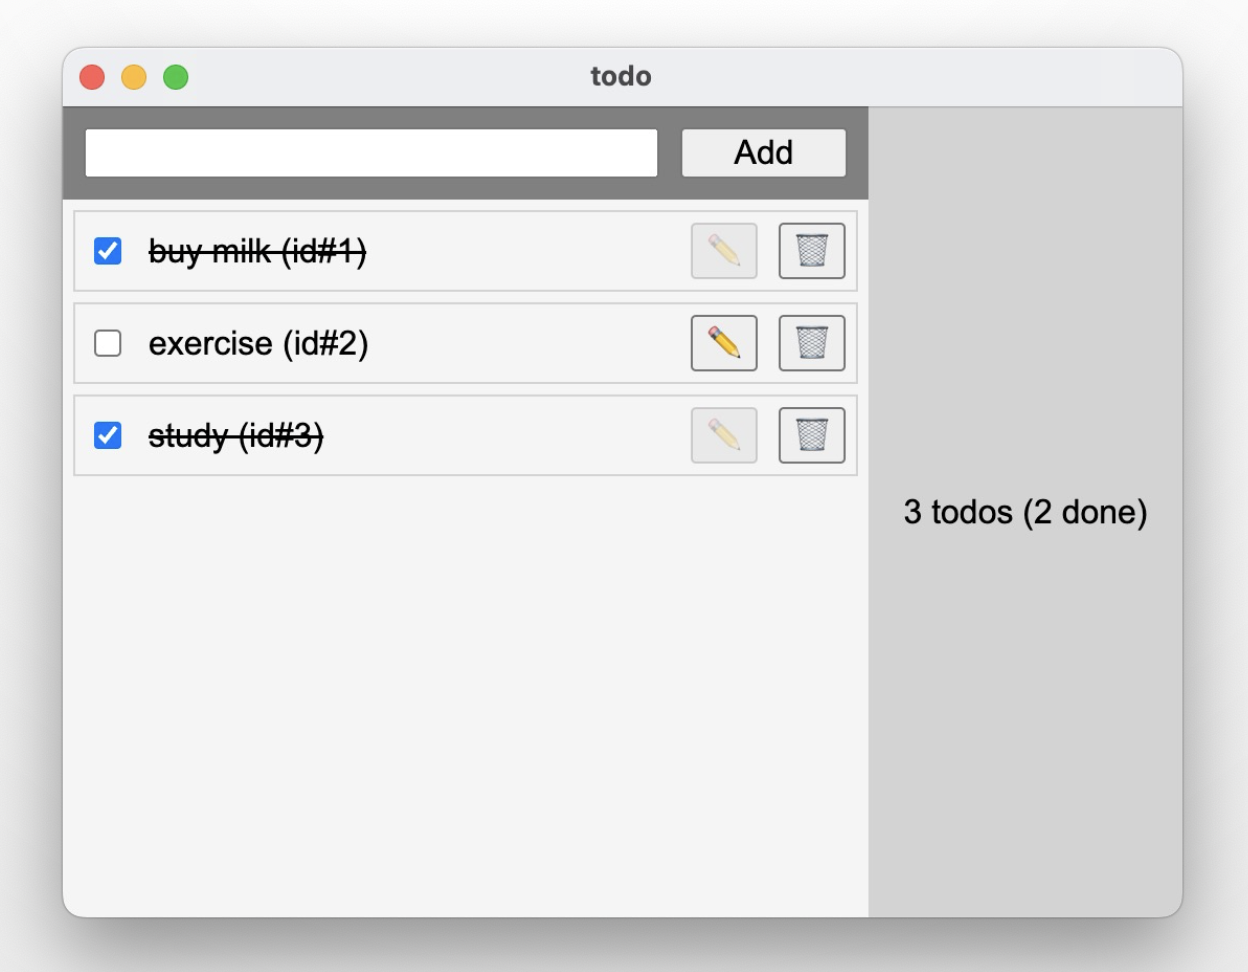
Must go through demos in code to really understand. Otherwise you can't!
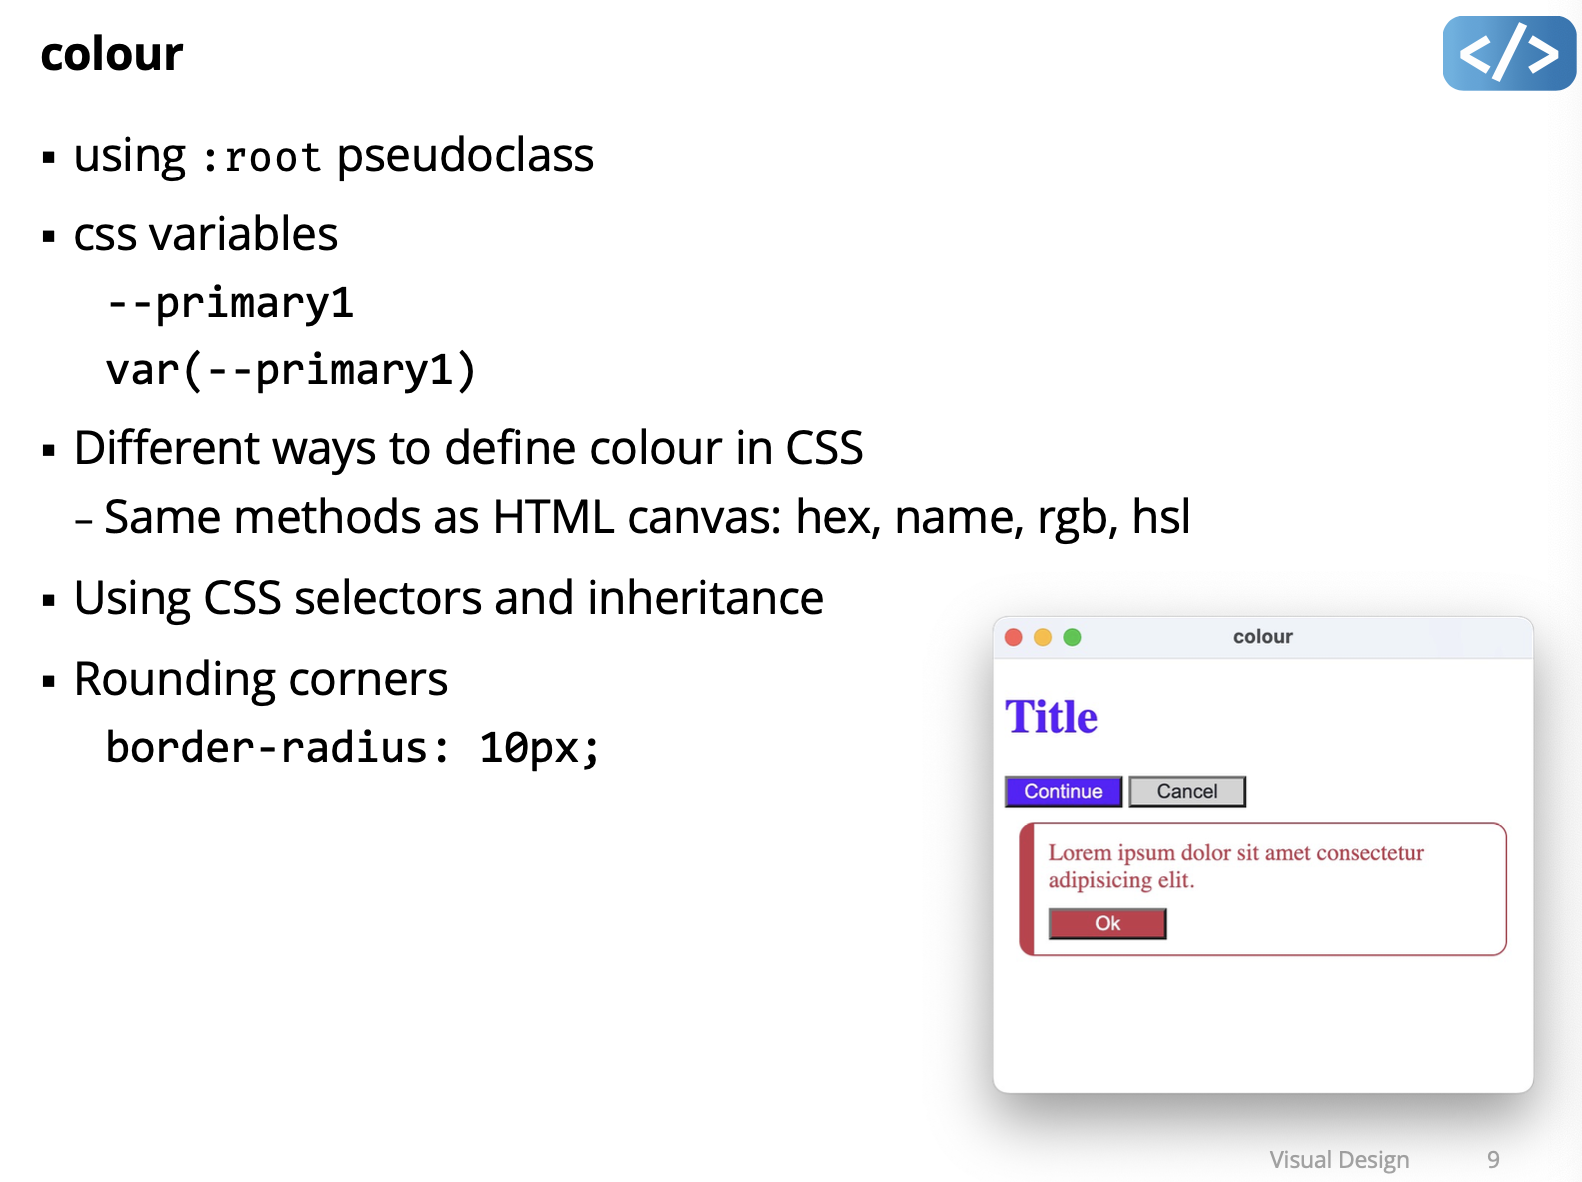
Lecture 12 - Visual Design
- Colour
- Typography
- Layout
- Design Systems
Colour palette exploration tools:
Demo: colour
Typography
- Typography is the art of arranging letters and text in a way that makes the copy legible, clear, and visually appealing.
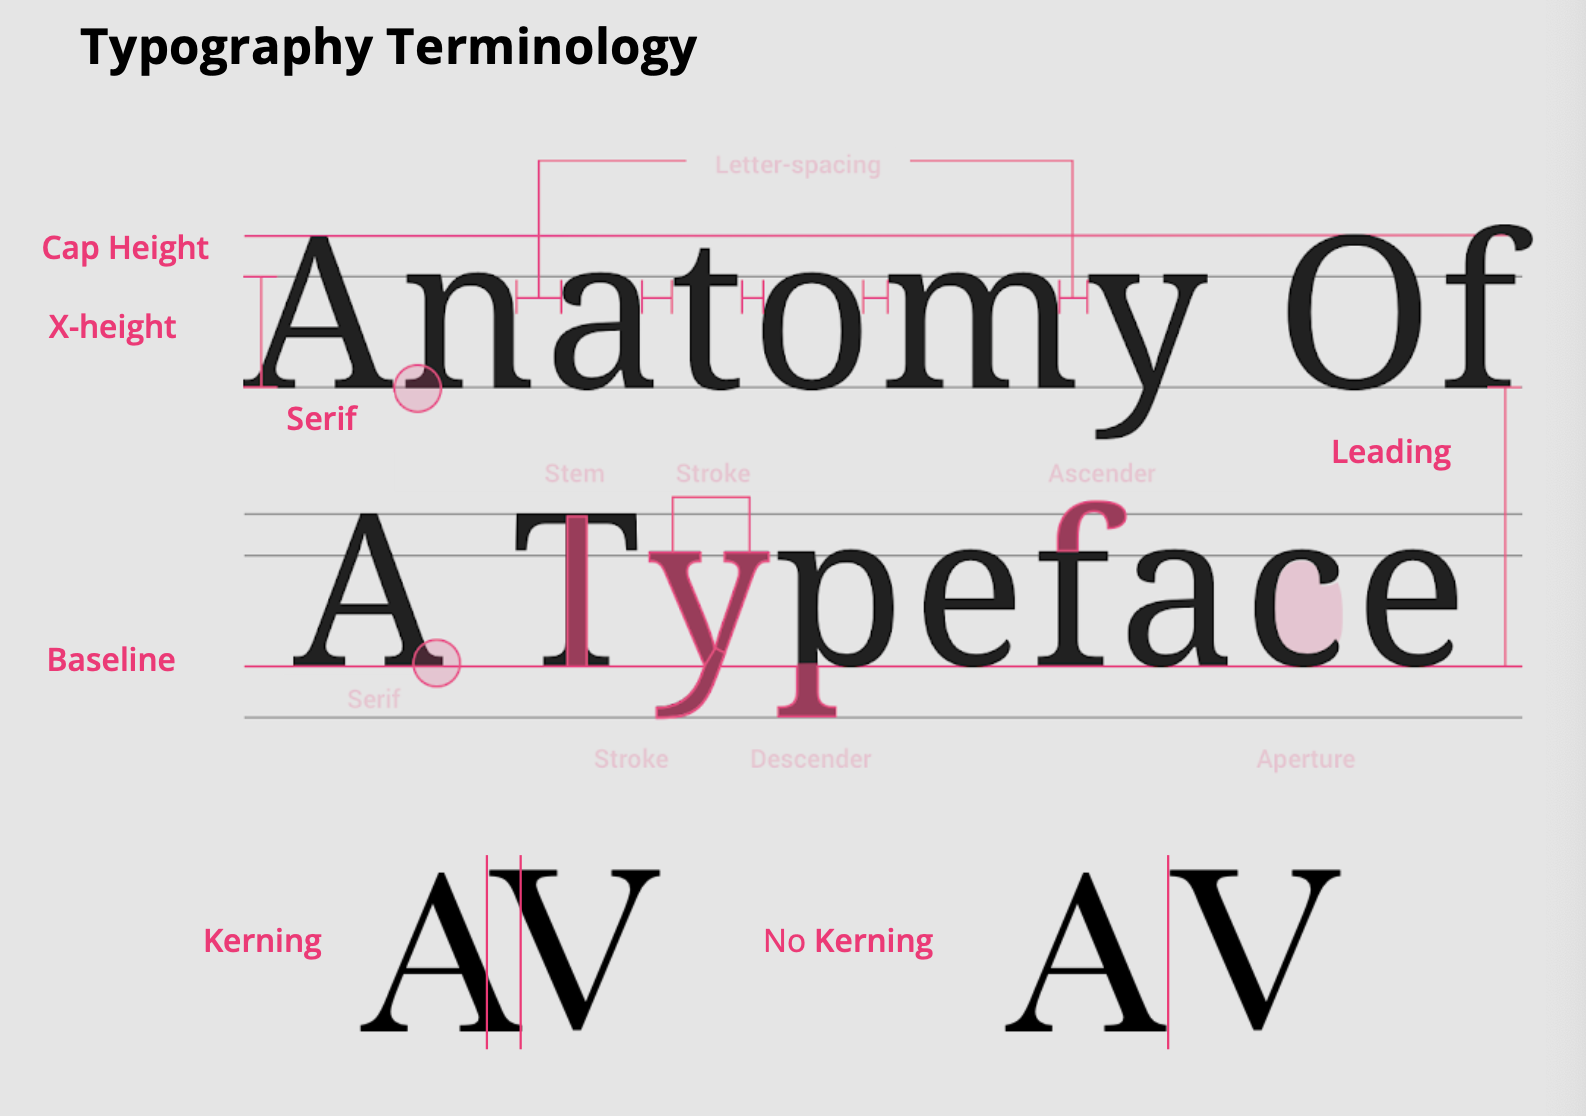
Typeface vs. Font
Typically, what we refer to as a “font” is actually a “typeface”
- e.g. Times, Helvetica, Arial aren’t fonts, they’re typefaces.
Typeface Styles
- Four main classes of typeface styles:
- sherif, sans serif, display, script
- They suggest different moods and feeling
- Some are more readable than others
Choosing Typefaces
- Prefer standard, simple typefaces
- Sans-serif are most readable and work best on digital platforms
- Serif can be effective for headings and feels classic and stable
- Use typefaces designed for digital from reputable sources
- e.g. Google Fonts, Adobe Fonts
- In general, avoid display and script typefaces
Font Anatomy
- Weight (e.g. bold)
- Emphasis (e.g. italic
- Point: 0.351mm = 1/72” (mostly)
- original Mac was 72 DPI
Typographic System
- Define hierarchical names - e.g. footer, body, caption, subheading, heading, title, hero
- Use size, weight, and emphasis to create visual hierarchy
- 7 different scales is often enough: e.g. 14, 16, 18, 24, 32, 48, 72
- Use all caps sparingly for headings
Leading and Paragraph Spacing
- Leading is space between lines
- Increase leading to emphasize lines in paragraphs
- try 140% to 180%
- Add space between paragraphs rather than indent first line
Alignment
- Use left alignment for text in paragraphs
- Use left or centre alignment for text in headings
- Use centre alignment for buttons and similar interface controls
- Never use fully justified text
- harder to read, creates unintentional “rivers” which looks bad
Demo: typography
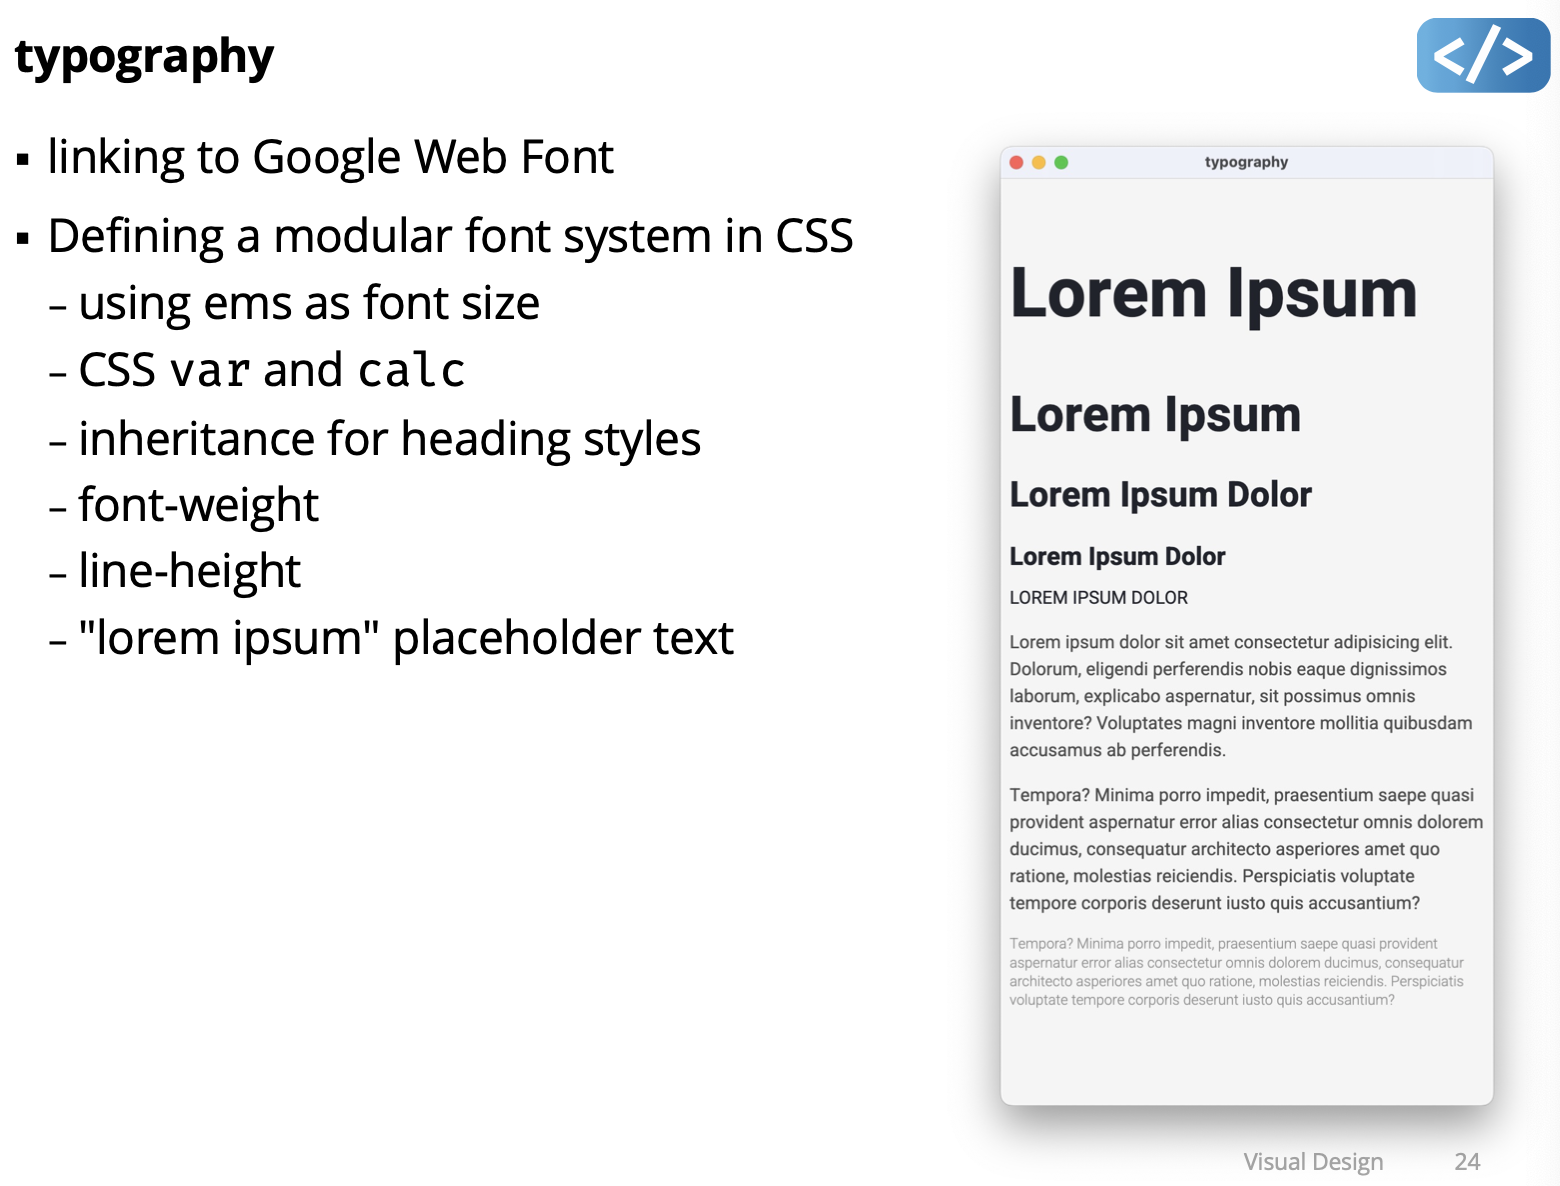
Typography Rules of Thumb
- Avoid using display typefaces (especially avoid comic sans )
- Avoid using more than 2 typefaces in a design (1 is often best)
- Avoid using more than 3 weights (avoid Black and Ultralight weights)
- Avoid underlining unless it’s a hyperlink (use bold and italics for emphasis)
- Avoid fully justified text
Layout
- Layout is the structure that organizes visual elements in an interface.
- It creates visual paths, connections, and gaps to group, rank, and make sense of information and interactive elements.
- e.g. structure content to highlight what is most important, what order it to read, what can be done with interactive elements, etc.
- It implicitly supports the brand message and value proposition:
- reliable, organized, professional, edgy, fast, calm, different, etc.
- Layout function is invisible to user, but relevant to user experience
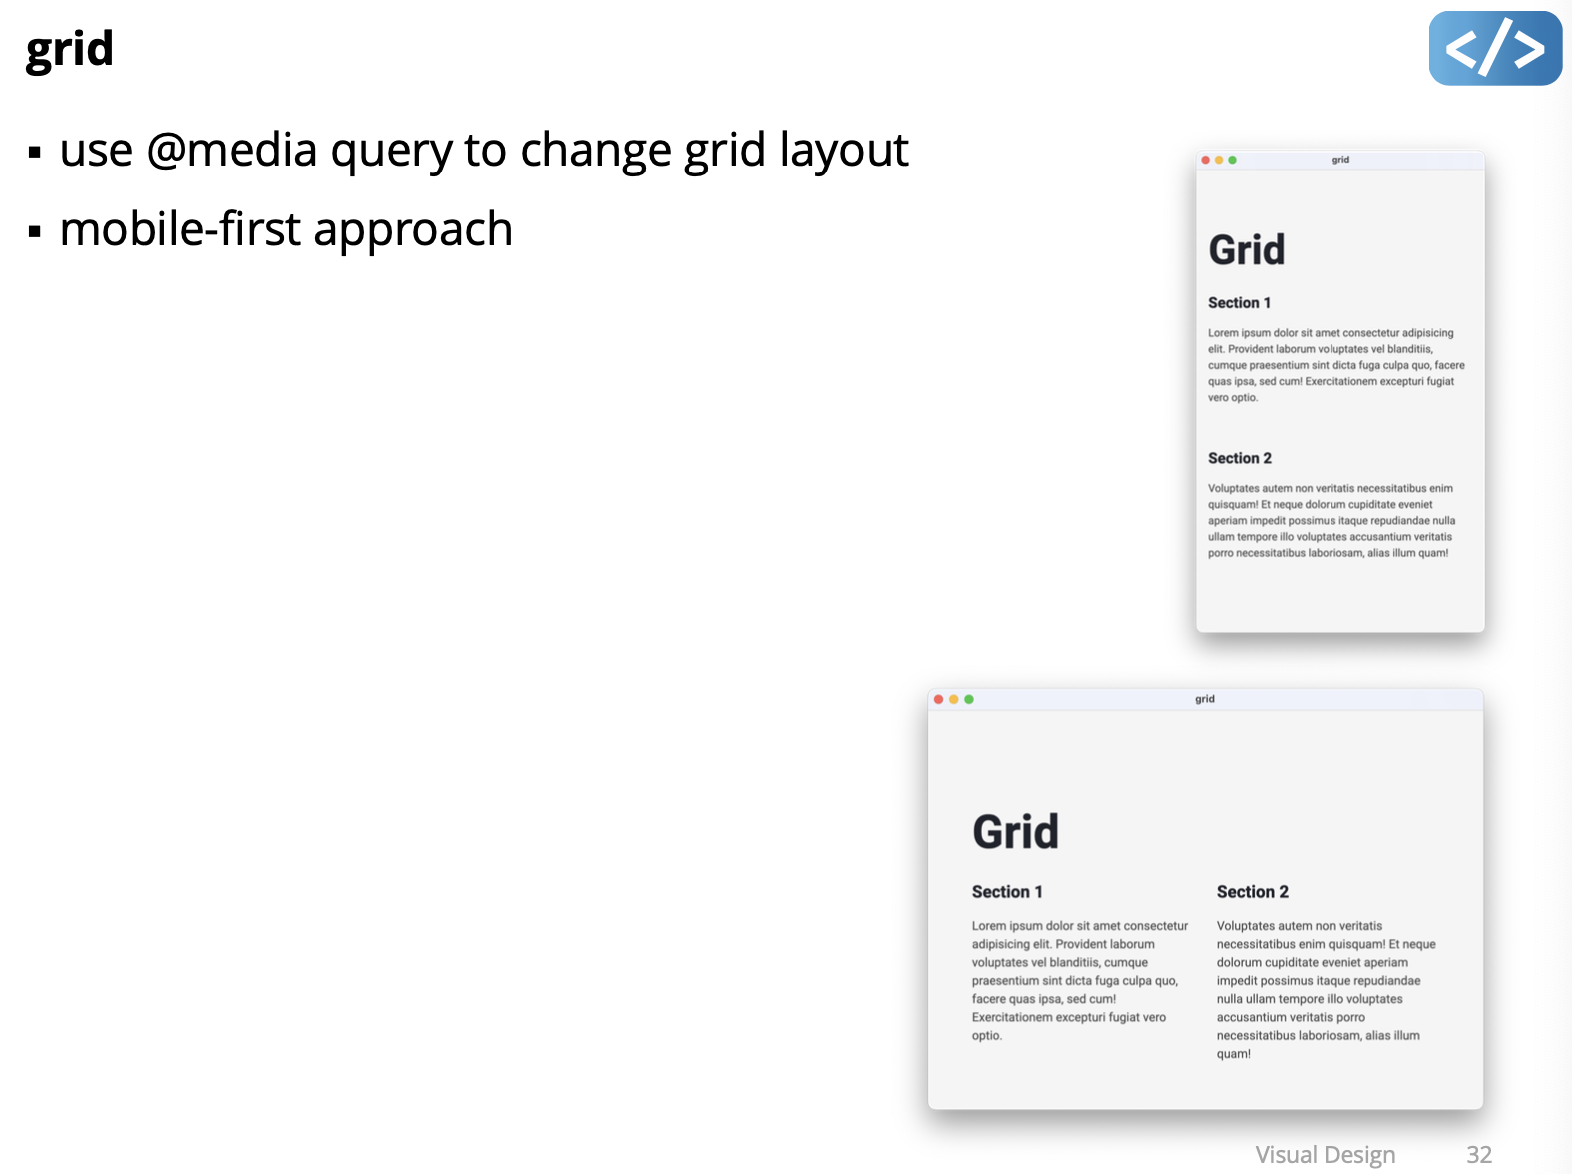
The Grid
- Underlying regularized structure to organize elements in a layout
- Most basic form is vertical columns and gaps (aka “gutters”)
- often 12 columns (because 12 can be divided by 2, 3, 4, … )
- Often includes a “baseline” grid to place text
8-Point “Pixel Grid”
- Use multiples of 8 to define dimensions, padding, and margins
- column and gaps are multiples of 8
- element sizes and spacing are multiples of 8
- even type can be multiples of 8 (though often multiples of 4)
Negative Space
- Negative space is space between content, often referred to as “white space” in reference to print designs on white paper.
- It groups and divides content
- It lets the user’s eye rest
- It doesn’t need to white or even one colour, can be a gradient, background image, texture
(but must not contain content)
- Don’t crowd your design, let it breath
Alignment
- Alignment is when the dominant visual parts of multiple elements form an implied line
- alignment must be done on visual parts of an element, which may not be the same as underlying file or bounding box
- even slight misalignment jumps out
- Using a grid forces good alignment
Demo: grid
Aspect Ratio
- Changing the aspect ratio of an image, illustration, or type changes the balance and perception.
Don't EVER change the aspect ratio of an image, illustration, or type to fit a layout.
Layout Rules of Thumb
- Use an underlying grid to guide your design - you can create grid layouts with flexbox
- Don’t try to use all of the grid
- a 12-column grid doesn’t mean use all permutations of columns
- keep it simple
- It’s ok to “break” the grid for added emphasis
- Use negative space, don’t make your layout too dense
- Good layout uses Gestalt principles
Laws of UX is a collection of best practices that designers can consider when building user interfaces: https://lawsofux.com
Design Systems
A Design System is a systematic approach to product development, complete with guidelines, principles, philosophies, and code.
Many (Many) Design Systems Available
- Material Design (Google)
- Carbon Design System (IBM)
- Atlassian Design System (Atlassian)
- Polaris (Shopify)
- Global Experience Language (BBC)
- Spectrum (Adobe)
- Goldman Sachs Design System (Goldman Sachs)
- Backpack
- Garden (Zendesk)
- Momentum Design (Cisco) Oxygen (Repsol)
- Lightning Design System (Salesforce)
- Lexicon (Liferay)
- Predix Design System (GE) (Skyscanner)
Bootstrap: https://getbootstrap.com/
Free and Open Source CSS framework directed at responsive, mobile-first front-end web development.
- Design templates
- typography, forms
- UI Components
- buttons, navigation, and other interface components
https://getbootstrap.com/docs/5.3/getting-started/introduction/
Demo: bootstrap
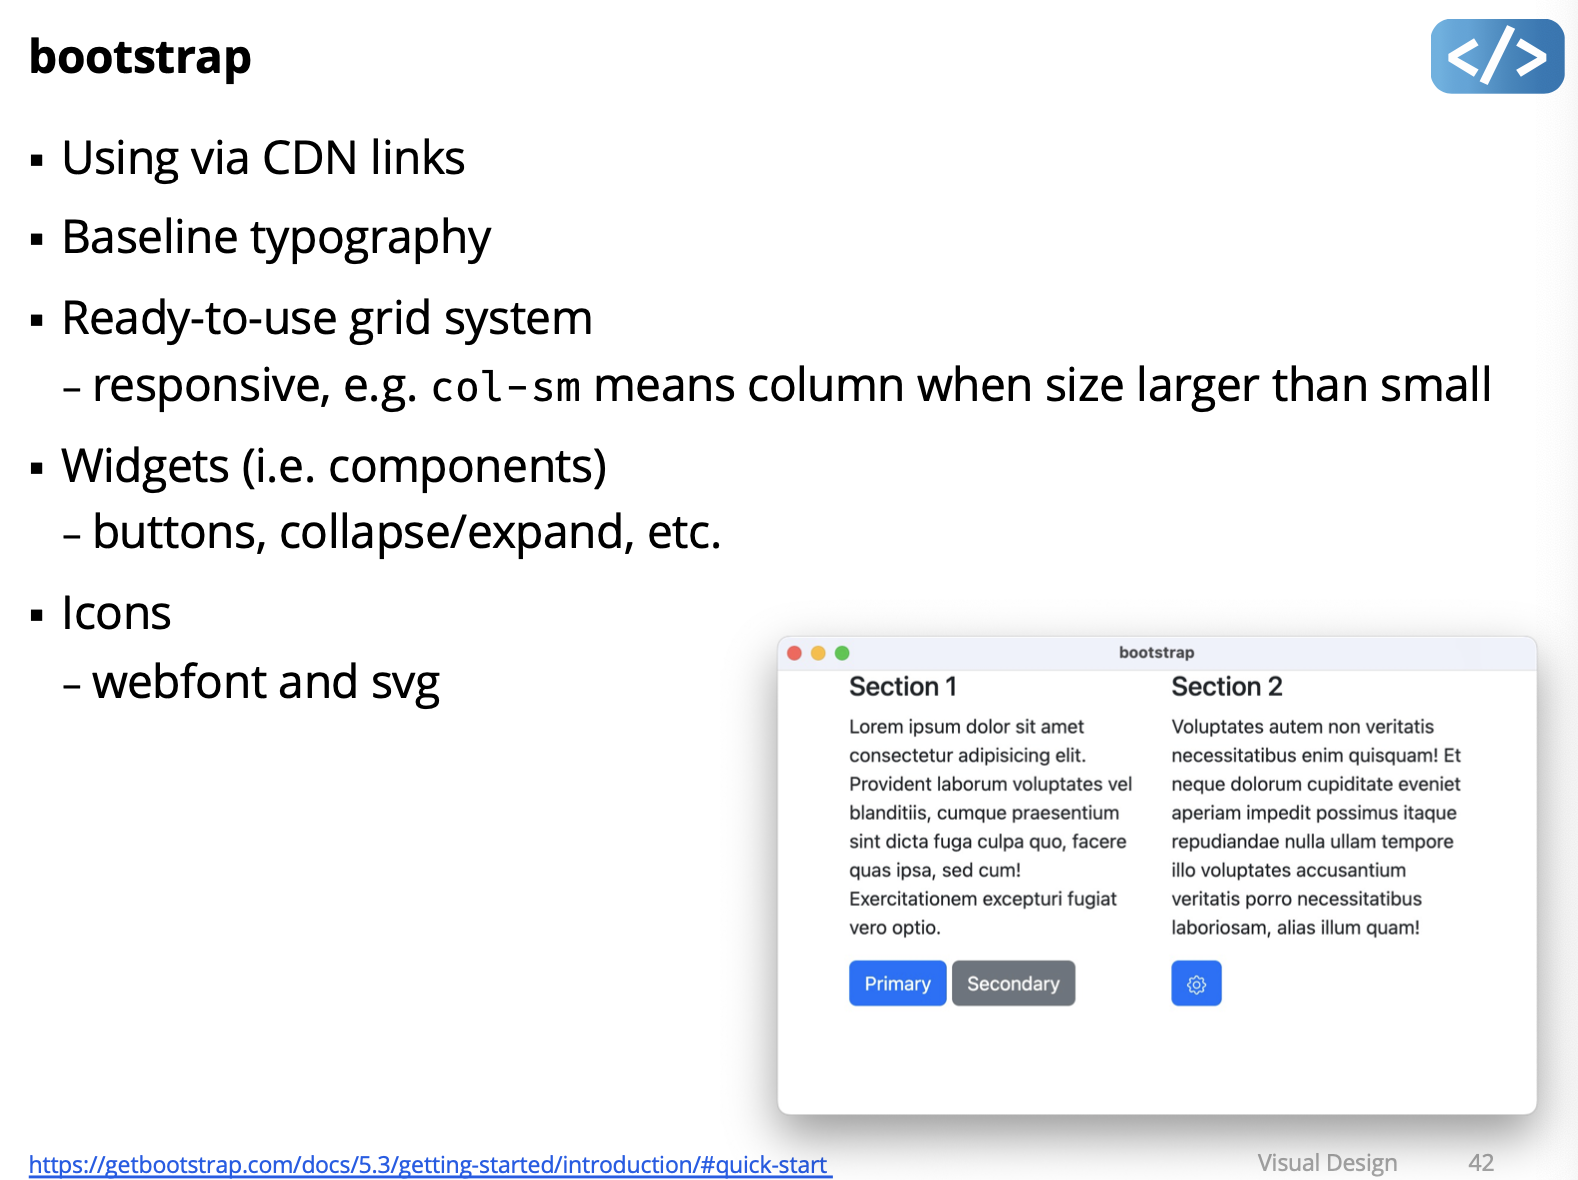
https://getbootstrap.com/docs/5.3/getting-started/introduction/#quick-start
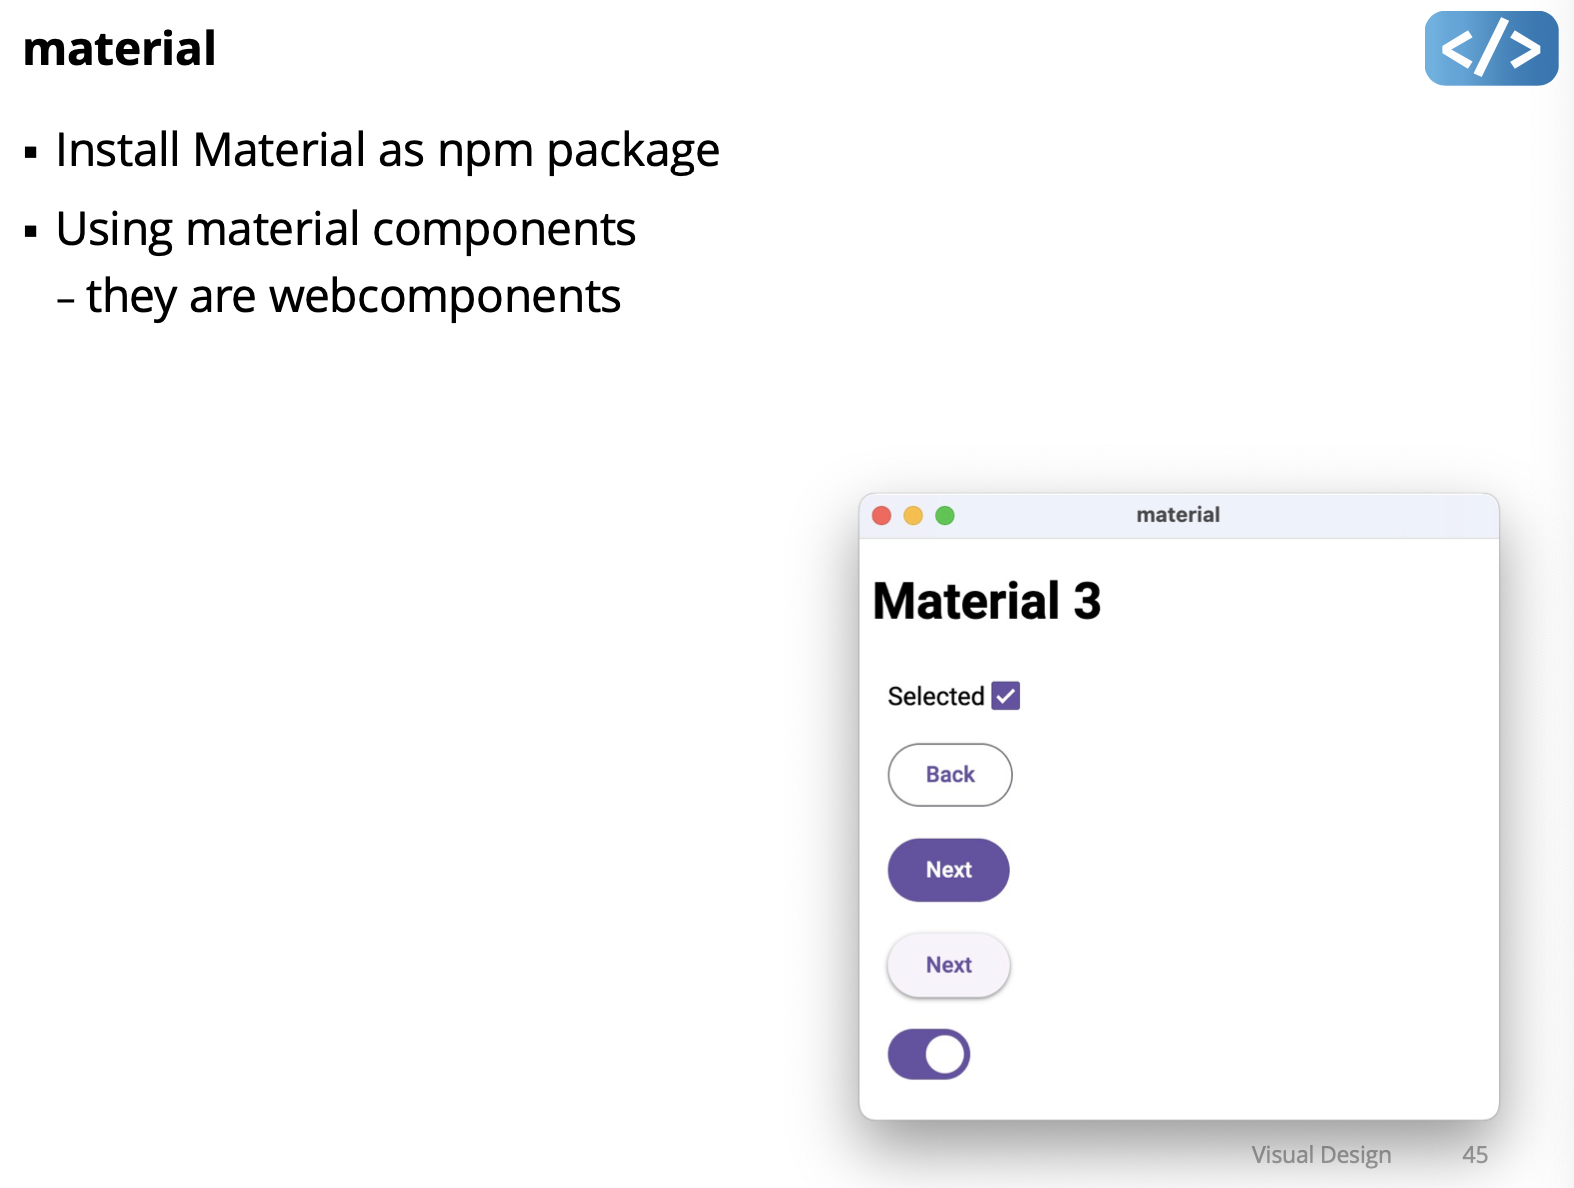
Material Design:
- https://m3.material.io/
- Google open-source design system
- Web, Android, Flutter, …
- UI Components
- buttons, navigation, form input, containers, …
- UX Guidance
- colour, icons, motion, typography - accessibility, adaptive design
Material Design Web
Demo: material
Mon Mar 4 2024
Lecture 13 - Undo
Demo: forward
Note
Every time you perform an action that changes the state of the model (such as setting the count, incrementing, decrementing, etc.), a corresponding command is created and added to the undo stack. These commands represent the actions you’ve taken.
The
computeState()method doesn’t save every state in a list. Instead, it dynamically computes the current state of the model by applying each command’sdo()method to the base state. This computation happens on-the-fly whenever you need to retrieve the current state, such as when you callget count().So, instead of storing every state explicitly, the system stores the commands that led to the current state. This approach is memory-efficient because it doesn’t store redundant states. It also allows for efficient undo and redo operations, as the system can easily apply or reverse individual commands as needed.
- I don’t understand the function before execute??? in the forward demo in the undoManager()
- Only model deals with UndoManager and the UndoManager knows a lot about the model
Reverse Undo
-
Notion of base anymore
-
Starts at 0, current state of model is 4 with 4 increment. State of the model is 4. Calculation is done when you increment.
-
When you do undo it puts the increment in the redo stack and they are all +1, the increment in the undo stack is all -1
-
Always calculate what the current value is
Reverse Undo
From my understanding, so in this reverse undo implementation, instead of directly computing the current state from a base state and a series of commands, the current state is computed from the previous state combined with the effects of the “do” command.
Command in “undo.ts” in demo:
- the do and undo commands are actually done in the model (JavaScript thing). Even if its implemented in the UndoManager???
undo()can just call command.undo() → changed in the modelredo()same thing command.do()- increment function in model
- added the definition of Command: this.undoManager.execute({}): it has do and undo function that calls the model’s function
- const oldValue = this.count; saves the old value
The implementation of reverse undo:
- The
UndoManagerclass maintains two stacks:undoStackandredoStack, which store instances of theCommandinterface. - When a command is executed, it is added to the
undoStack, and theredoStackis cleared. - The
undo()method pops a command from theundoStack, executes itsundo()method to revert the action, and then adds the command to theredoStack. - Similarly, the
redo()method pops a command from theredoStack, executes itsdo()method to redo the action, and then adds the command to theundoStack. - The
Modelclass utilizes theUndoManagerto manage undo and redo operations for the model’s state changes. - Each mutation method in the
Modelclass (e.g.,count,increment,decrement) creates a command that encapsulates both the action and its reversal, which are then executed by theUndoManager.
Need to go back and fully understand by looking at the code.
this.range.input
so if you are unsure and keep dragging, it would still register those as input. And so when you want to undo, it undo’s every single little movement. Just comment that section out.
todo demo:
- UndoManager is the exactly same as before
- Secret in
export interface Command{} - for create,
- undo he just undo the last task in undo(), used slice command, take the whole array except from last one element.
- Only thing he changed, he had
this.todos=[..., {id:uniqueId++, text:task,donefalse}, then he removeduniqueId++that way he only have ONE id: for create undo - Use map to find the todo and undo it
- Delete
-
Need to capture two things
-
Remember where is the index you’ve deleted it. Save the deletedTodo as or Editing and the deletedTodoIndex
-
Then reconstructed at the right location using slice(0, deletedTodoIndex)
-
Need to know a little bit about generic (something about the final exam??) Memento: complete saved state
Todo adapts it to MVC model:
- View Updates: Add Undo and Redo buttons to the view. These buttons will trigger the undo and redo actions respectively.
- Model Updates:
- Integrate an
UndoManagerinto the model to handle undo and redo operations. - Modify the model methods responsible for mutating todo list data to include both
doandundocommands. These commands should encapsulate the changes made to the todo list items, allowing for easy reversal. - For the
updatemethod, capture the original state before the update to facilitate undo functionality. - For the
deletemethod, capture both the state of the deleted item and its index. When redoing, insert the deleted item back into the todo list at the same position.
- Integrate an
- Controller Updates: The controller remains largely unchanged, as it primarily acts as an intermediary between the view and the model. However, you may need to update event handlers to trigger undo and redo actions based on user interactions with the view.
By implementing these changes, you’ll enable undo and redo functionality for your todo list application while adhering to the MVC architecture.
memento demo:
-
saving the entire state
-
undo.ts:Memento<State>, it can have any state? Whatever you put in state, that’s the type of the state.- when you create your memento
ths.undoMemento.execute()as MenmentoState? - constructor , memento needs a initial base state\
- look at
model.ts
- when you create your memento
-
And watch TypeScript Generics video!!
Wed Mar 6 2024
Lecture 14 - Asynchronous
We can make a UI responsive in two ways:
- Designing to meet human expectations and perceptions (mostly about this in this lecture)
- Loading data efficiently so it’s available quickly (don’t make it too slow)
What factors affect responsiveness?
Responsiveness is the most important factor in determining user satisfaction, more so than ease of learning or ease of use.
Responsiveness is not just system performance.
It’s find to have slow performance, but make sure to tell the user, so they can go do something else for instance.
Watch video: https://www.youtube.com/watch?v=bGYgFYG2Ccw
Design Implications
- Visual-motor reaction time to an observed event:
- Display busy/progress indicators for operations more than 1s
- Present a “skeleton screen” ..
Skeleton Screens
- Load a minimal version of an interface while the real one loads
- Can be generic layout or minimal version of actual content
- E.g, think of linkedin
- Advantages:
- User adjusts to a layout they’ll eventually see
- Loading process seems faster because there is an initial result
Progress Indicator Design Best Practices
- Show work remaining, not work completed
- Show total progress when multiple steps, not only step progress
- Display finished state (e.g. 100%) very briefly at the end
- Show smooth progress, not erratic bursts
- Use human precision, not computer precision (Bad: “243.5 seconds remaining”, God: “about 4 minutes”)
Responsiveness by Progressive Loading
- Provide user with some data while loading rest of data
- Examples
- word processor shows first page as soon as document opens
- search function displays some items as soon as it finds them
- webpage displays low resolution images, then higher resolution
Responsiveness by Predicting Next Operation
- Use periods of low load to pre-compute responses to high probability requests. Speeds up subsequent responses.
- Examples
- chrome got in trouble for this, they would just fetch some places that you might go after, before the user even going
- text search function looks for next occurrence of the target word while user looks at the current
- web browser pre-downloads linked pages (“pre-fetch”)
Responsiveness by Graceful Degradation of Feedback
- Simplify feedback for high-computation
- Examples:
- window manager updates window rendering after drag
- graphics editor only draws object outlines during manipulation
- CAD package reduces render quality when panning or zooming
Handling Long Tasks in a User Interface
- Goals
- keep UI responsive
- provide progress feedback
- (ideally) allow long task to be paused or canceled
Long Tasks that can be Scheduled
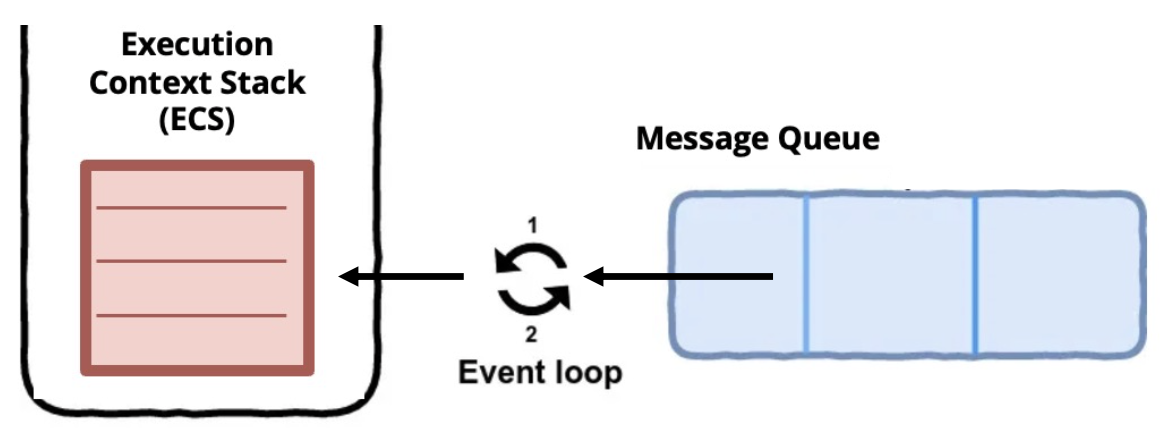
JavaScript Runtime Environment
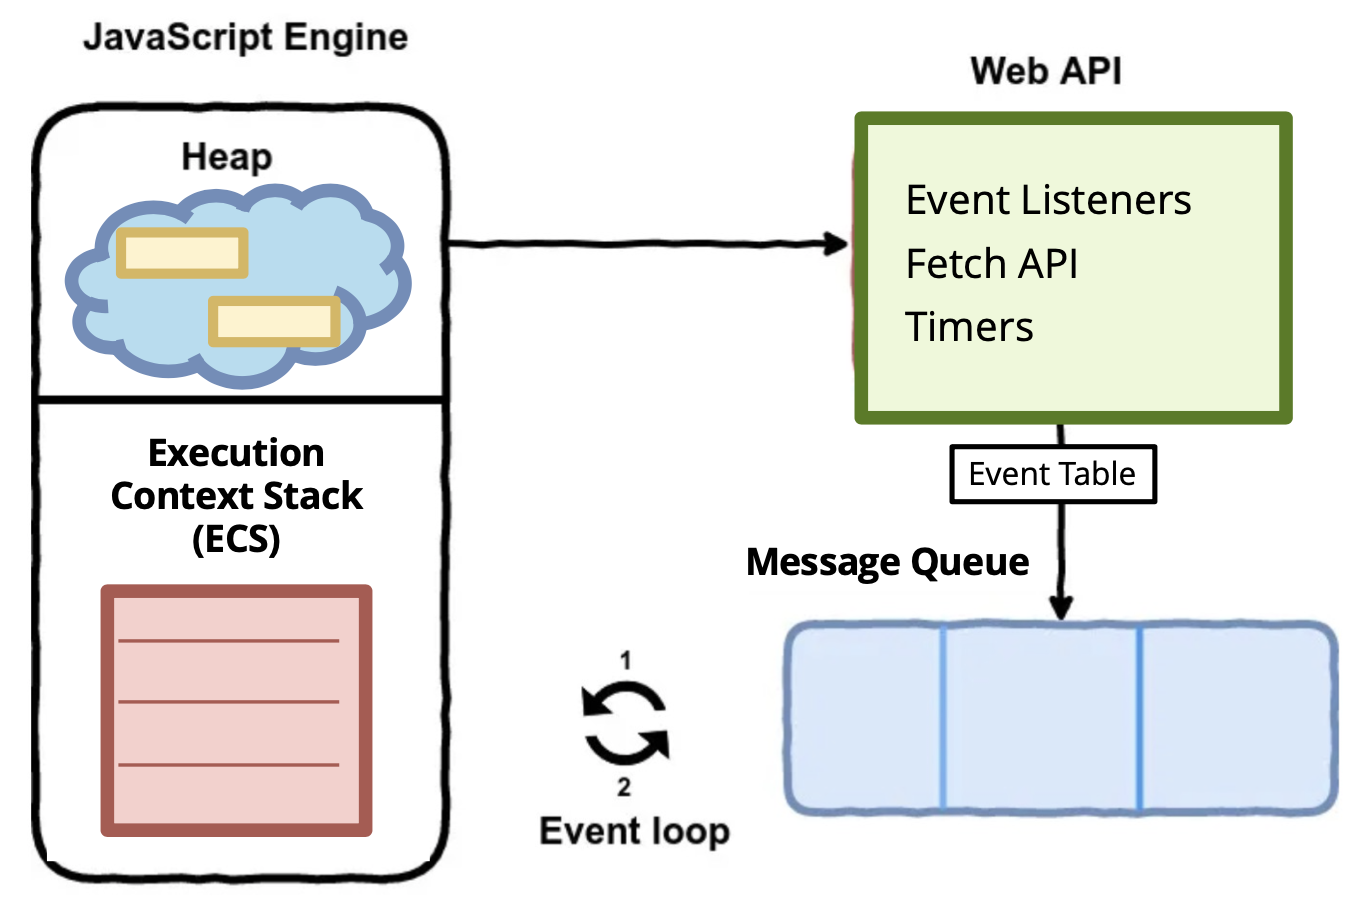
- Engine: Execute code
- Web API: makes your webpage work, where the asynchronous happens
- Apparently callback happens in the exectution context stack (ECS)?
JavaScript Engine:
- Execution context stack (ECS): code to execute next
- Heap: function definitions, objects, etc.
How does eventlistener gets called???
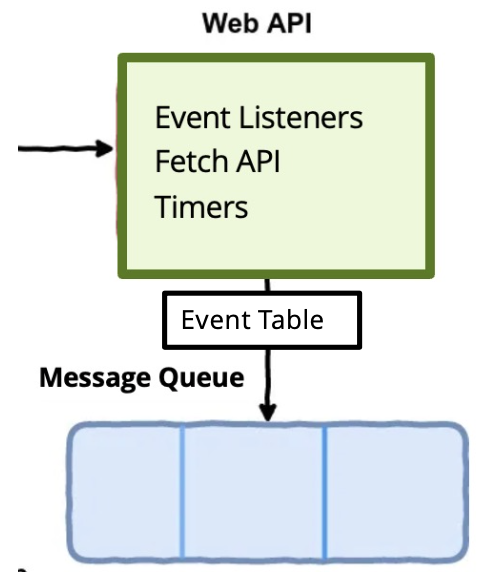
Web API
- DOM API
- Fetch API
- Timer Functions
Message Queue:
- Some API
- Event Table: same thing as the binding table in simplekit
- When event occurs, the method is put into the Message Queue
Event Loop
- To execute an asynchronous method, it must be moved to ECS
- AN even loop continually checks if ECS is empty
- If empty, then it moves from message queue to ECS
- Then JavaScript Engine can execute the asynchronous method
Callbacks
- Input events are asynchronous methods
- We handle them as callbacks bound to a DOM element
Fetch API
- Can cause callback hell, one asynchronous call in another callback and so on
- An interface for fetching resources across the network
fetch()function- starts the process of fetching a resource from the network
- Returns a “Promise” object with three states:
- Pending , when fetch process is happening
- Resolved, when the process was successful and there’s a valid response
- Rejected, when the process failed and there’s an error
Demo: fetch
- promises are of type response (typescript generic!)
- Uses something called chaining (javascript thenable chaining)
- Method called then() gets called when we get a response back
- response.json is another promise??
fetch1()function is special, notice you call and exit the fetch function, and it is no longer on the ECS, it sits in the WebAPI?, stored in the Event Table, it gets triggered when the promises are fulfilled- When prof uses
fetch2()instead offetch1(), the fetch2 ends after the promises…- he uses the keyword called
await(), a decorator, it doesn’t block, but just like promises, it puts it on the WebAPI and Event Table done with the stack, if you are done, let me know, i’ll execute the code. Doesn’t block, just await, stops. So, when we call fetch2 in the callback, and it hits await, it just return, therefore we see that we have exited the callback function. But it still sits in the special Web API and Event Table and acts like a promise.
- he uses the keyword called
- Difference: the first fetch, just skips through everything and exits. It assumes that you can’t do anything without hearing back about the promise
- So with async and await, we won’t get this callback hell happening!
Even with promises, mark those function with keyword async!
Demo: worker
- to create another thread, we can just create another worker (manage them)
Kinda stopped listening because they’ve released the CS341 midterm marks…
Mon March 11 2024
Lecture 15 - Declarative (Preact 1)
Slowly moving to functional Prect, how it works.
Imperative vs. Declarative
- Imperative Programming
- describe how to achieve a result
- Declarative Programming
- describe what result you want
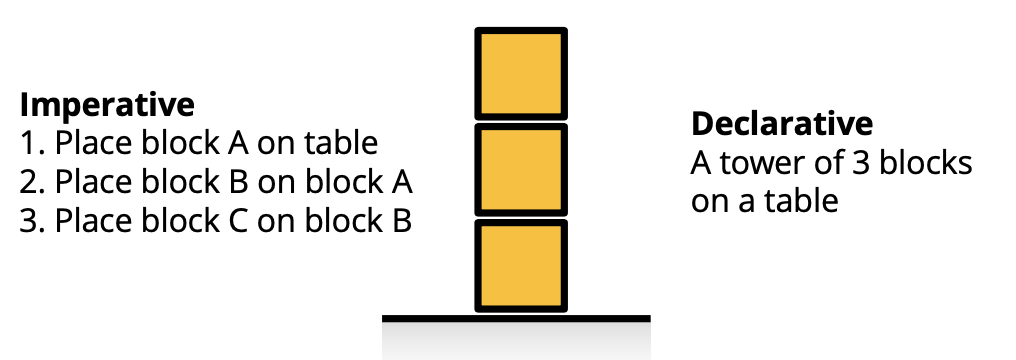
Imperative and Declarative UI
Setup for Next Demos
- State is just a boolean called clicked and change the state. Every time it changes state they update
- He’s not using a mvc model to keep it simple
Declarative-html
- declarative-html has a html button on click that you can set to a javascript function
- hard in html to have pure imperative, as soon we want to make it dynamic, it’s more difficult
- Alpine library: solves the problem of static html and can build dynamic simple html apps
Declarative-string
- we’ve added the declarative in main.ts using click state in html
- the Clicked is declarative (how it is rendered)
- html here is just a string formatter coming from
import html from "html-template-tag"; - but then we have imperative listener code
Declarative-htm
- html here is different, it is a function??, it’s coming from
"htm/preact"- creates DOM and eventListeners for you
- the render functin is special, App component. How does it work?
Declarative Syntax: HyperScript
- HyperScript is a language to generate descriptions of UI trees
- h same as create element in react
- takes name of the tag element, object describing its object and arguments, and array of children translator to HyperScript then it is easier to render imperative UI
Declarative-h
- same things as htm but using
h - lower level description of UI, recursive.
Virtual DOM
- Hyperscript function calls create a representation of UI tree
- It’s a JavaScript object
- Commonly referred to as a virtual DOM (or just “vdom”)
NOT actual DOM
JS object script of UI generated by HyperScript functions.
Take declarative syntax and actually create UI using imperative method
- Used for two purposes:
- “Render” an actual DOM using imperative methods explained next
- Lightweight abstraction of DOM to compare changes
Consult this: https://github.com/zserge/o for minimal example of a reactive UI library
Render hyperscript virtual node to a DOM element
- render function goals
- convert in html dom
- figure out what changed and don’t need to replace whole DOM
Render hyperscript with event attribute
onClick: html syntax- set attributes to elements
Note
- h: declarative way to create those virtual nodes, have those big JS objects, put through rendering function, use imperative elements and go through he tree to create it recursively
- you only need to deal with declarative syntax
Demo: render-dom
- look at code
Rendering HTM (HyperScript Tagged Templates)
- It’s like writing machine code.
- We don’t want that
- HTM is just “syntactic sugar” for hyperscript § HTM declarative syntax:
- html
<p style="color: red;">Example B</p>;
- html
- Equivalent hyperscript:
- h(“p”, { style: “color: red;” }, “Example B”);
render-dom(htm examples)
- main1-htm.ts, html doesn’t return a string
- strings : fields in between the dollar sign
- main2.-htm.ts
- in vdom.js: it’s basically parsing that string (think of compiler tokenization and parsing) inside this htm tag!!!
- own converter from htm to hyperscript
Preact and JSX
Library
Framework
Toolkit
Tool
Software to perform a specific task
- e.g. Vite
How react was created: https://youtu.be/gmp0istg5xo
How JSX Works JSX: syntaxic sugar for hyperscript
- JSX is compiled into hyperscript
- Try pasting JSX into this bable repl https://babeljs.io/repl#
- hyperscript is used to render
- h function to create a Virtual DOM object
- render function to create DOM from Virtual DOM
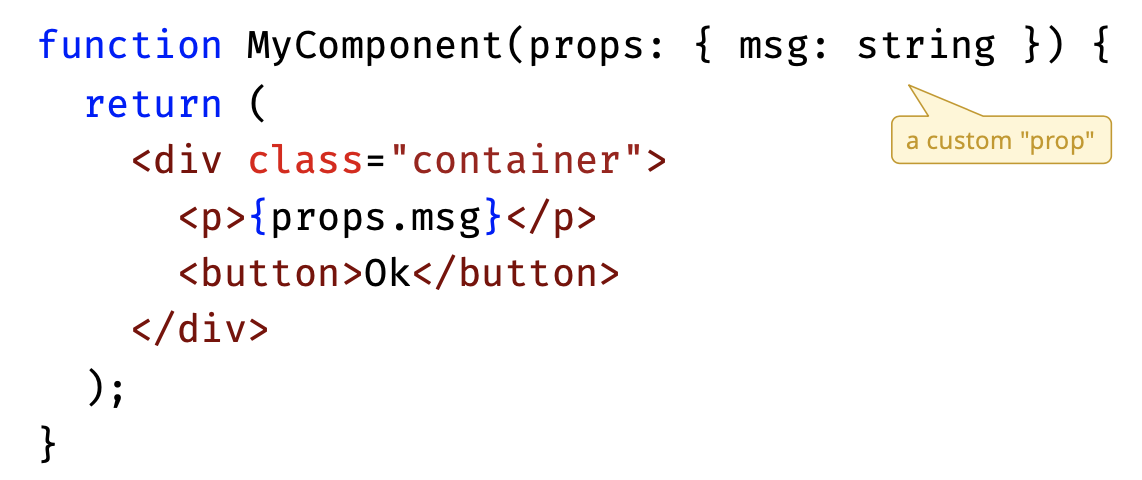
Preact Components
- Components are the building blocks of a Preact application
- Components have custom properties (i.e. “props”)
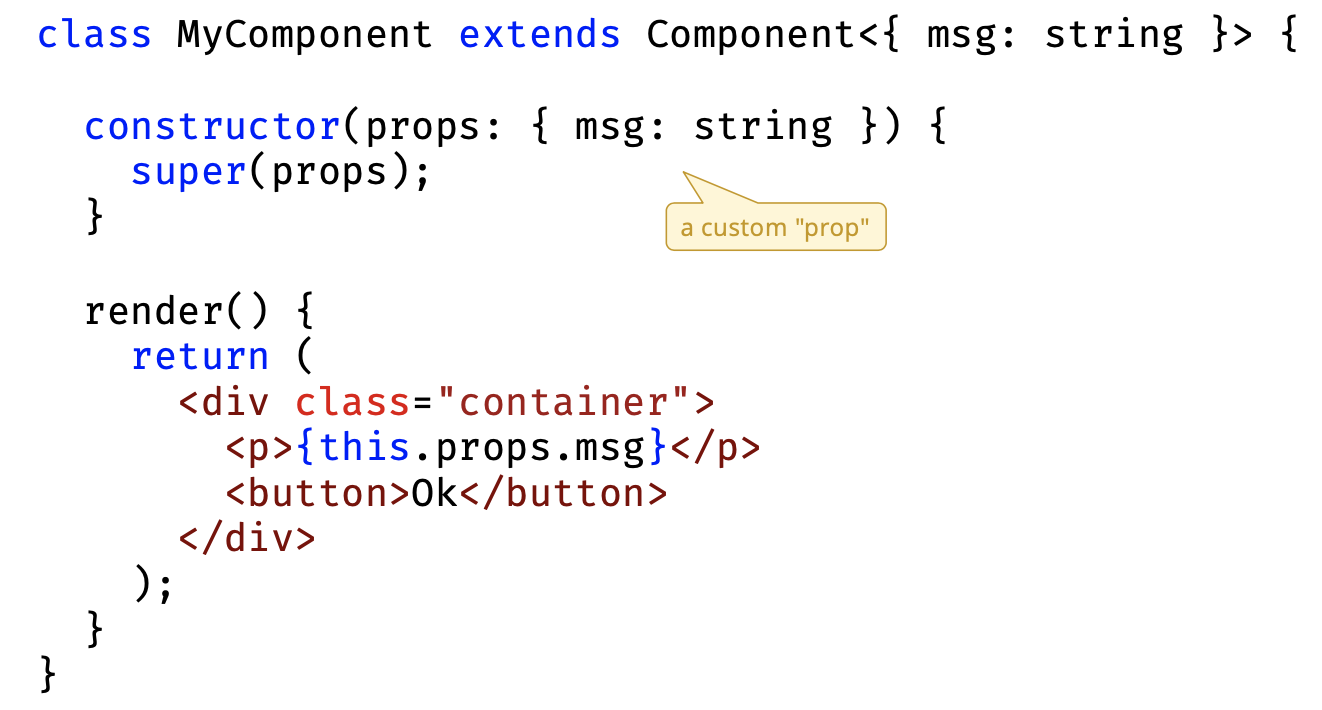
- Example using a custom component:
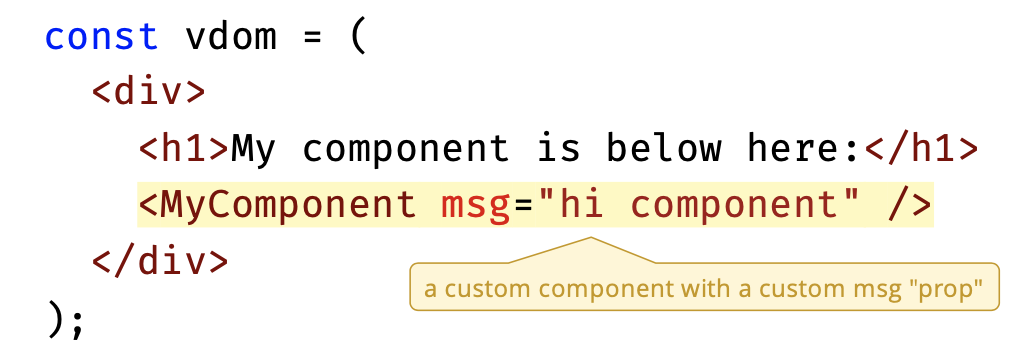
MyComponent later calls its own function to create its own JSX.
Functional Components:
- Functions are the most common way to create components:
Class Components
- Components can also be defined as classes
- method is no longer common, functional components are better
Component Children
- Components can be nested like HTML elements
- Components can have HTML or Component nodes as children
- This enables control over how Virtual DOM elements nested within a component should be rendered
- The Array of children is a special implicit prop
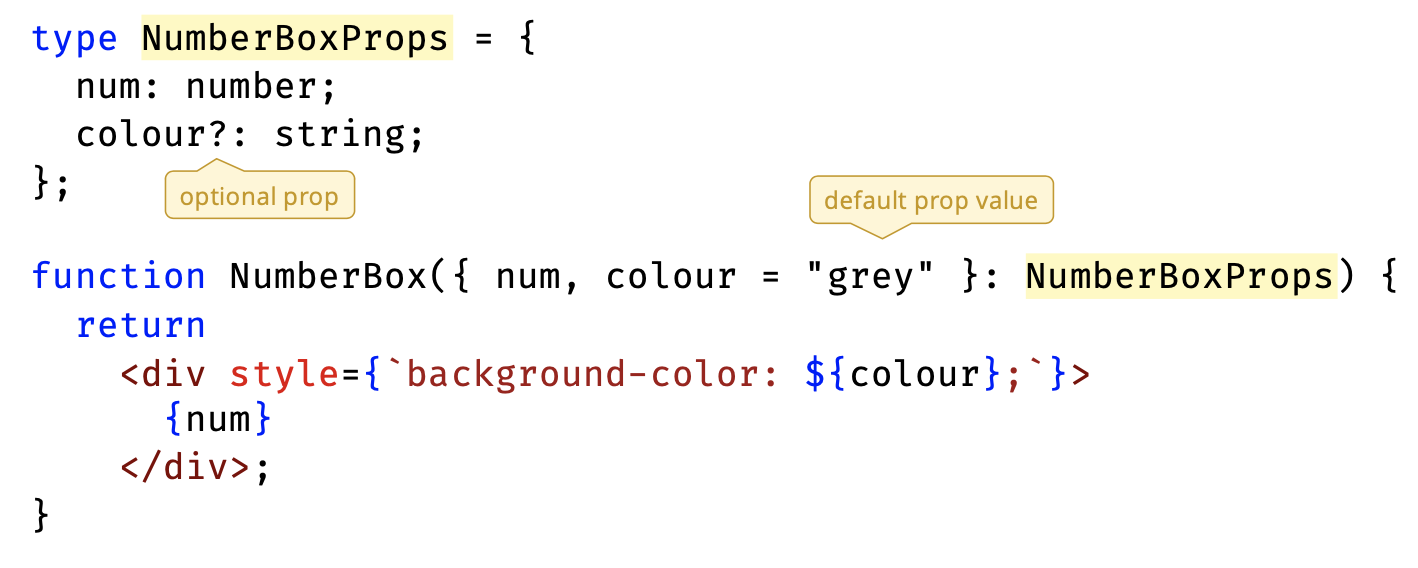
Props Type Definitions
- TypeScript requires type definition for Component props
- Best practice is to define a MyComponentProps type
- can have optional props
- A little bit like views??
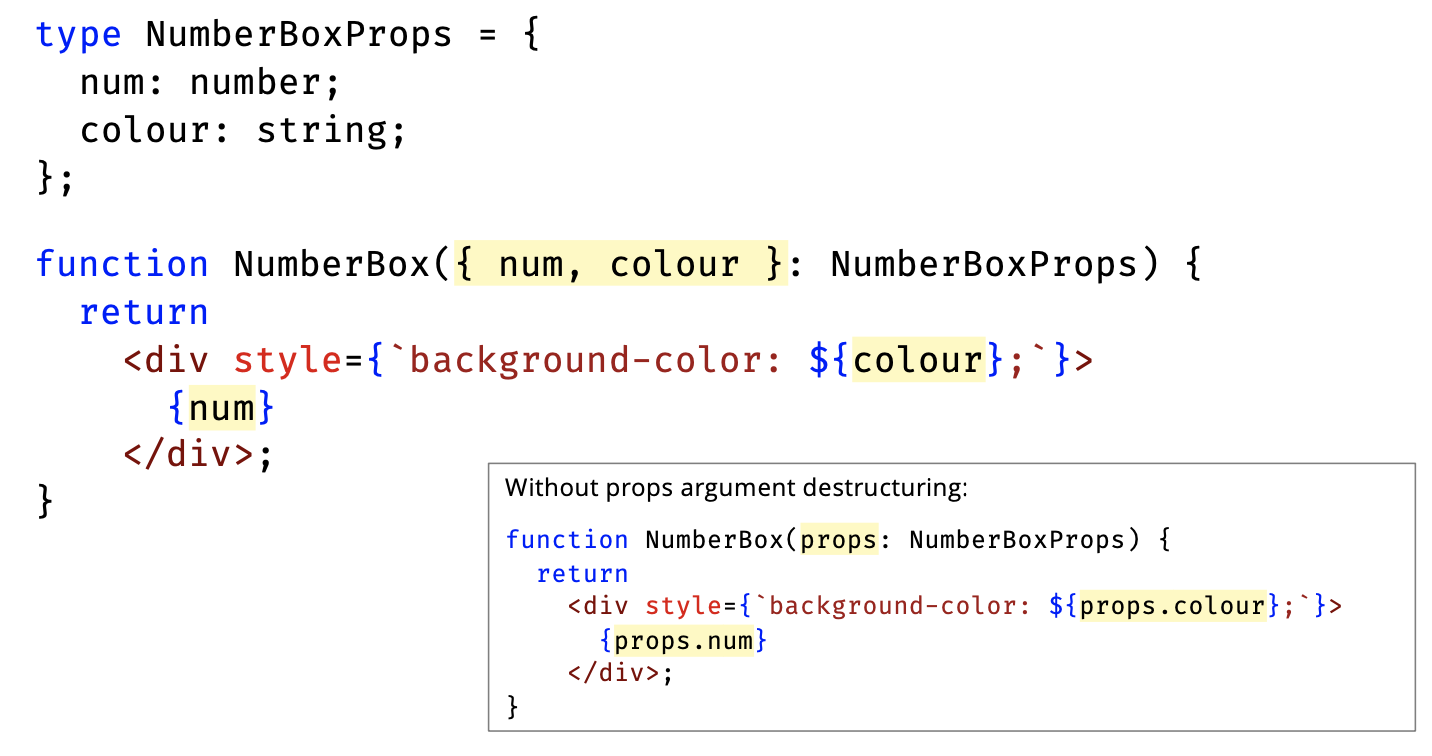
Props Destructuring
- Avoid props.myprop syntax by destructuring props argument
- makes it easier to assign default props values
These are fancy ways to create JSX.
Now, how do we create events??
Defining Events in Components
- Preact uses standard DOM events with declarative syntax
- If event handler is small, include function definition inline:
const jsx = <button onClick={() => console.log("click")}> Click

</button>- If event handler is more complex, then call handler function:
function handleClick() {
	console.log("click");
}
const jsx = <button onClick={handleClick}>Click</button>- Event handlers can be passed as props to components
JSX Must Evaluate to an Expression
- An expression is a valid unit of code that resolves to a value
- JSX is an expression, and everything in JSX must be an expression
- to insert a JavaScript expression into JSX, use
{ }
- to insert a JavaScript expression into JSX, use
You can’t just put a for loop
Approaches
- Shove a string template literal in {} in the JSX
- Option 2: Using hyperscript object
- {} inner brackets
- outer brackets are different? Didn’t catch it
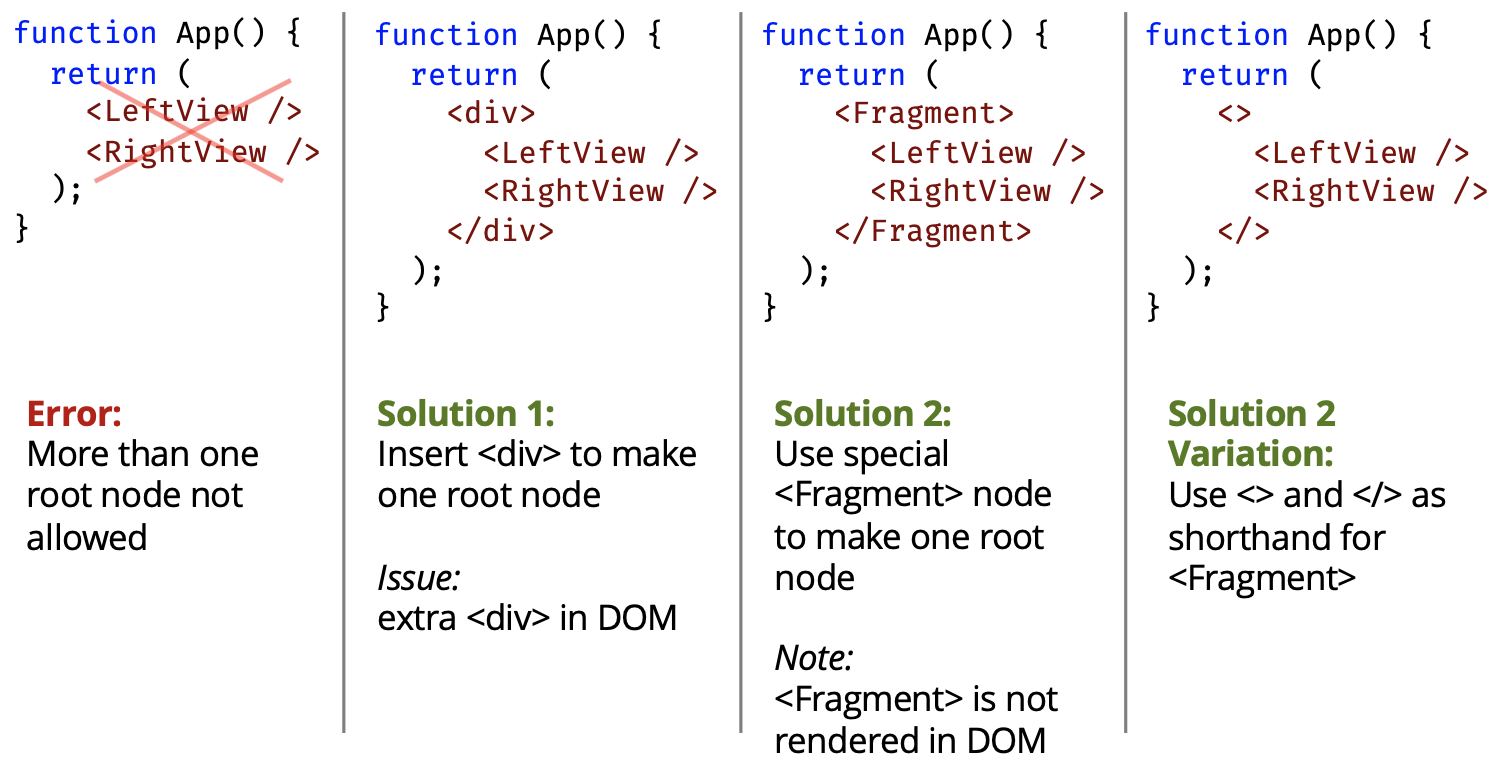
Components Must Return One Root Node
- If you don’t naturally have a single root node, best approach is to wrap component nodes in
<Fragment>node
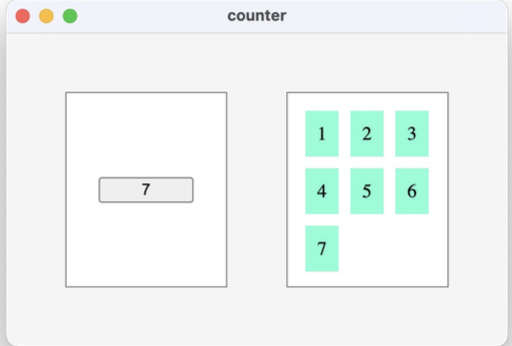
Demo: count
- Counter example from MVC and HTML-CSS as Preact components
- Very simple global state forces re-render each time it changes
- passes count as prop
- proper state management and styling covered in next lectures
- Demos
- getting ref to app div
- App fragment usage
- LeftView onClick event and count prop - NumberBox (in RightView)
- NumberBox style expression
- RightView iteration methods
- RightView optional colour prop
- Some “prop drilling” to set colour
Wed Mar 13, 2024
Prof showing the demo:
- Left view is simple
- Right view has a NumberBox component. To allow flexibility
- Second part of the demo: he shows it with function loop (doing it iteratively). But without using it is much cleaner and easier to understand.
...Array(count): trick to initialize an array from 0 up to a number we want.- Notice they are all functions, he is not doing anything with hooks, just simple function that returns JSX.
- Preact prat is in main.tsx. Render function renders LefView and RightView (i think)
Lecture 17 - Reactive
Reactivity
- Reactivity can be broadly defined as the automatic update of the UI due to a change in the application’s state
- As a developer, you can focus on the state of the application and let the framework reflect that state in the user interface
Watch the video on How Does Reactivity Actually Work?
Virtual DOM (VDOM) Reconciliation
- The VDOM is a lightweight representation of the UI in memory
- The VDOM is synchronized with the “real” DOM as follows:
- Save current VDOM
- Components and/or application state updates the VDOM
- A re-render is triggered by framework
- Compare VDOM before update with VDOM after update
- Reconcile the difference identifying a set of DOM patches
- Perform patch operations on real DOM
- Back to step 1
He is simplifying things here.
Node Difference Reconciliation Operations
-
If the node type changes, the whole subtree is rebuilt
-
If node type is the same, attributes are compared and updated
DOM figures this out? We want to minimize how much the tree will be rebuilt.
In order to make it more efficient. Keep it “lightweight”. For the sake of GHG.
Sibling Difference Reconciliation Operations
- If a node is inserted into list of same node type siblings, all children would be updated (if more information isn’t provided)
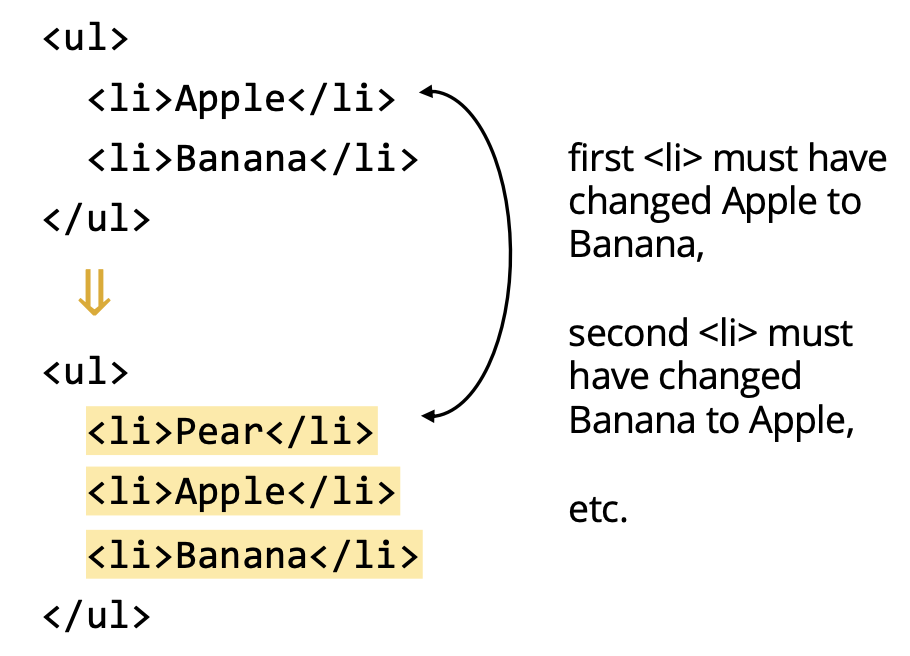
- Before and after change of the virtual DOM
- Diffing algorithm is quite simple, here it looks at ul, compares it. then li, then what’s inside of the li, which compares Apple to Pear. change it. And so on…
Use keys for Better Child Reconciliation
- When updating children of same node type, use key prop
- each key must be stable and unique
- key should be assigned when data created, not when rendered
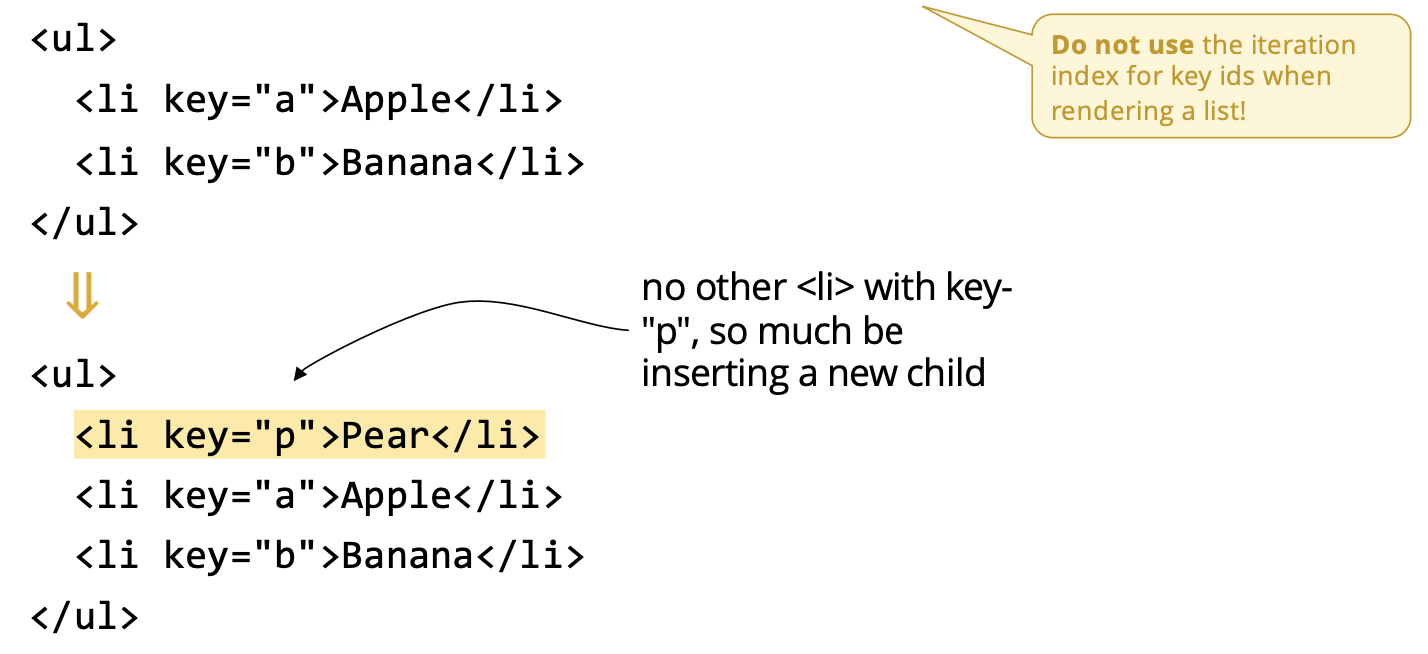
- Diffing algorithm will look at the key (the case of React and Preact)
- Don’t set key to the iteration index!! Be careful to how to create your keys.
- Optimization^
React’s diff algorithm (Dec 2013): https://calendar.perfplanet.com/2013/diff/
the result of render is not an actual DOM node. Those are just lightweight JS objects. We call them the virtual DOM.
Adventures in the Virtual DOM: https://medium.com/@KevinBGreene/adventures-in-the-virtual-dom-part-2-the-diff-render-loop-dac7f879bb21
Approaches to Managing State
- useState hook for local component state
- pass state to children
- useContext hook to access state
- without passing as props
- Signals
Prof will not talk about Redux.
Demo: count-state
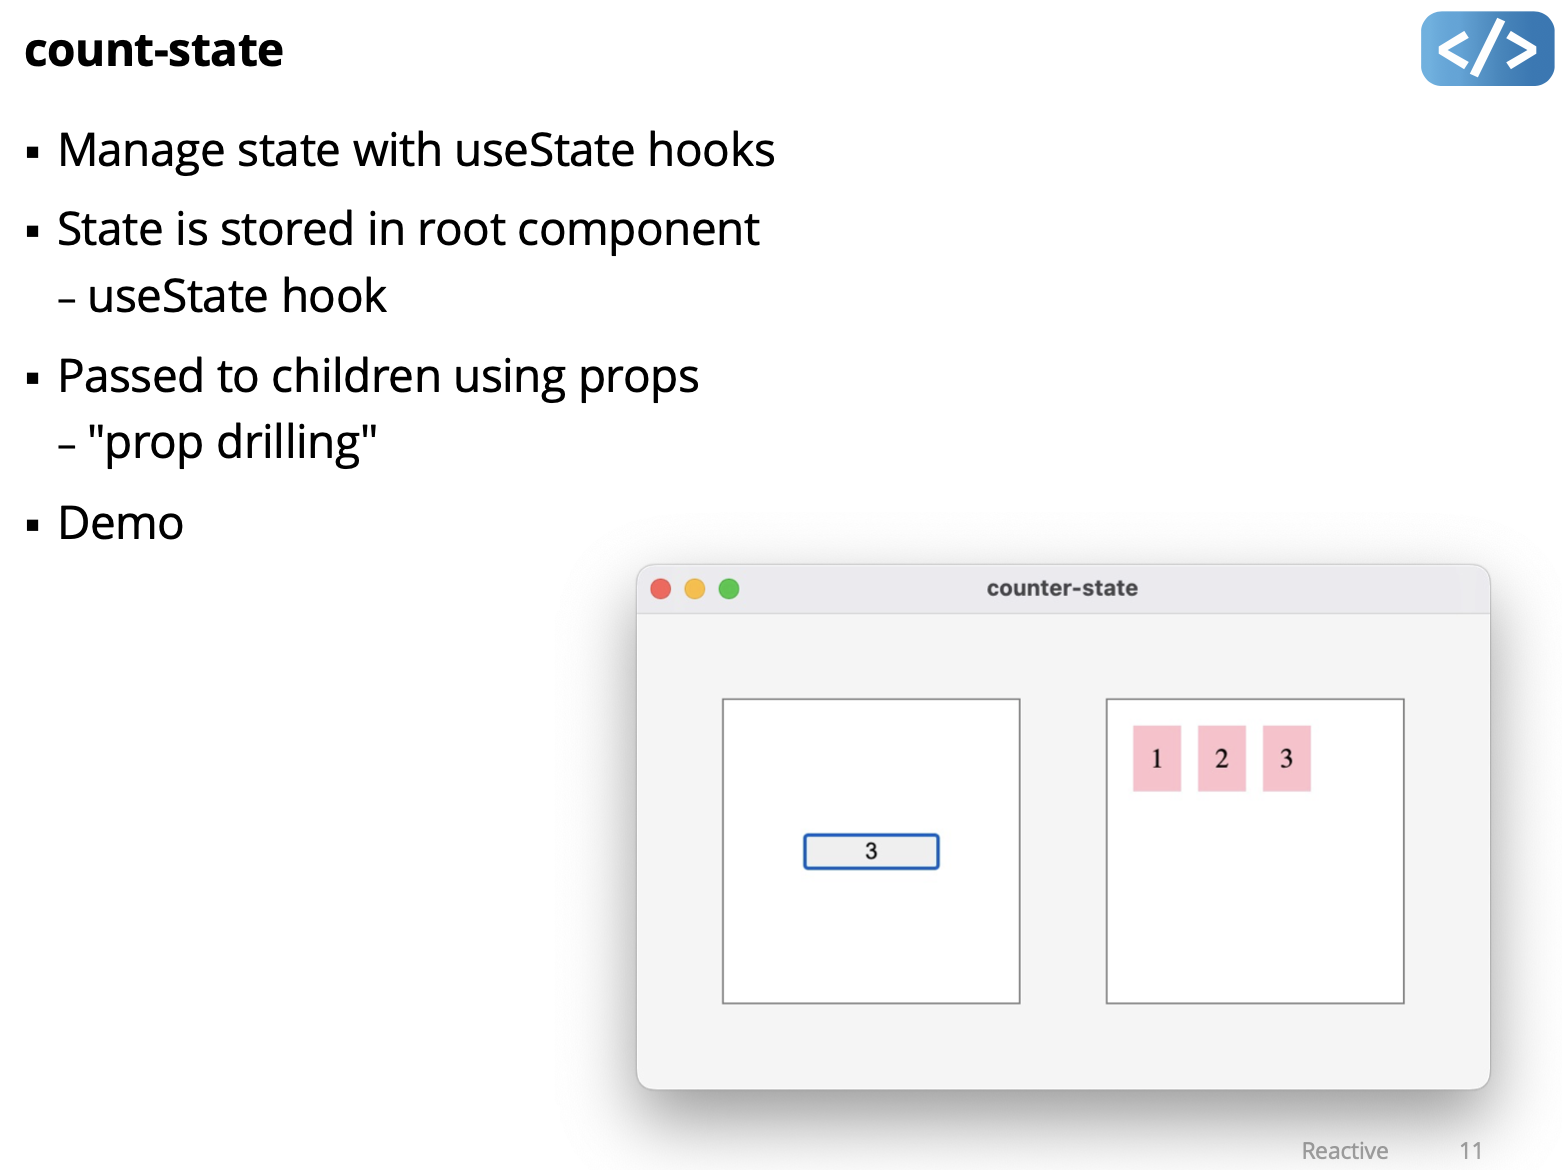
const [count, setCount] = useState(0);- useState is a hook, it returns count and setCount, then pass in initial state of 0
- the handler is calling the hook function setCount in this case.
- in the other version, we had a global variable called count (in the declarative demo)
- in this version, we just set the count, the state is changed, so it just renders???
- you don’t have to remember to tell the model to update it. it is reactive.
- App has state, but it is not a function. Hook is used to maintain state across multiple functions
This has prop drilling, where you need to pass down in this case colour down to multiple layers in your application.
Hooks
Behind the scenes, hook functions like
setState, work by storing data in sequence of “slots” associated with each component in the Virtual DOM tree. Calling a hook function uses up one slot, and increments an internal “slot number” counter so the next call uses the next slot. Preact resets this counter before invoking each component, so each hook call gets associated with the same slot when a component is rendered multiple times.
This is called call site ordering, and its reason why hooks must always be called in the same order within a component, and cannot be called conditionally or within loops.
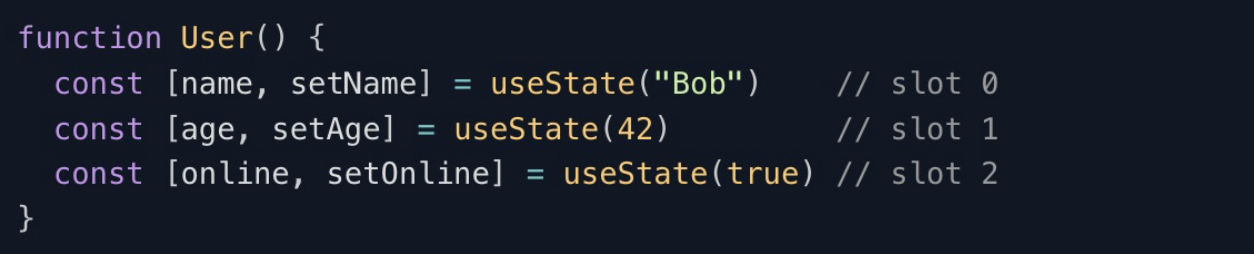
How Hooks Work
- Examine O! minimal reactive library source code
- (line 173) useReducer hook
- a generalization of useState hook (see line 201)
- (line 138) getHook to manage hooks
- Global array of hook “slots”
- Function to get (or create) a hook in a slot
- render
- (line 257 ) hooks storage setup
- (line 270) get hooks for component (in order)
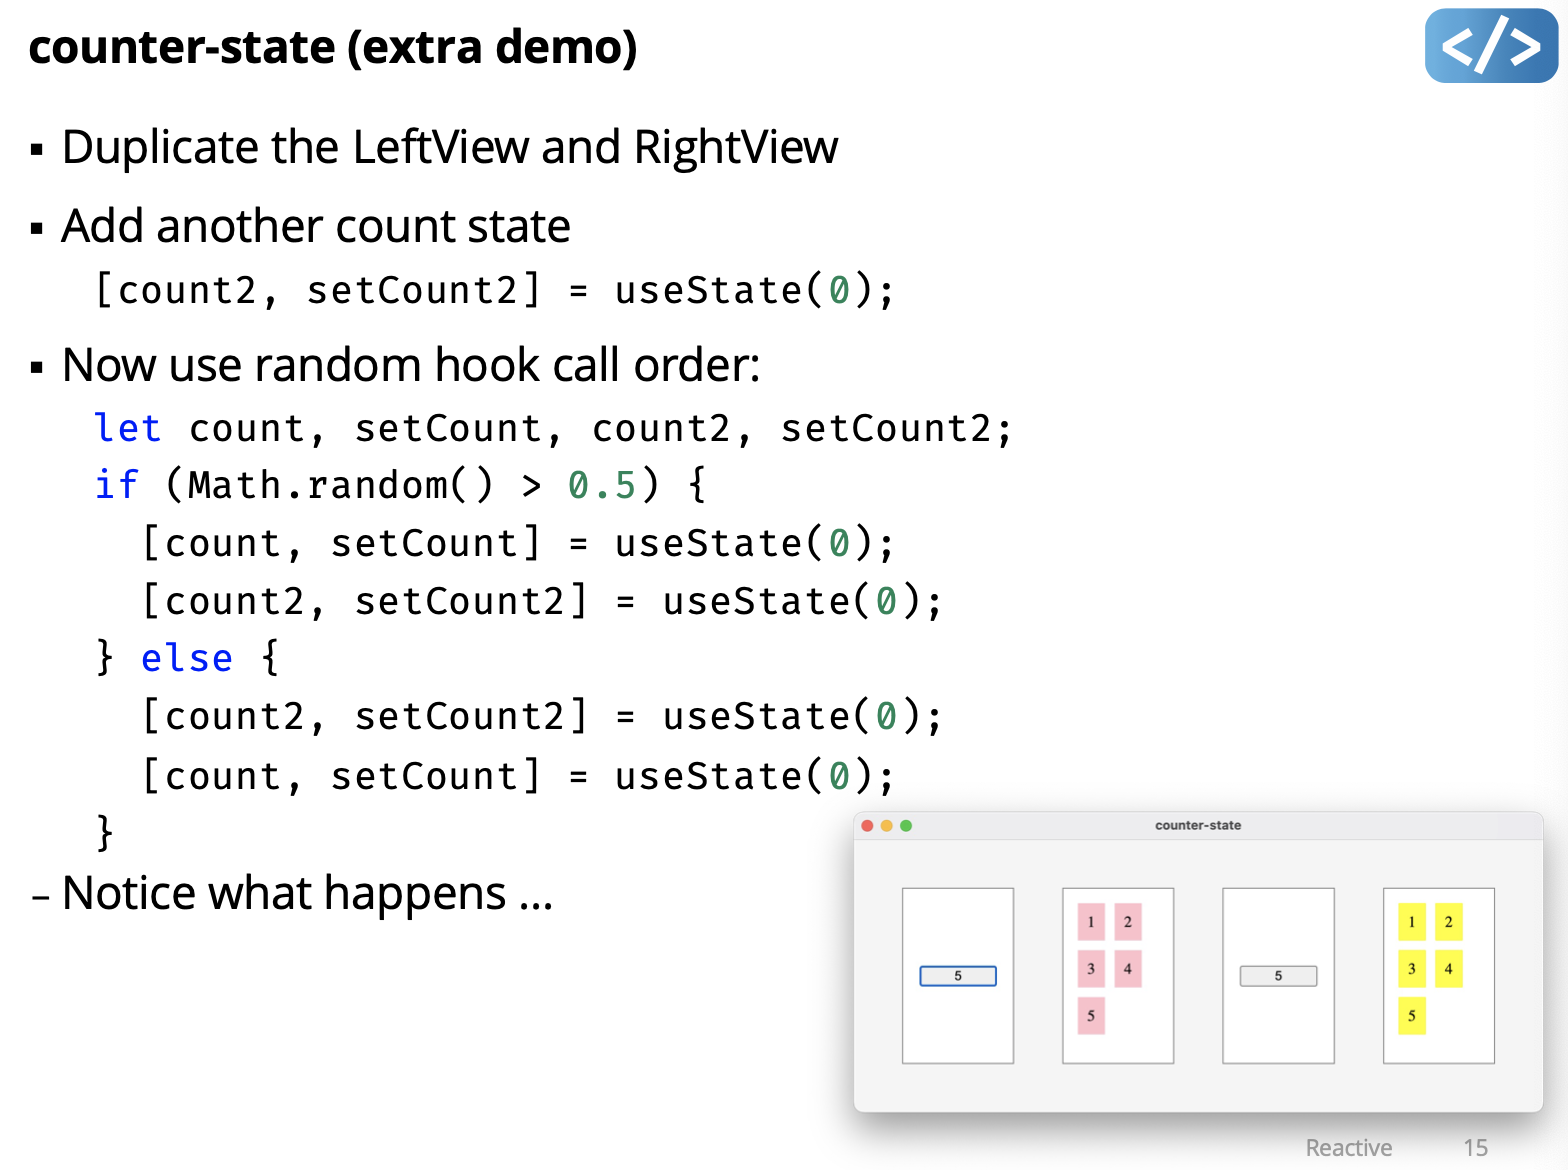
Demo: counter-state (extra demo)
useEffect(() => {
	console.log("useEffect");
}, [count]);
Hooks in Preact
- Functional methods to compose state and side effects
- useState
- to get and set state
- useContext
- access state context without prop drilling
- useRef
- get a reference to a DOM node inside a functional component
- useEffect
- trigger side-effects on state change
- useReducer
- for complex state logic similar to Redux (and several more …)
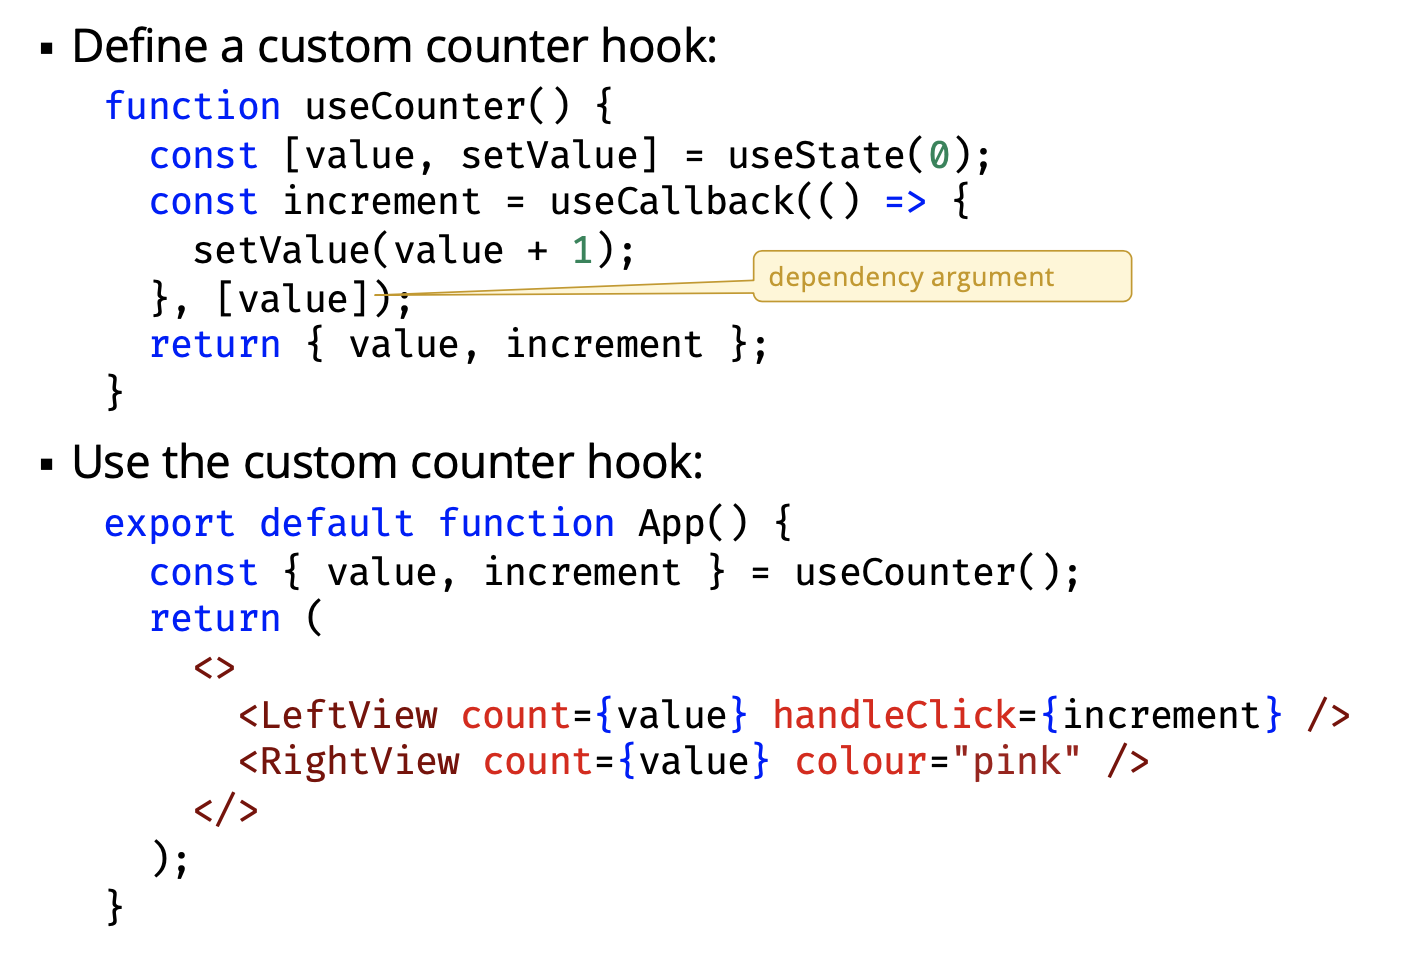
Custom Hooks
- Only changes when
[value]changes
Context
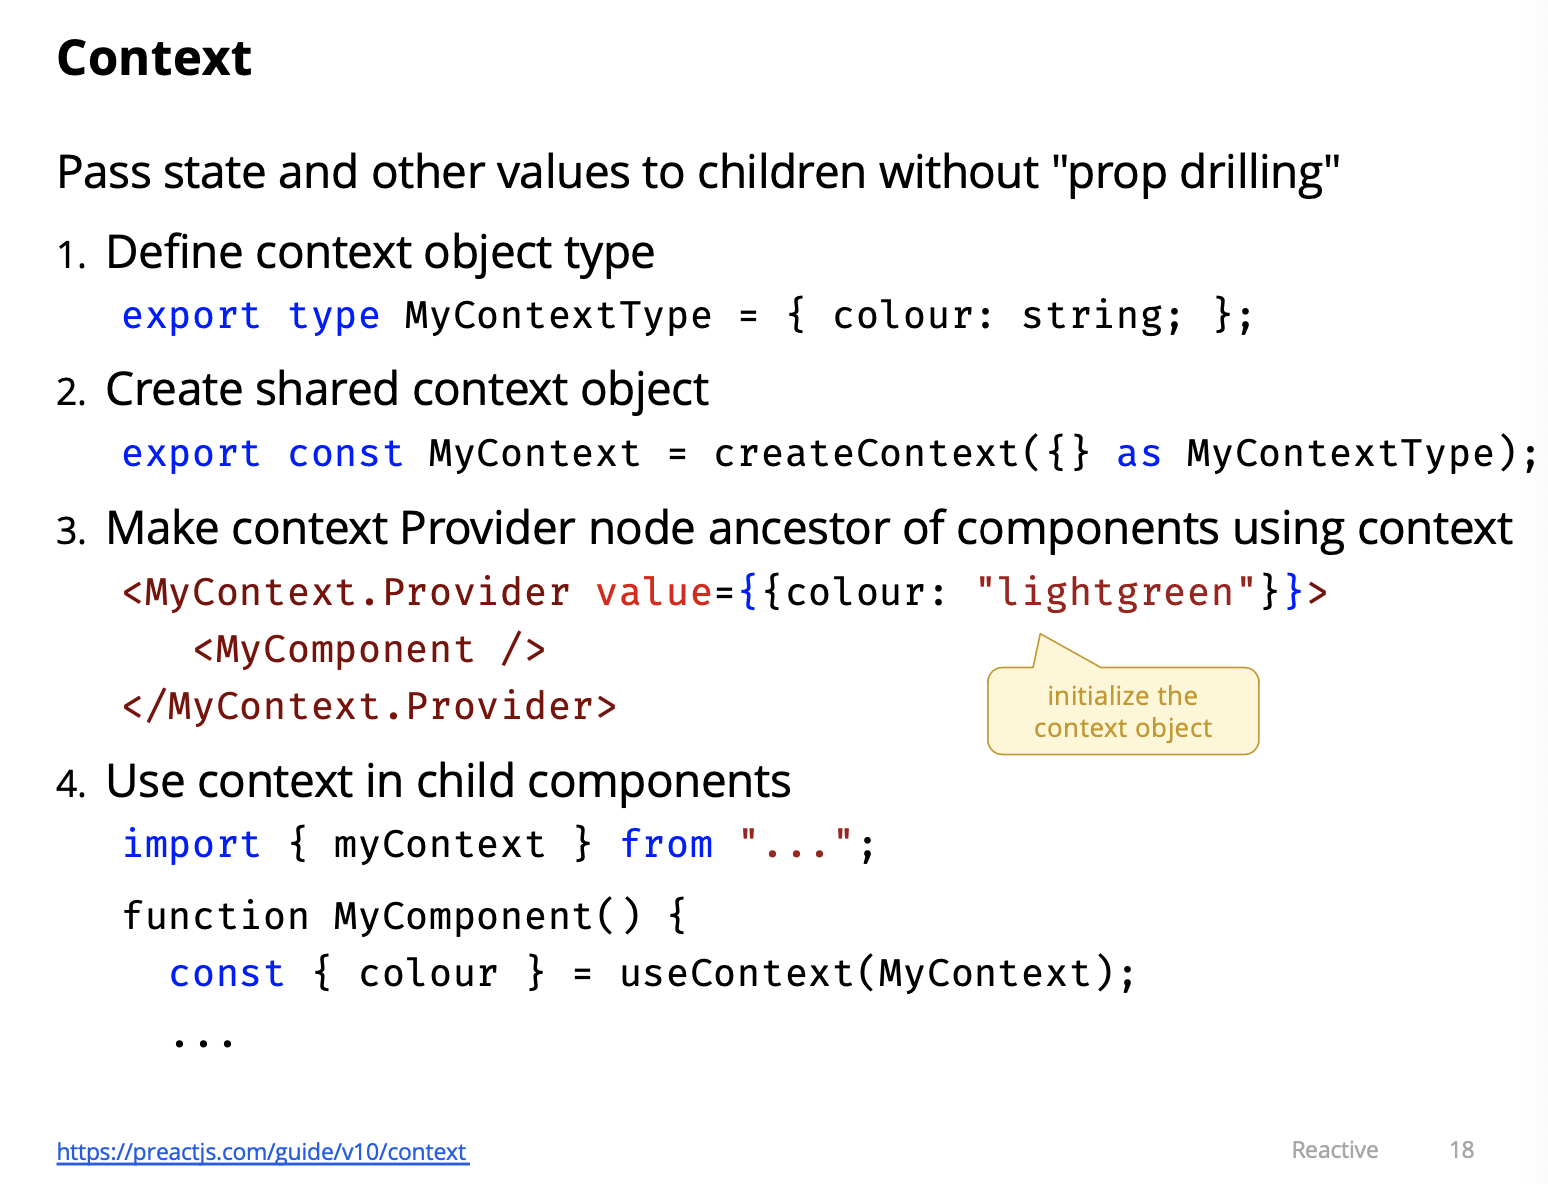
Demo: counter-context

- Get rid of the prop drilling, but using context, components don’t need props.
- Context provider: make information of higher level hooks available to children. Make all the value available to all the children!!!
- Grab the context like this
const {count, setCOunter} = useContext(CountContext);
- Grab the context like this
  return (
    <CountContext.Provider
      value={{
        count,
        setCount,
        colour: "lightgreen",
      }}
    >
      <LeftView />
      <RightView />
    </CountContext.Provider>
);- Prof doesn’t recommend using this for A4?
Signals
- State management module introduced by Preact
- can be used with React and other frameworks too
- Not included by default, must install: npm install @preact/signals
Demo: counter-signals
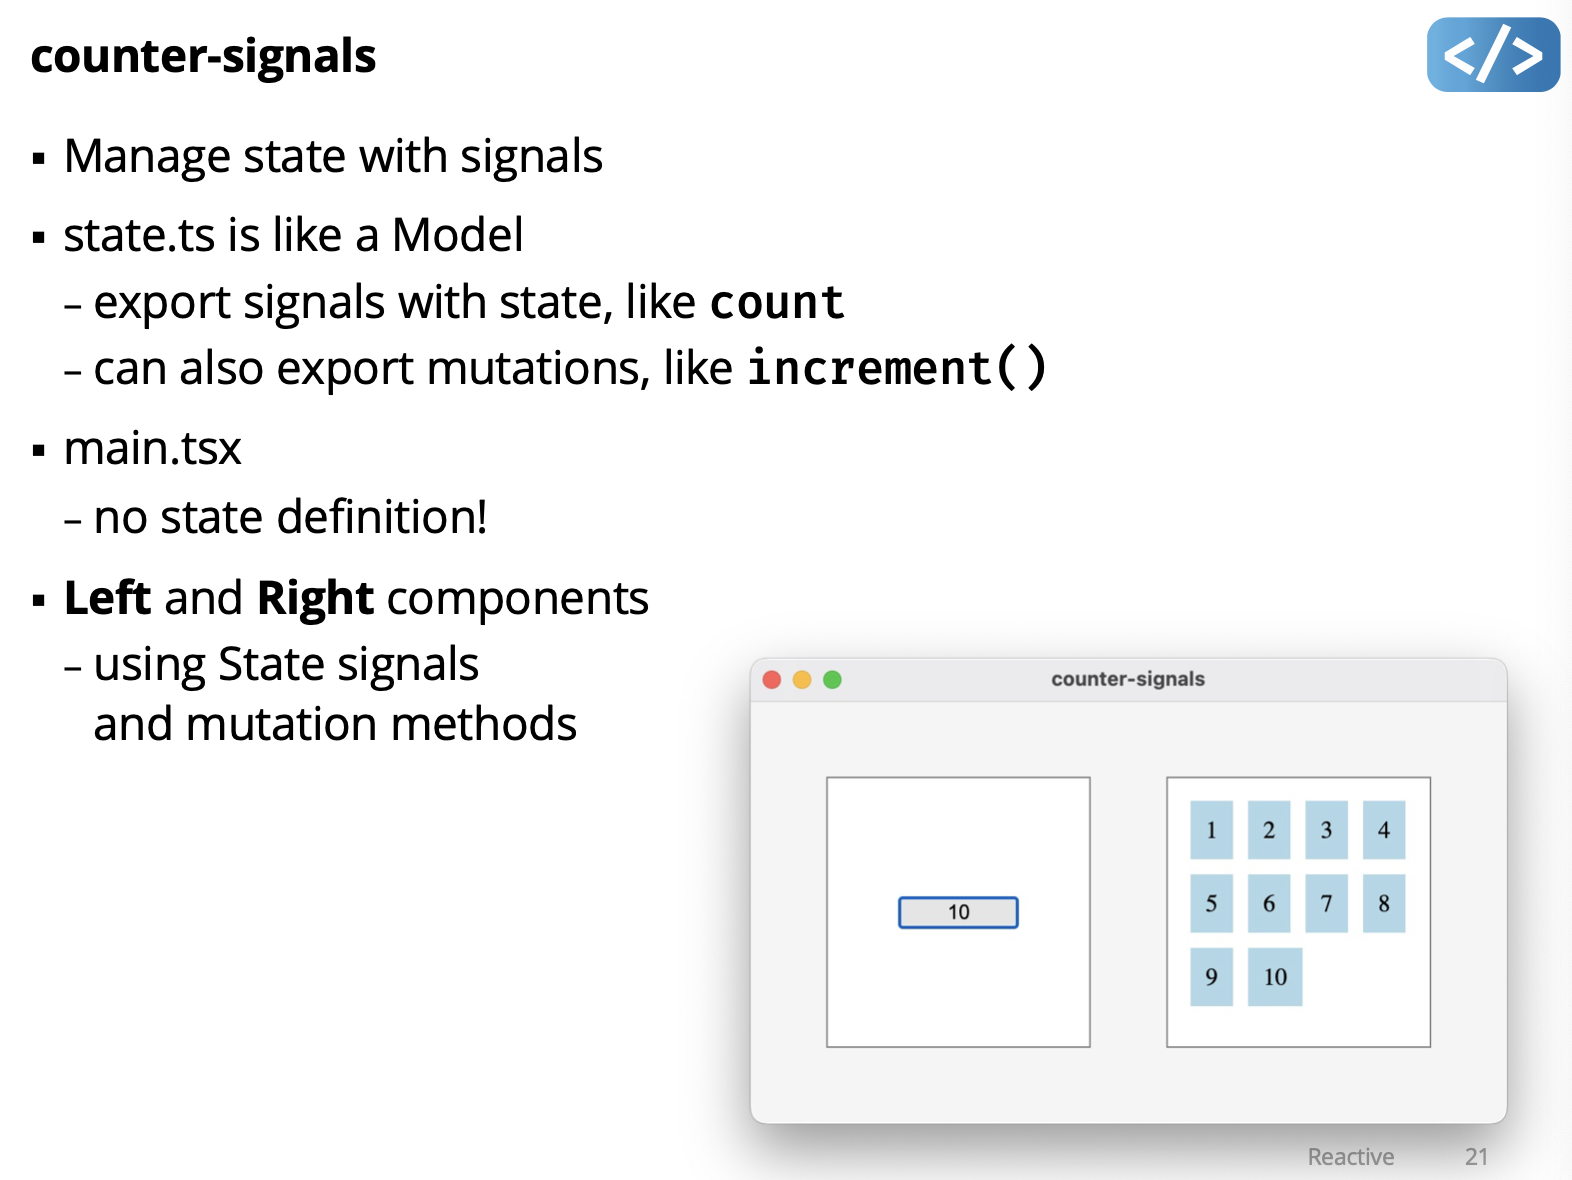
- signals: a bunch of tiny little models?? wtf
- signal in the state.tsx is count. initialized to 0.
- signals has a property called
value. If we change it. The signals knows that it’s changed. It tracks who used it, and adds it to a list? - Someone looked at me, and let’s put it on a list.
- Keeps a list of everyone who looked at it. Very interesting.
- signals has a property called
- In Left.tsx, it just access the signal using:
State.count.value - In Right.tsx is the same thing.
- It’s a bit more like model. State is in a place.
- When signal changes, React knows and it would just re-render left view again.
How do they implement Signals?
JavaScript Signals tutorial: implementing a signals library step by step (Medium member access)
Suggestions for State with Signals
- Keep your state minimal and well-organized
- each signal focused on a specific part of the state
- Use signals only where needed
- too many signals can introduce performance issues
- use signals to share state between different parts of application - for local app state, use useState() hook
- Keep components small and focused
- “all-in-one” components handling several tasks makes state hard to manage
- break UI down into small focused components that each manage a specific piece of state
Demo: todo (using Preact and signals)
- when signal (selectedTodoId) changed, it will re-render App.
- In List.tsx: todos signal: if it changes the array, the list component will be called to re-render, will pass each todo items.
- signals are declared in state.tsx
- then it contains functions that changes the signals
What is useRef?
Mon March 18 2024
Lecture 18 - Effects
Side Effects
-
Side effects are changes outside the Vdom render
- Code is run as a result of Vdom change
- “Reach out of the Vdom tree” to mutate state or invoke imperative code, like calling into DOM APIs.
-
Examples
- DOM manipulation (e.g. classlist.AddClass)
-
Drawing in canvas graphics context - Fetching data
-
Preact side effect methods
- useRef hook
- useEffect hook (and useLayoutEffect) focus of next demos
Demo: canvas
- Tells us how to draw in preact
- useRef which is a hook and give it type HTML to give it reference to html elements. so the function Canvas has a reference to the canvas. canvasRef
Demo: canvas-resize ResizeObserver
- HTML DOM feature
- Like window-resize for elements Don’t need to worry about it. Implement some sort of ResizeObserver and other kinds of Observers. Good technique since sometimes you do want o render pixel to pixel. For web dev.
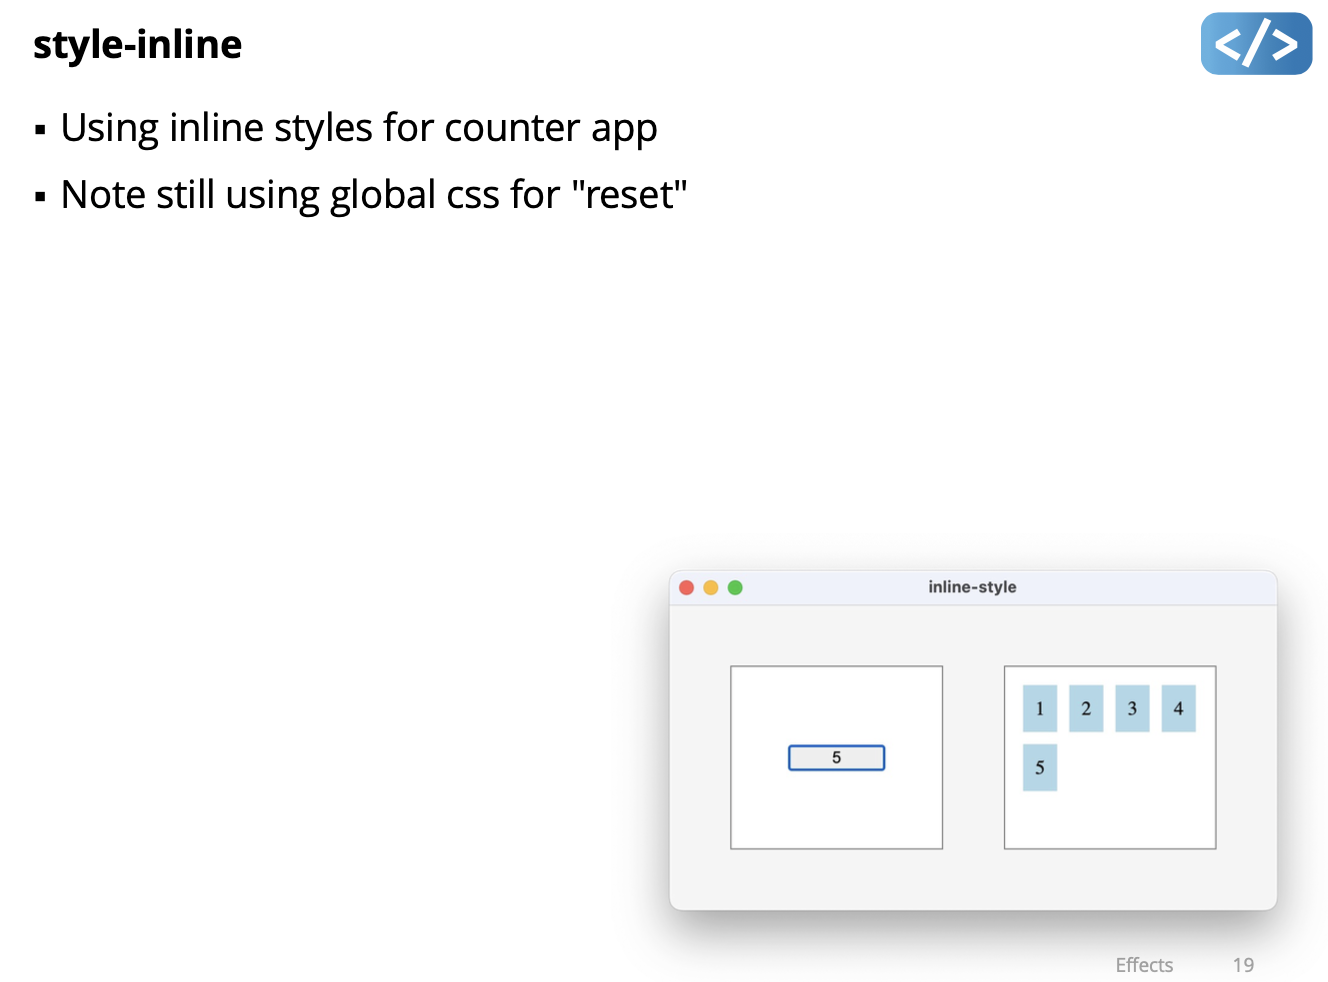
CSS Style for Components
We’ve used Global link
Introduce:
- Inline CSS attributes in component render
- Import component specific CSS module file
- Utility classes (e.g. using Tailwind)
Inline CSS (can’t use this in A4-Preact)
-
Style attribute accepts a JavaScript object to specify CSS properties
- e.g. “padding: 10px” { padding: “10px” }
- “padding: 10px” { padding: 10 }
- “flex: 1 1 autoa { flex: “1 1 auto” }
-
JavaScript variable names can’t have ”-” character, so CSS properties with ”-” are written in camelCase
- e.g. “flex-flow: row nowrap” { flexFlow: “row nowrap” }
-
Convention is to create const object and assign in render
-
Inline styles do not provide flexibility with rules, selectors, etc.
CSS Modules
- CSS file with “.module.css” extension
- convention is to name like “MyComponent.module.css”
- import module.css into the component tsx file
import style from "./MyComponent.module.css";- Assign classes in render
<div class={style.root}>- Class names are locally scoped to component
- unique class names are generated, e.g.
<div class="root_dsfsdf_1" - try inspecting styles in DevTools
- unique class names are generated, e.g.
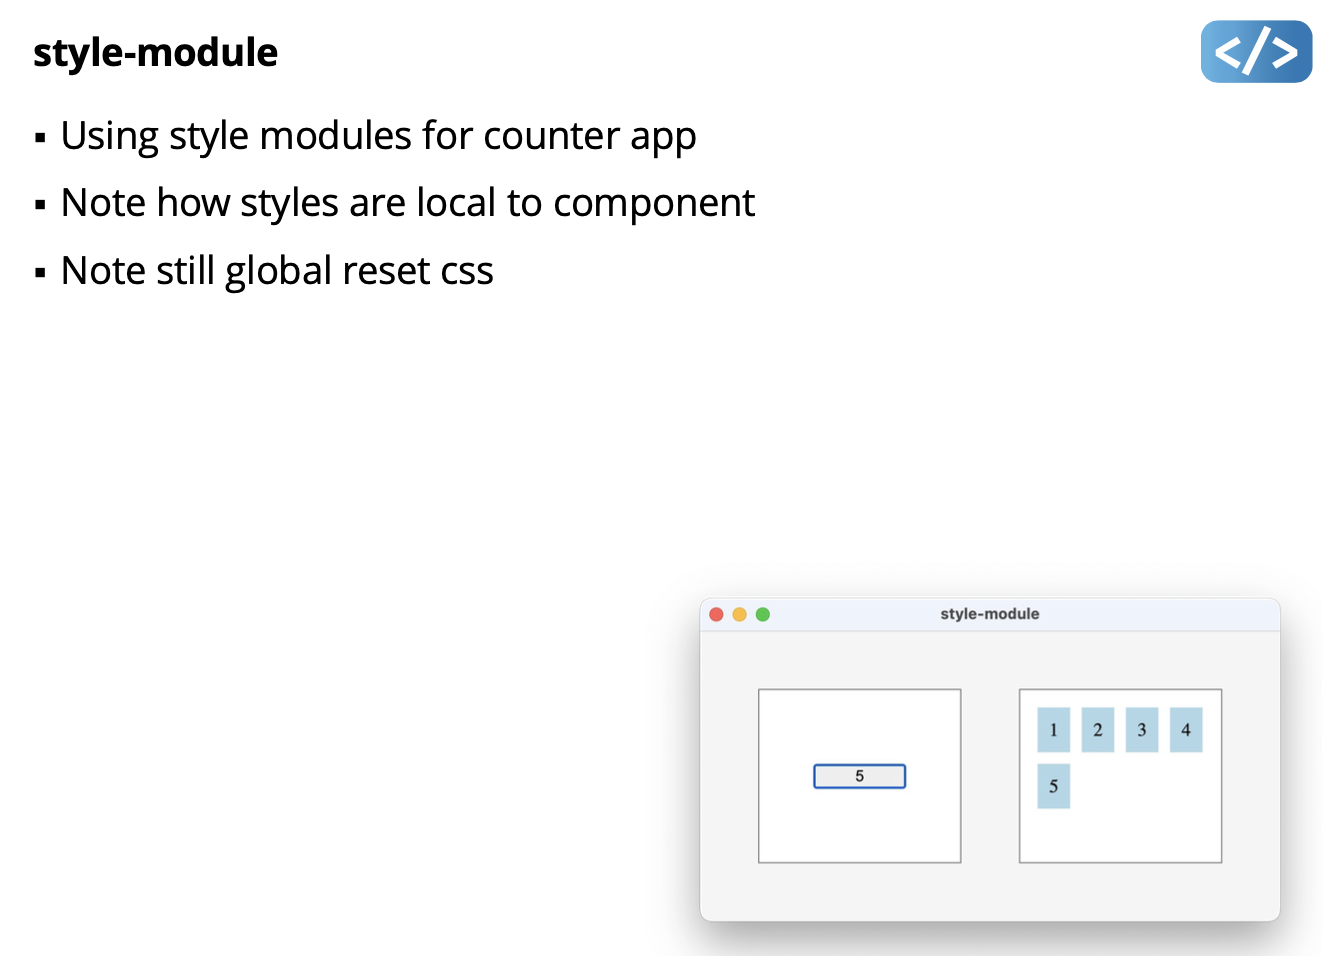
Can use this for A4. But apparently Tailwind is easier.
Notice in the .module.css, you can just use button{ } and set properties. And the component will have buttons with you specified properties in the css. Interesting. Don’t need to select the right id, etc.
Wed Mar 20 2024
Continue with Tailwind?
- A utility-first CSS framework
- class names are the style (called “utility classes”)
- No need for media queries, use size prefix instead
- Same strategy for hover, focus, etc.
- automatically removes all unused CSS when building for production, which means your final CSS bundle is the smallest it could possibly be. In fact, most Tailwind projects ship less than 10kB of CSS to the client.
- Approach works best with component-based development
Tailwind Setup
- Follow “Tailwind with Vite+React” installation steps:
- https://tailwindcss.com/docs/guides/vite
- Needed for compiling Tailwind CSS
- Install official Tailwind VS Code Plug-in:
- https://tailwindcss.com/docs/editor-setup#intelli-sense-for-vs-code
- Tailwind autocomplete, linting, hover preview of actual CSS
Tailwind Philosophy
No predesigned components like buttons, cards, alerts, etc.
- other CSS frameworks (e.g. Bootstrap) provide predesigned components, that you “fight to override”
- Tailwind uses a pretty extreme CSS reset (called “preflight”) https://tailwindcss.com/docs/preflight
- Implication: you need to add basic styling for everything
Can disable the Tailwind CSS reset and use browser defaults
Example of Basic Styling with Tailwind
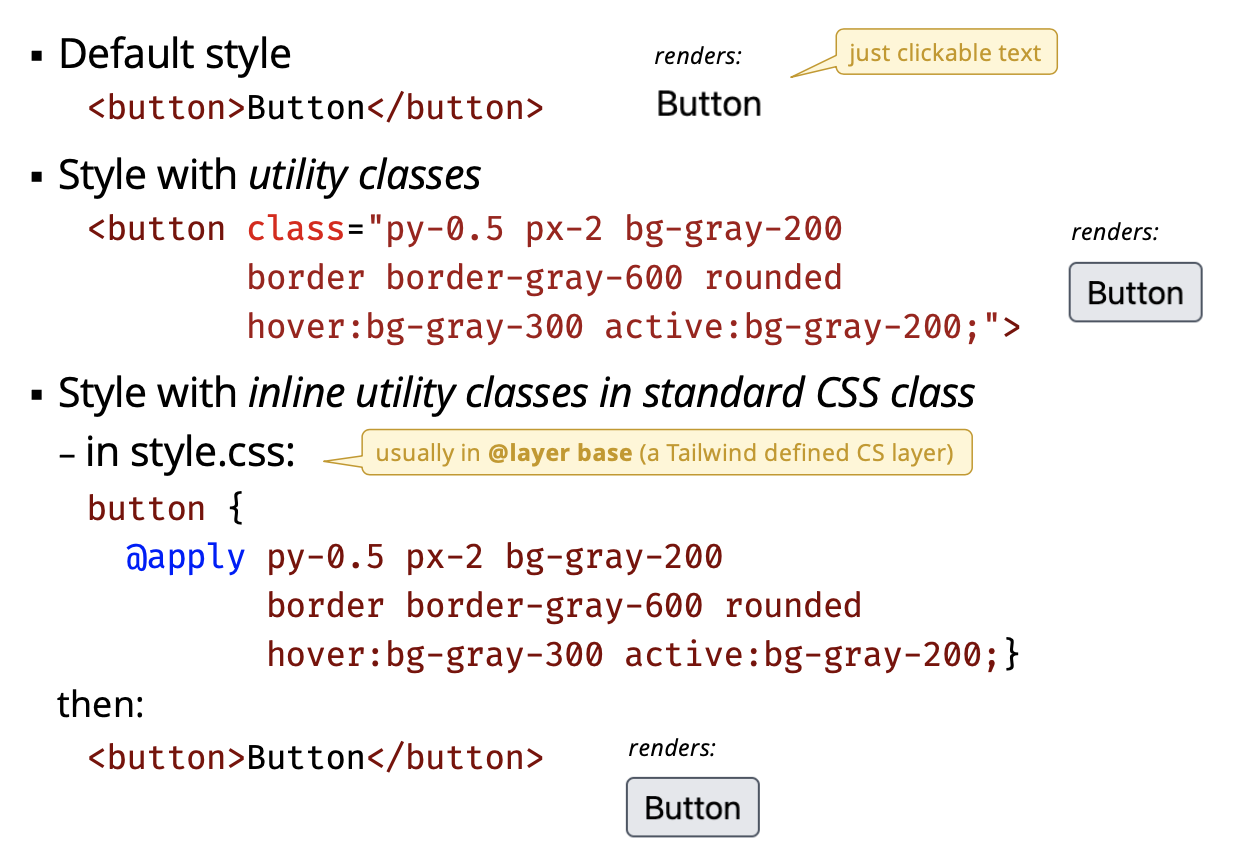
- Only really makes sense in Components???
- You can use
@applyto apply a style to all buttons. Pro putted it instyle.cssfile
Demo: style-tailwind-test
- Test Tailwind in a simple html file
- Setup: must add html files to types for processing in
tailwind.config.js
- Demos: (what he showed in class)
- Experiment with inline class and
@applyinstyle.css - Button (including hover, active, disabled)
- Padding values, including custom unit like
p-[10px] - Screen sizes (next slide)
Tailwind is Mobile-first Responsive
- Provides a
{screen:}prefix to use instead of media queries/rules - Screen prefix identifies when to use utility class
- default screen is mobile (no prefix)

- default screen is mobile (no prefix)
- Example:

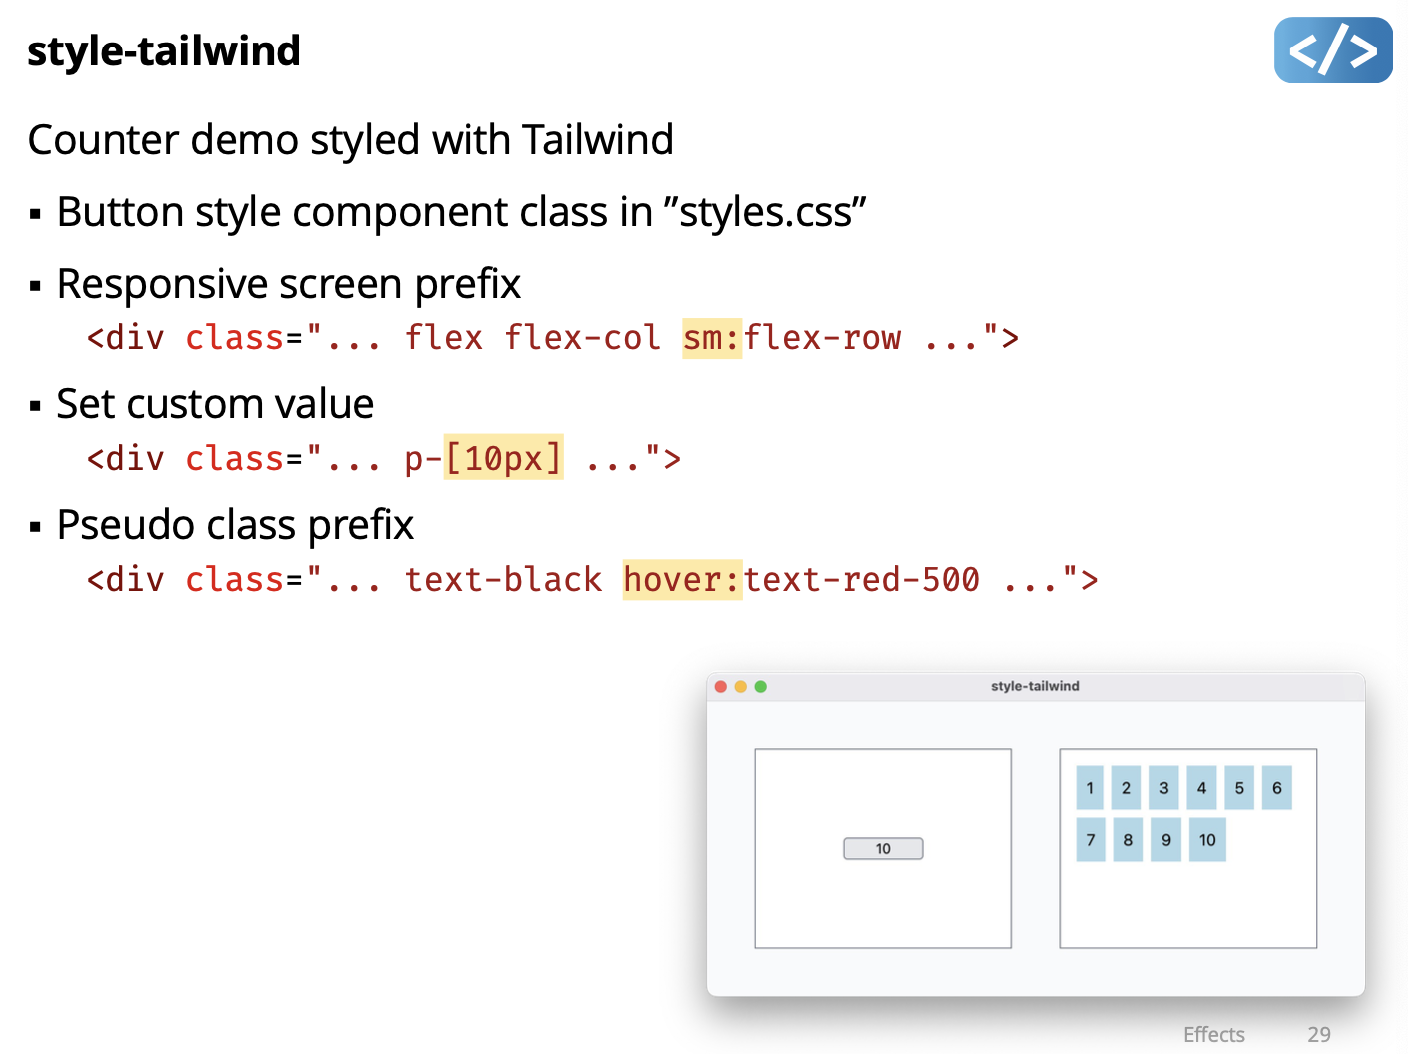
sm:it will depending on screen size use different settings…
Try this Exercise to try out Tailwind.
Todo App. No need to use it for A4.
Lecture 19 - Direct Manipulation
Direct Manipulation
When a virtual representation of an object is manipulated in a similar way to a real–world object (proposed in 1983 by Ben Schneiderman)
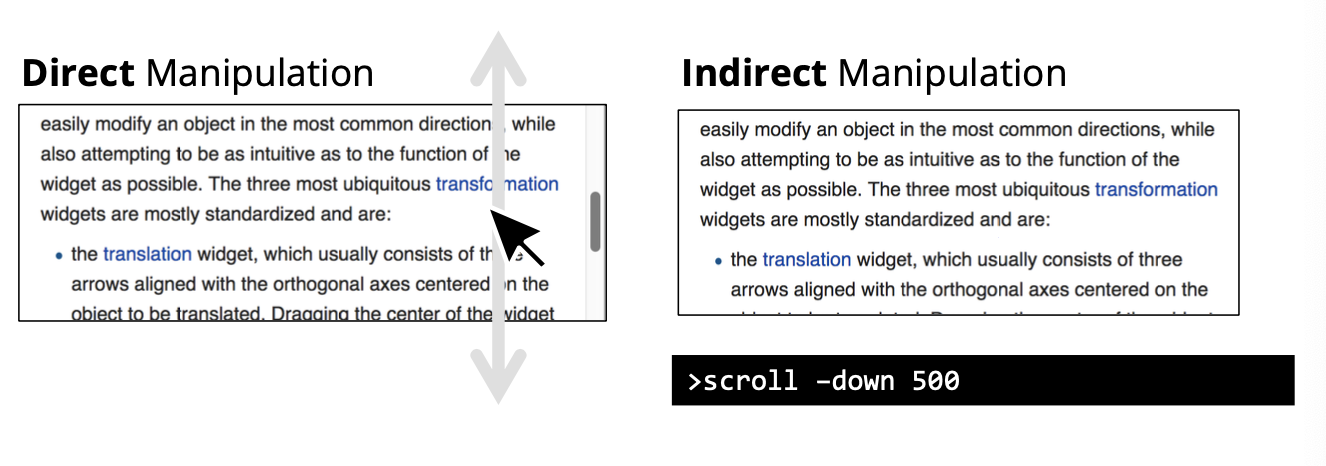
Make the interaction feel like manipulating a “real object” instead of working through an intermediary
Requires a representation of “task objects”
- A task object is something the user can manipulate
- Can be the object of interest or an interface widget
- object of interest: the actual thing we want to change
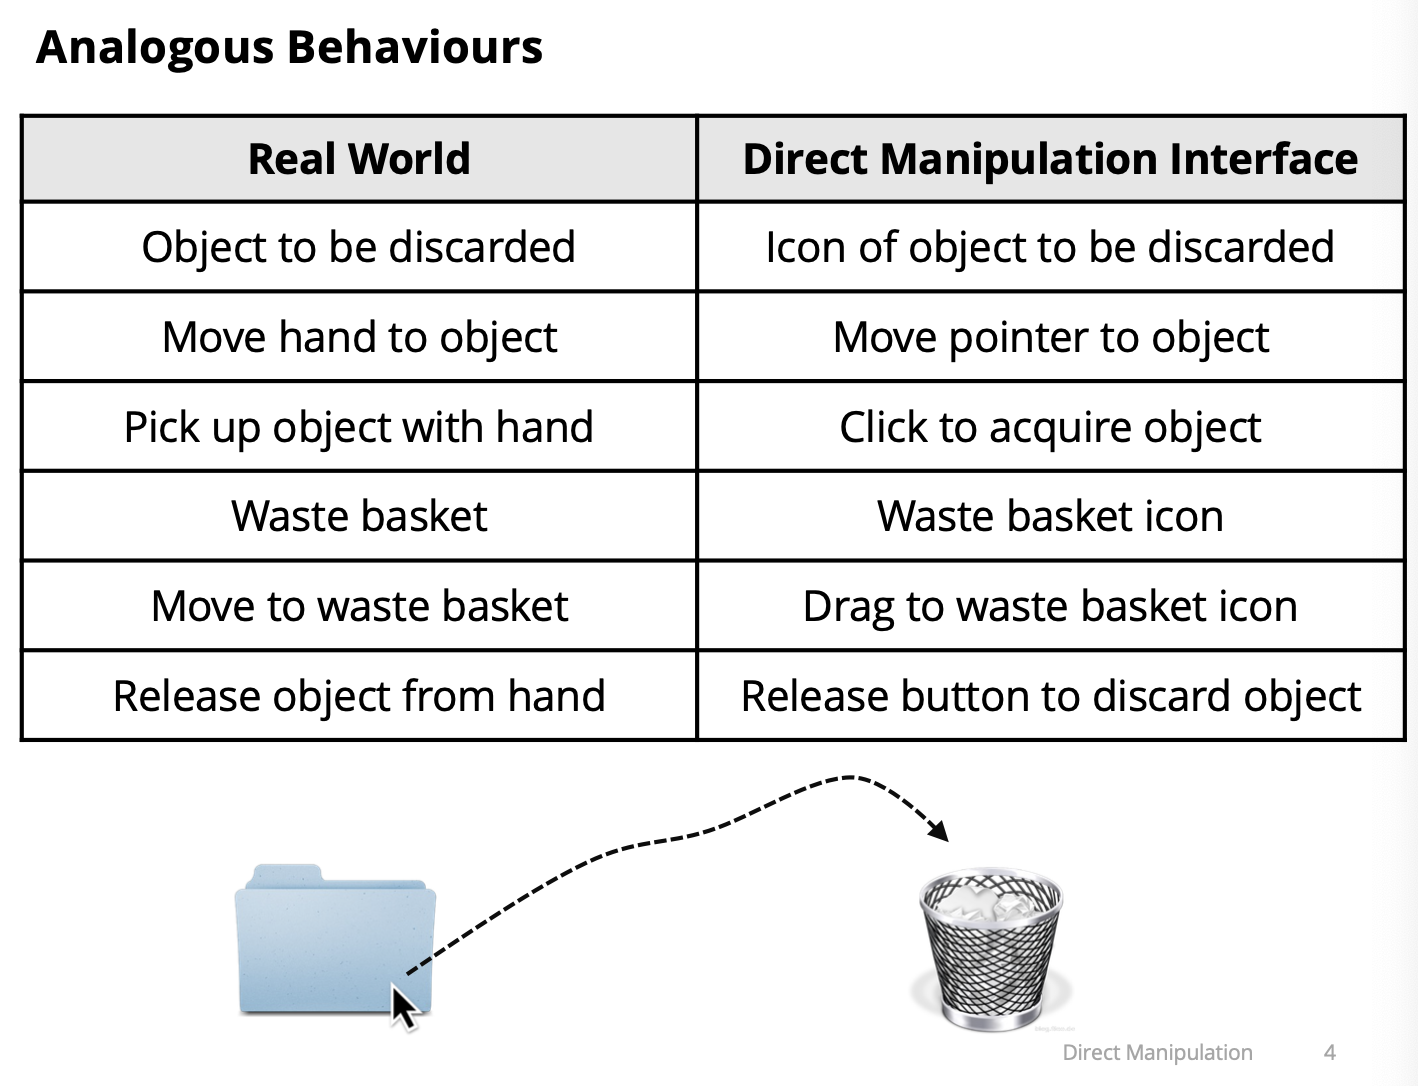
Schneiderman’s Characteristics of Direct Manipulation
- Continuous representation of task objects and actions
- Task objects manipulated by physical actions, not complex syntax
- Fast, incremental, and reversible actions with effects on task objects immediately apparent
- Layered, self-revealing approach to learning
Benefit of Direct Manipulation
Feel as if interacting with the task object rather than with the interface, so you focus on the task rather than on the technology
There is a feeling of direct involvement with a world of task objects rather than communication with an intermediary
BumpTop - A Multi Touch 3D Physics Desktop - https://youtu.be/M0ODskdEPnQ
Interaction Model
“An interaction model is a set of principles, rules, and properties that guide the design of an interface. It describes how to combine interaction techniques in a meaningful and consistent way and defines the look and feel of the interaction from the user’s perspective. Properties of the interaction model can be used to evaluate specific interaction designs.” (Beaudouin-Lafon, 2000)
We want an interaction model that works with typical desktop interaction, and is useful to describe Direct Manipulation’
Beaudouin-Lafon. Instrumental interaction: an interaction model for designing post-WIMP user interfaces. Proceedings of CHI 2000, 446-453. http://doi.acm.org/10.1145/332040.332473
Instrumental Interaction
“A model of interaction based on how we naturally use tools (or instruments) to manipulate objects in the physical world.”
- Interfaces have interaction instruments and domain objects
- Interaction instrument: a necessary mediator between the user and domain objects
- Domain objects: the thing of interest, data, and associated attributes, which is manipulated using an interaction instrument
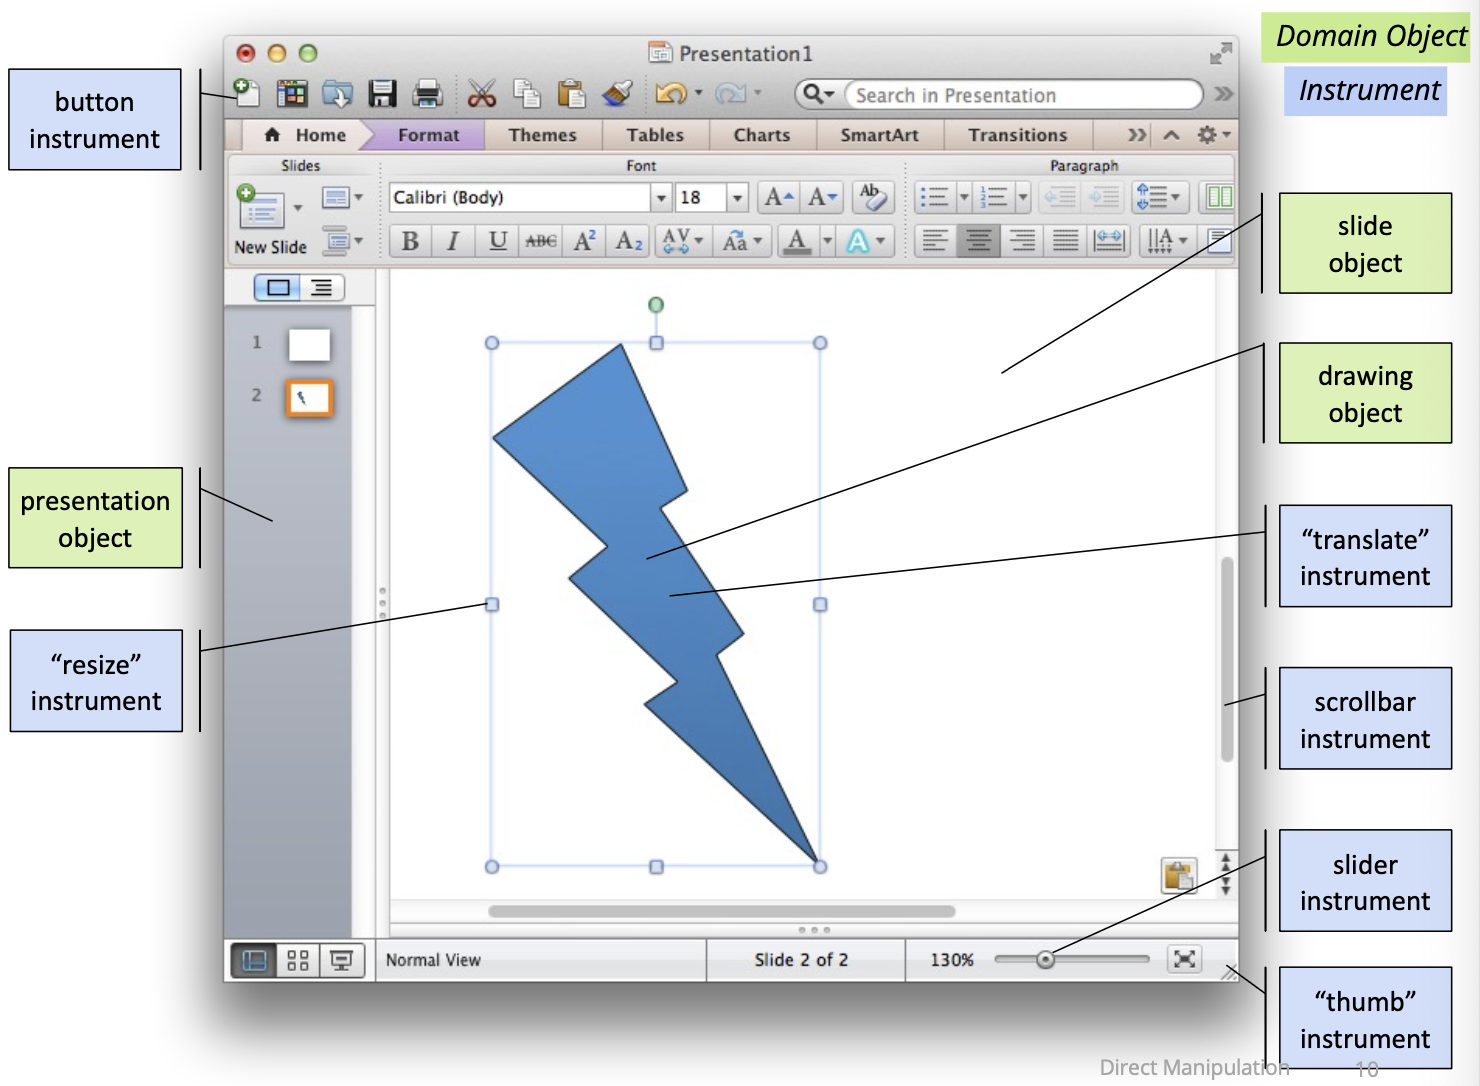
You can look at interface and decide at which are domain objects and instruments. Usually few Domain Objects.
Instrument Activation
- Activation is the how an instrument is triggered for use
- GUI instruments activated spatially and temporally
- spatially has a movement cost
- temporally has a time cost
- UI layout and design is concerned with the tradeoff of these costs
- Save is fully spatial
- Scaling is spatial
- When I drag it’s purely spatial
- Clicks on Format
Reification and Meta-Instruments
- Reification: turning concepts into something concrete
- i.e. an instrument is the reification of a command
- e.g. a scrollbar reifies command to move content inside window
- Meta-instrument: an instrument that acts on another instrument
- the other instrument becomes an object of interest - e.g. a pencil is an instrument to manipulate the object “paper”, but when the pencil tip breaks, the pencil becomes an object of interest manipulated by a sharpener meta-instrument
- GUI examples?
Object Reification
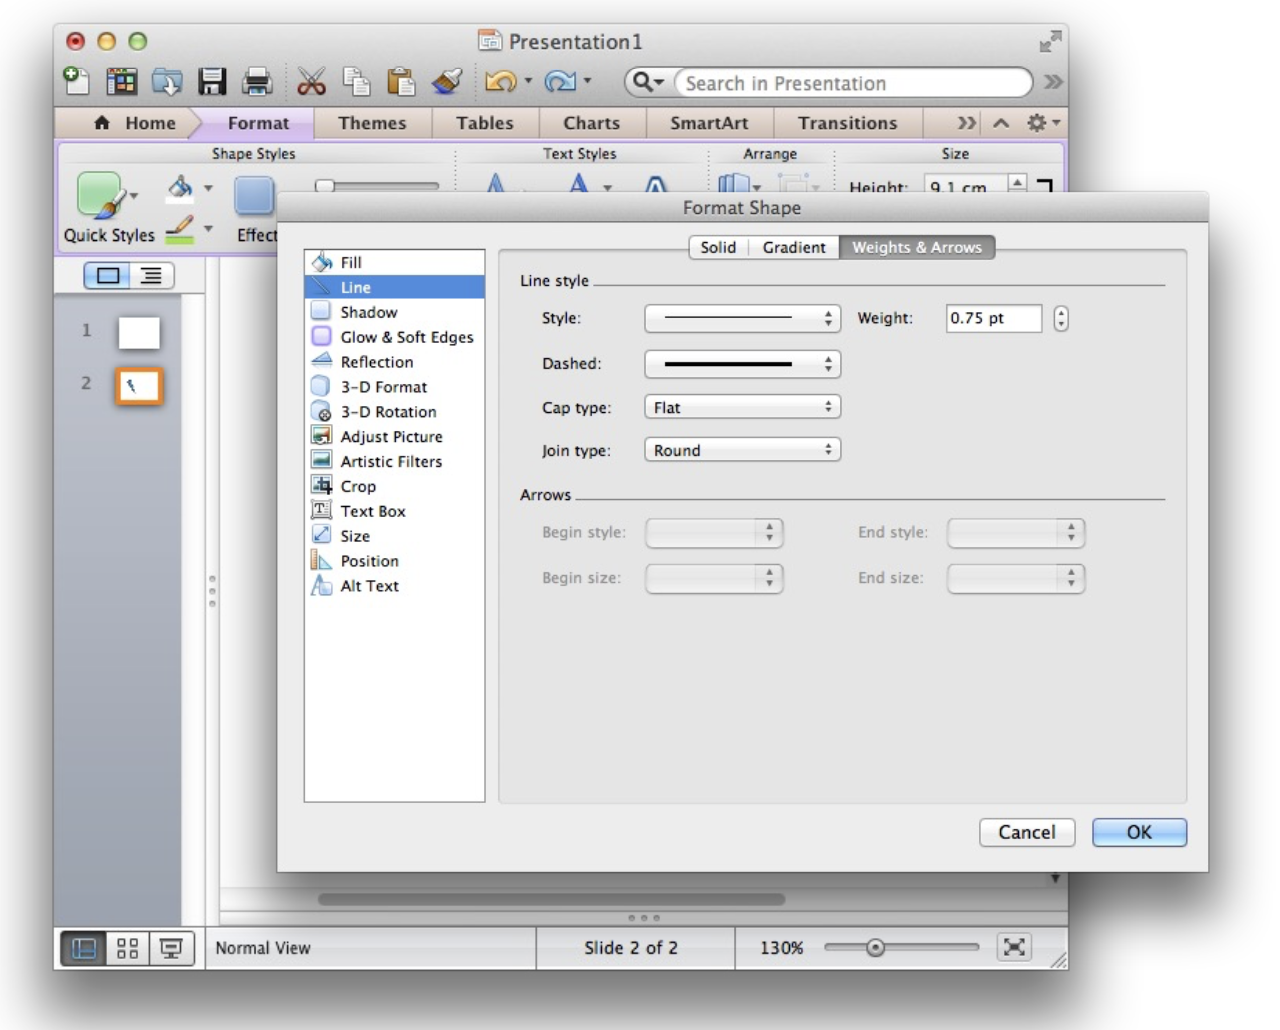
- Turning attributes of a primary object into other objects of interest
- e.g. colour swatch, font styles, shader materials
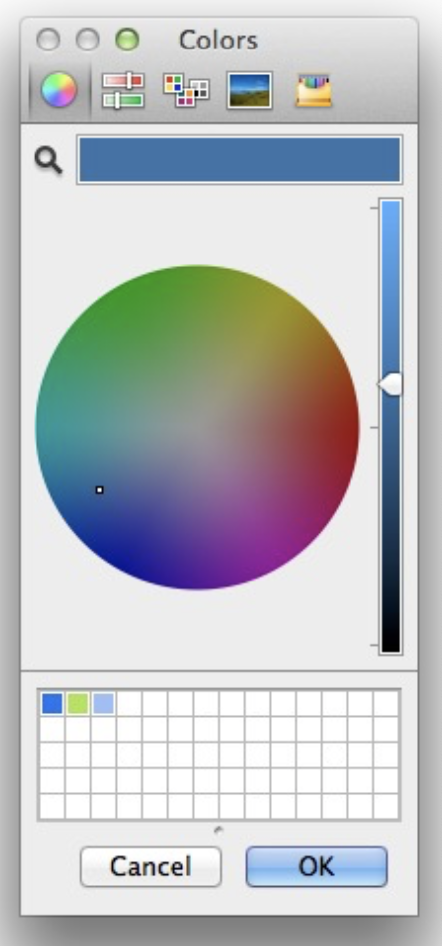
- When you adjust colour, meta-instrument is the colour selector.
- When you click on the colour, your object of interest is the menu of colour you want to choose from. Menu is kind of
- Then your object of interest is the yellow bolt once you’ve clicked on yellow.
- Focus changes
- There are instrument that changes. The dropdown is an instrument, then the colours you can choose from, etc.
- Reification is the concept of general.
Describing Instruments
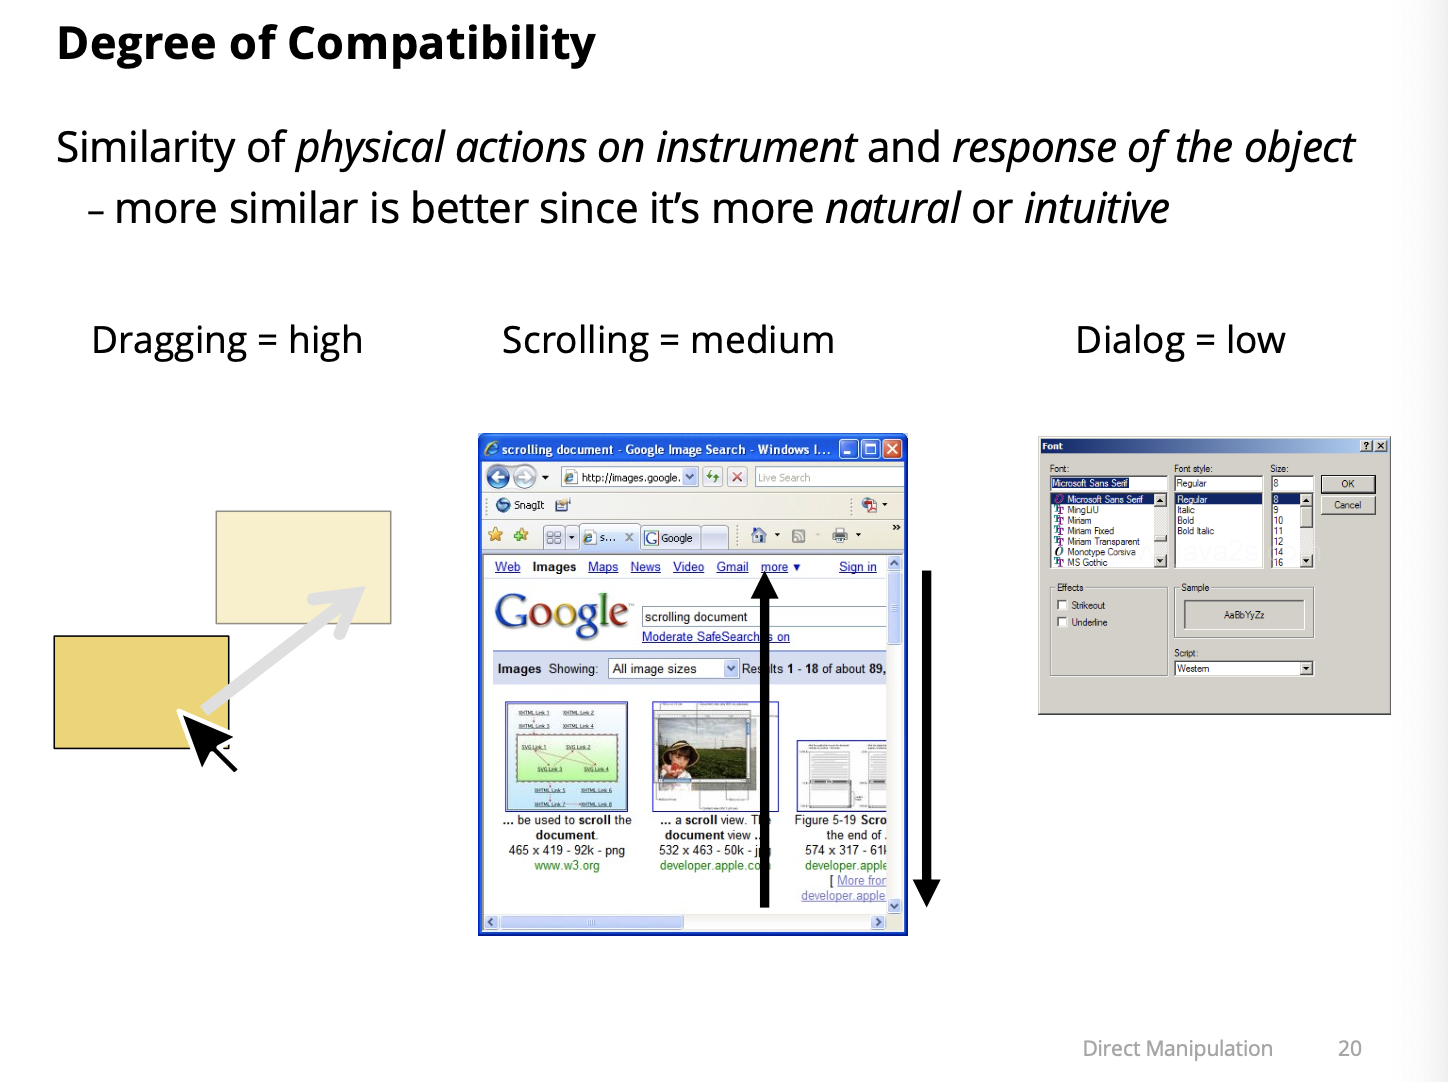
Three properties:
- Degree of indirection
- Spatial/temporal offset between instrument and action on object
- Degree of integration
- Match between input device to instrument degrees of freedom
- Degree of compatibility
- Similarity of action on device/instrument to action on object
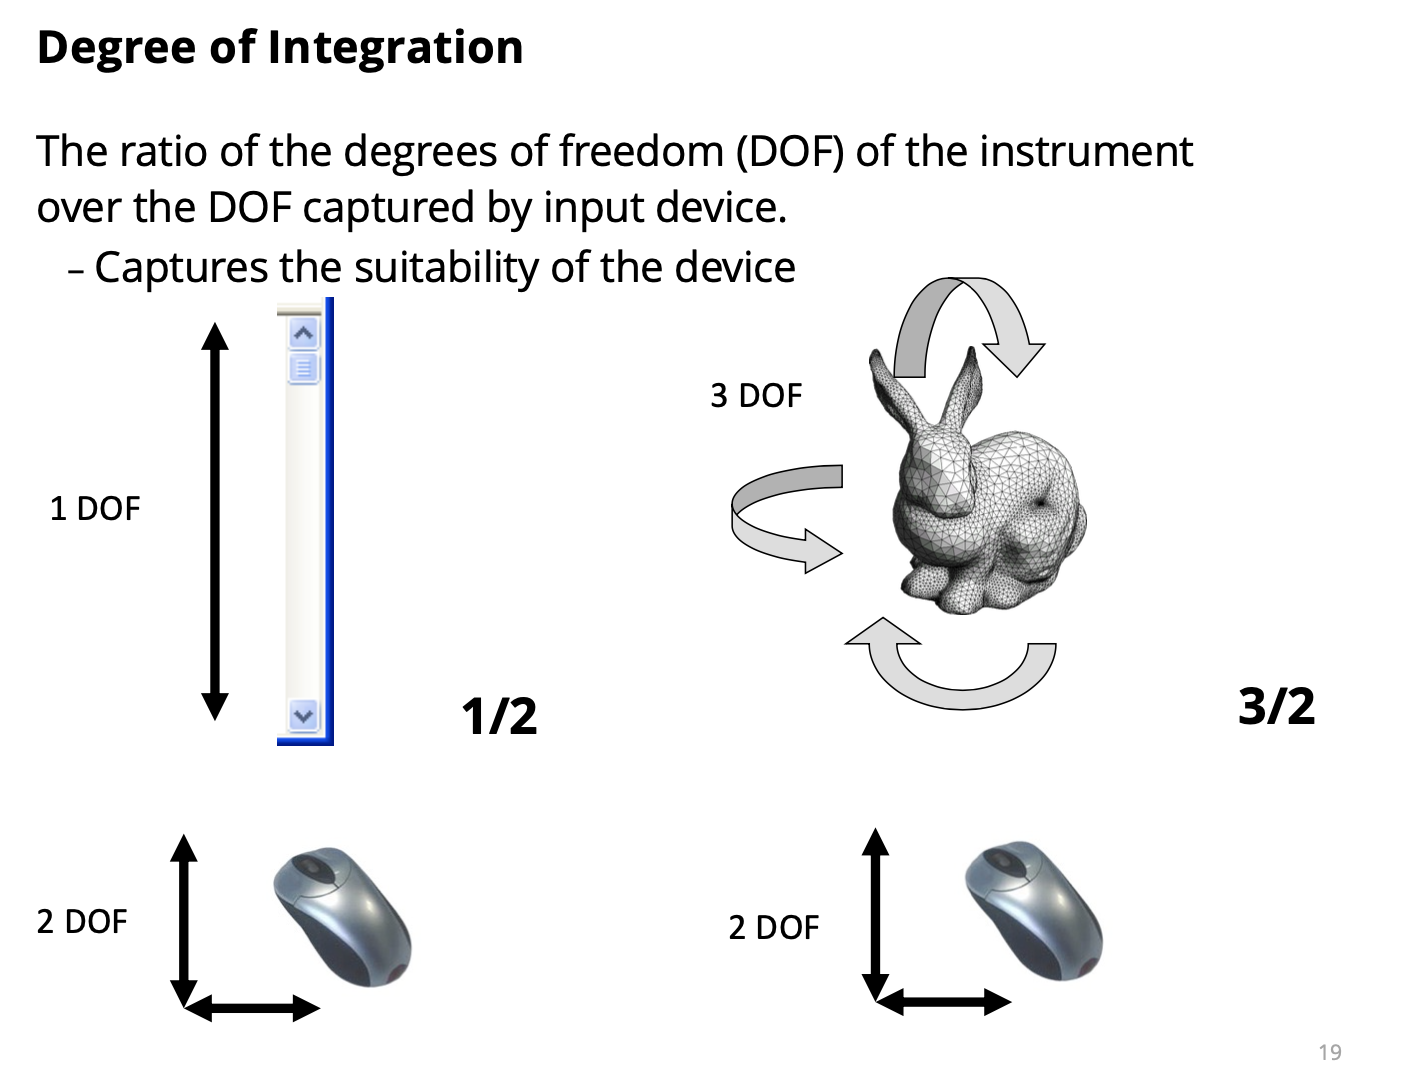
- DOF: degree of freedom
- Mouse has x and y.
- The ratio of the instrument we want to manipulate to the input device we want to manipulate it to.
- When rotating the 3D object, there are 3 ways to rotate. But then, the mouse only has 2.
- A bit more quantitative
Direct Manipulation as Instrumental Interaction
- A direct manipulation interface allows a user to directly act on a set of objects in the interface
- Low indirection (low spatial and temporal offsets) - High integration (ideally 1:1 correspondence)
- High compatibility (similarity of action and effect)
- Ideal level of direct manipulation is when instruments are visually indistinguishable from objects they control
- The actions on instrument/object entities are analogous to actions on similar objects in the real world.
- The actions on instrument/object entities preserve the conceptual linkage between instrument and object.
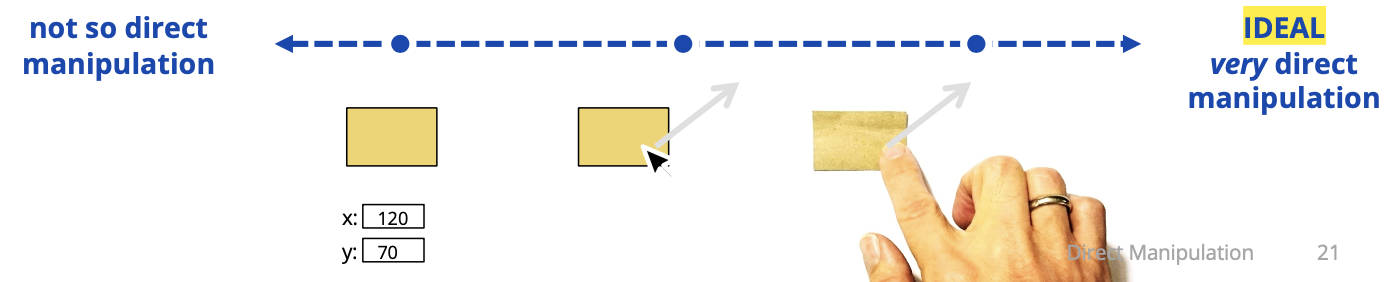
Bret Victor, Inventing on Principle (talk from CUSEC 2012)
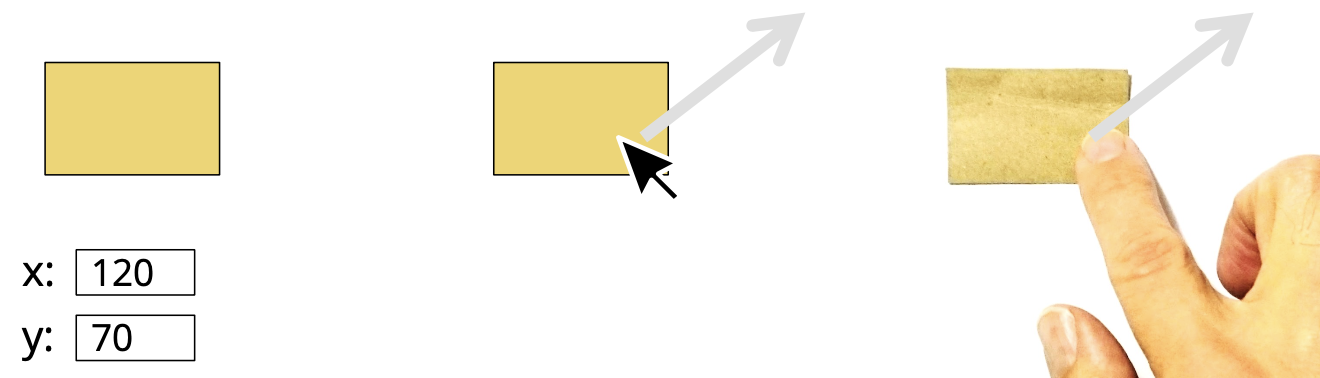
Dragging
- mousedown on shape starts drag
- calculate offset from position to the shape frame-of-reference
- mousemove to drag
- mouseup to end drag
Mon March 25 2024
Came in 30 min late, he started showing us the demo
Lecture 20 - Transformable
Demo: walkthrough
Wed March 27
Lecture 21 - Accessibility
(User Interface) Accessibility
Developing content to be as accessible as possible, no matter an individual’s physical and cognitive abilities and how they access a user interface.
- Often abbreviated as “a11y”, sometimes pronounced “ally”
- The “average person” is just a statistical construct
- The people who will use your interface are different than you
Great a11y resource: https://inclusive.microsoft.design/
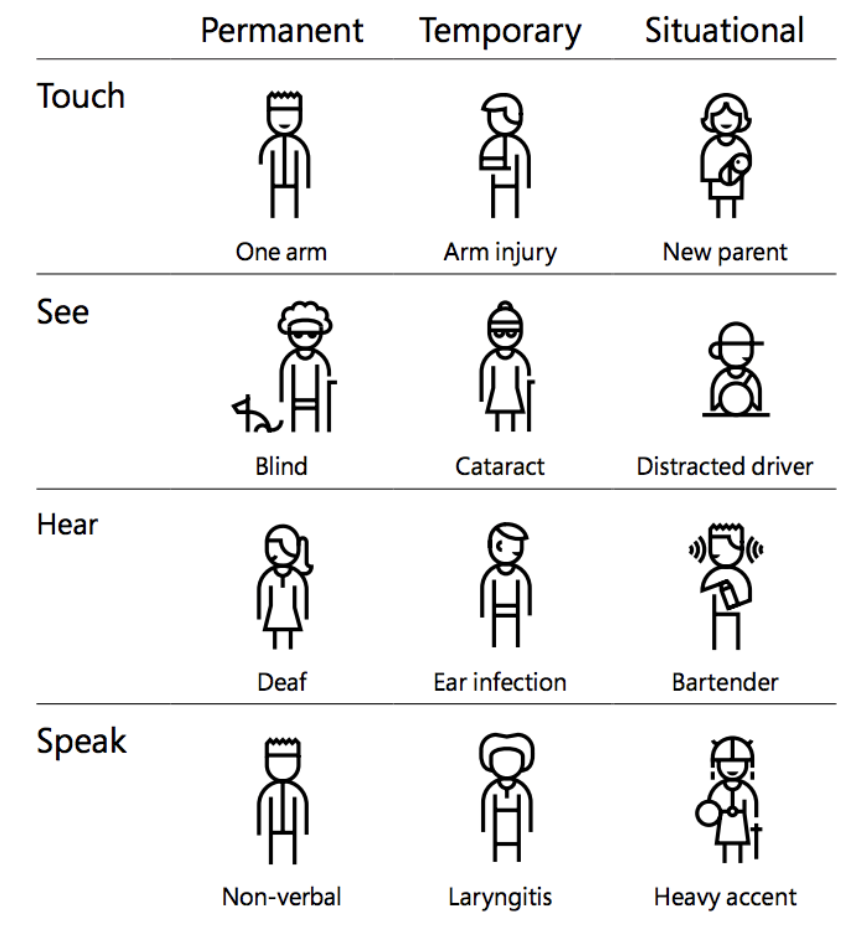
Temporary and Situational Disabilities
Sick or injured
- Temporarily impaired cognitive capabilities - Temporary loss of motor capabilities Driving a car
- Limited attentional bandwidth Underwater diving
- Impaired sight, hearing, mobility Using an ATM late at night in an unfamiliar surrounding
- Likely paying attention to multiple things at the same time
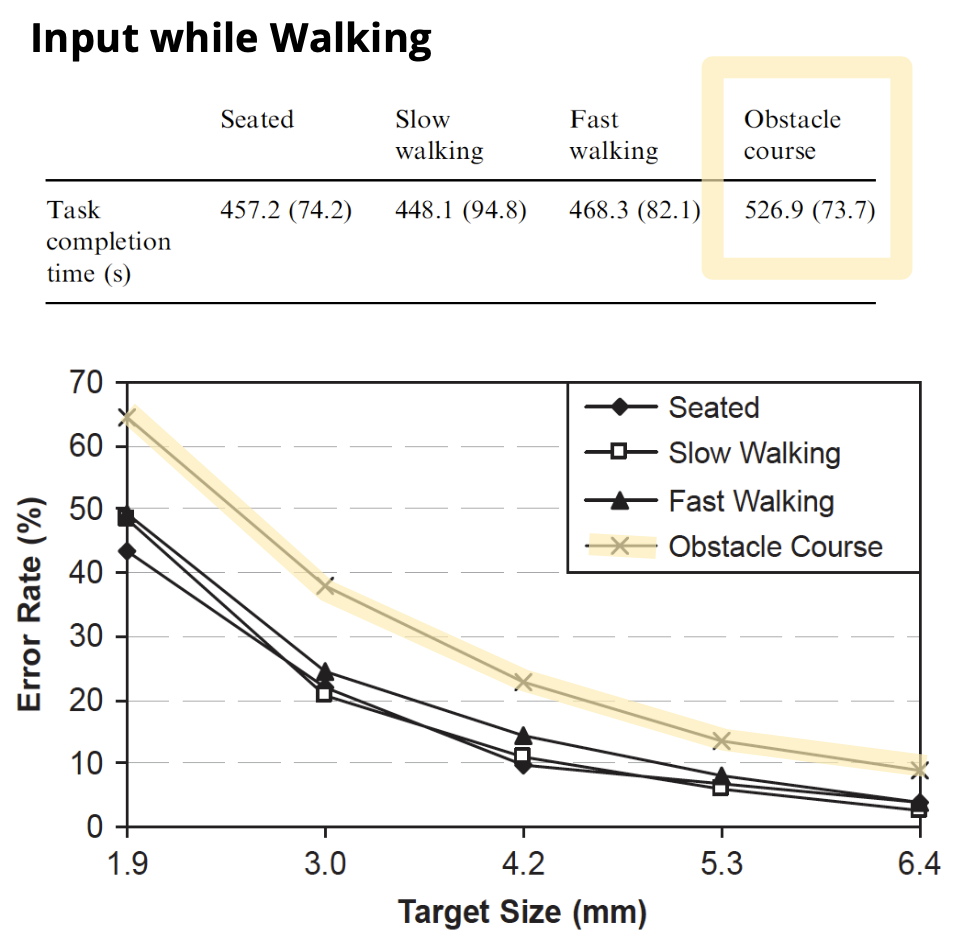
Input while Walking
Experiment to understand the impact of using a phone while walking
- Tap on targets when:
- Seated
- Walking on treadmill (slow/fast)
- Walking through Obstacle course
- Measures
- Time to complete task
- Errors when selecting targets
Reading and Thinking while Walking
Experiment to understand impact of using a phone while walking
Read short text and answer questions when:
- Seated
- Walking through obstacle course
Reading and Thinking while Walking Results
- Answered questions at same speed when seated or walking
- Read more slowly when walking
- Answered more questions incorrectly when walking
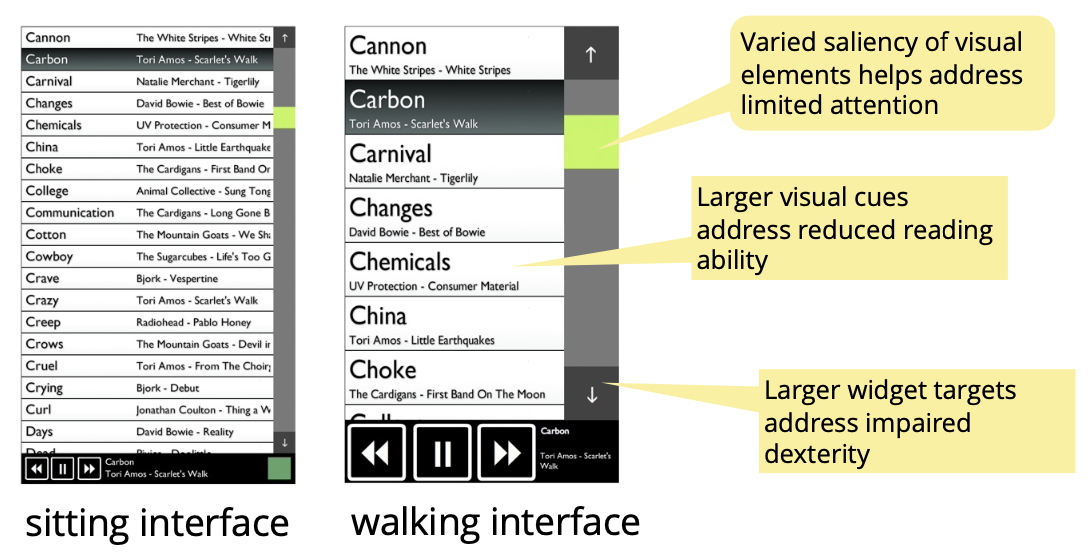
Interface Adaptation when Walking
- To address situational walking impairment
- Reduced dexterity and motor control
- Reduced cognitive ability
Age-Related Impairments
- Reduced motor coordination (fine/gross motor skills)
- Visual and hearing impairments
- Cognitive effects like loss of memory
~25% of Canadians will be over 65 by 2030 (only ~10% in 1991)
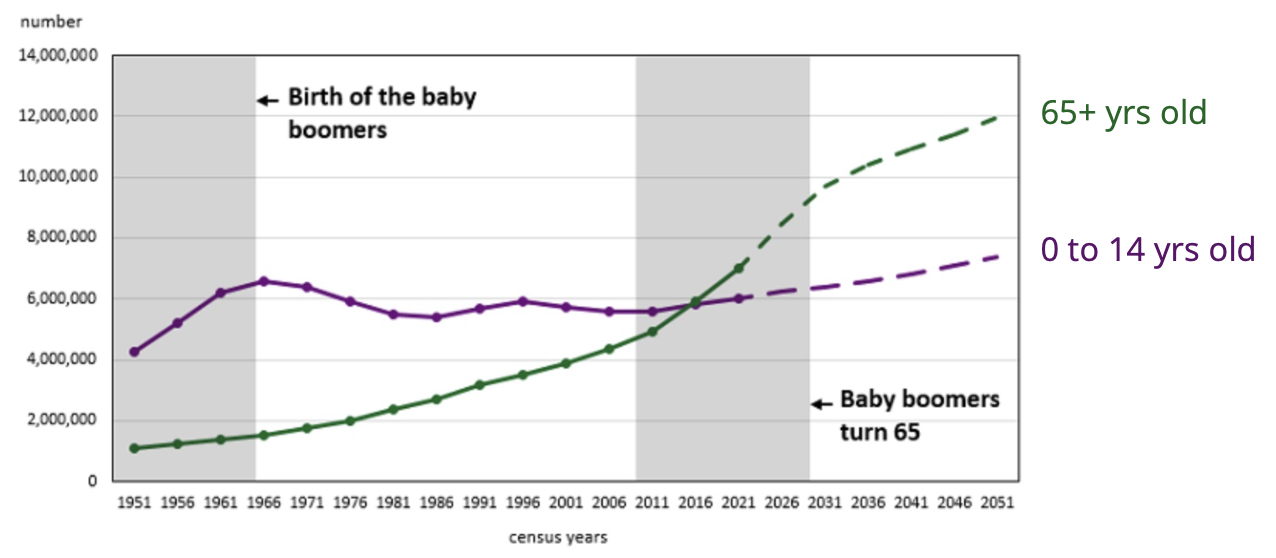
Interfaces for Age-Related Impairments
- Keep information simple (cognitive)
- High contrast colours, large text and icons (vision)
- Large widget and button sizes (motor)
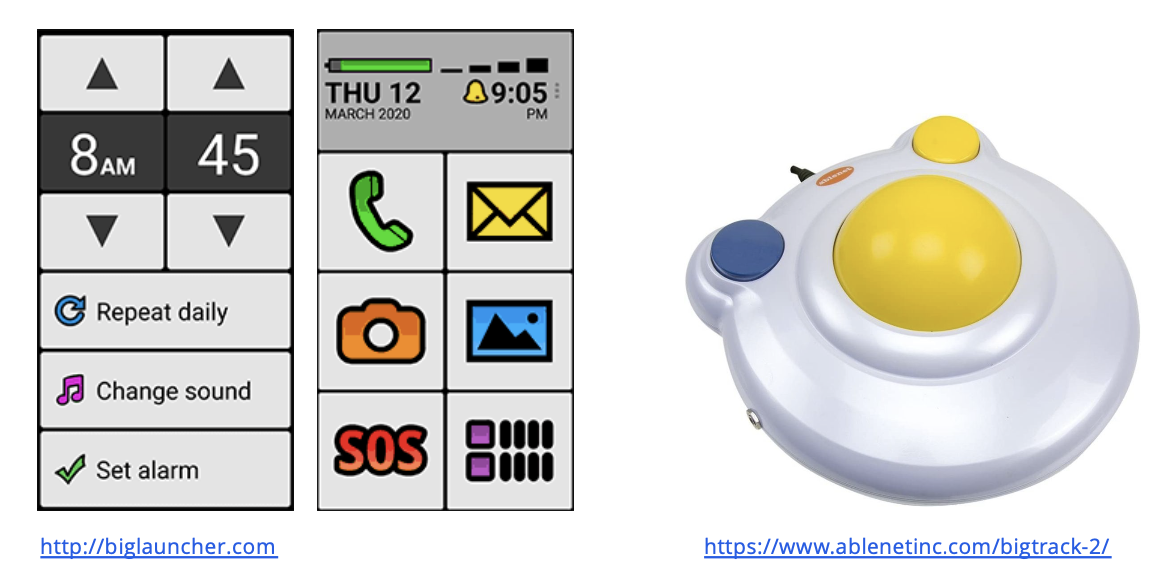
Chronic and Long-term Disabilities
Many People are Affected
- Visual
- 1 in 100 people have a significant visual disability
- 1 in 475 people are legally blind
- 1 in 2000 people are totally blind
- Hearing
- 1 in 10 people have a significant hearing impairment - 1 in 125 people are deaf
- Motor
- 1 in 250 people use a wheelchair
- Cognitive
- 3 in 100* people have a significant cognitive disability
10 to 20% of population estimated to have a long-term disability (3 to 6 million people in Canada)
Modern OS Support for Accessbility
- Control cursor from keyboard (motor)
- Adjust acceleration, tracking, precision (motor)
- Speech dictation (visual/motor)
- Magnify portions of the screen, adjust element sizes or font-size, provide full voice dictation (visual)
- Captions / subtitles (audial)
Interface Enhancements for Visual Impairments
- zoom screen or specific area, increase font size
- high contrast colours, dark mode, remove animations
- screen reader, voice input
- real world magnifier

Enhancements for Hearing Impairments
- Show audio alerts visually (e.g. vibrate, flashlight alarm)
- Realtime audio processing to filter background noise and amplify the voice of another person
- Monitor audio for certain sounds and send alert (e.g. baby crying)
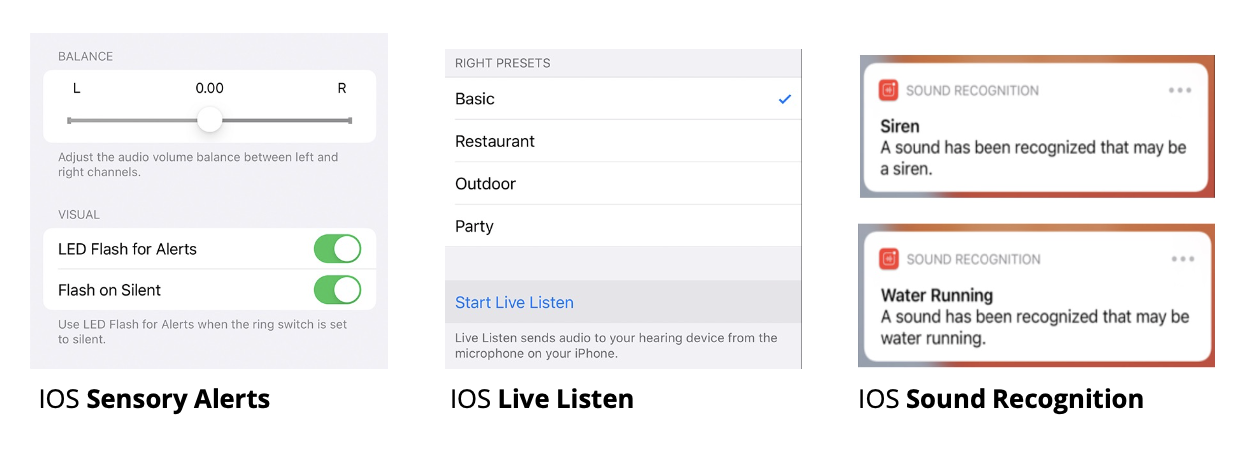
Enhancements for Motor Impairments
- Sticky keys, slow keys, and filter keys
- Reduce key repeat rate
- Eye tracking
- Voice input
- Physical switches and “puffers”
- Brain-computer interfaces (BCI)
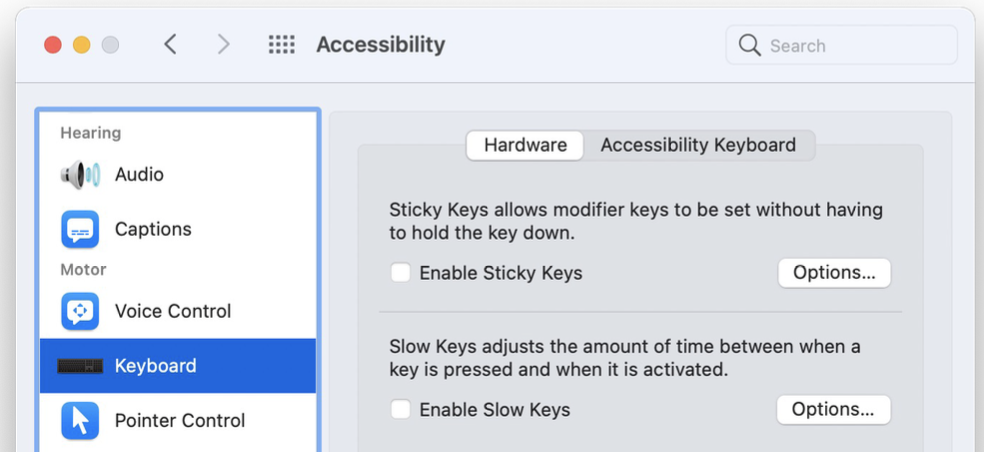
Enhancements for Cognitive Impairments
- word prediction, grammar and spelling check
- text-to-speech
- augmenting text with icons and pictures
- ”slow down interface”
- avoid sudden state changes
- reduce or remove unnecessary animations (esp. flickering)
- eliminate time sensitive actions
The “Curb Cut” Effect
Laws and programs designed to benefit vulnerable groups, such as people with a disability, often end up benefiting all of society.
It ended up making the lives of a lot of people easier.
Video Closed-Captioning
- Captions benefit more than people with hearing impairments
- enables watching TV in silence (while someone else is sleeping) or in noisy environments (like sports bar)
- helps children learn to read or adults to learn a second language
- native language captions enable viewers to enjoy foreign language films and television (i.e. “sub-titles”)
- source for searching and data mining video content
Legal Obligations in Canada
- The Accessible Canada Act (since 2019)
- government and federally regulated organizations (e.g. transportation, broadcasting, telecommunications, financial)
- expected to use Web Content Accessibility Guidelines (WCAG)
- fines up to $250K
- Accessibility for Ontarians with Disabilities Act (since 2005)
- applies to all Ontario government websites
- applies to Ontario public and private entities (50+ employees)
- must adhere to Web Content Accessibility Guidelines (WCAG) 2.0
- fines up to $100K
Legal Obligations Elsewhere
- United States Disabilities and Rehabilitation Act “Section 508”
- any organization doing business with federal agency or receives federal funding
- Americans with Disabilities Act (ADA)
- non-profits, business, local and state governments
- European Union Web Accessibility Directive
- all government websites
- any organizations financed through public contracts
Implementing Accessible Interfaces
Accessibility Tree
The browser generates an accessibility tree from the DOM with accessibility-related information for most HTML elements
- name, description, role, state
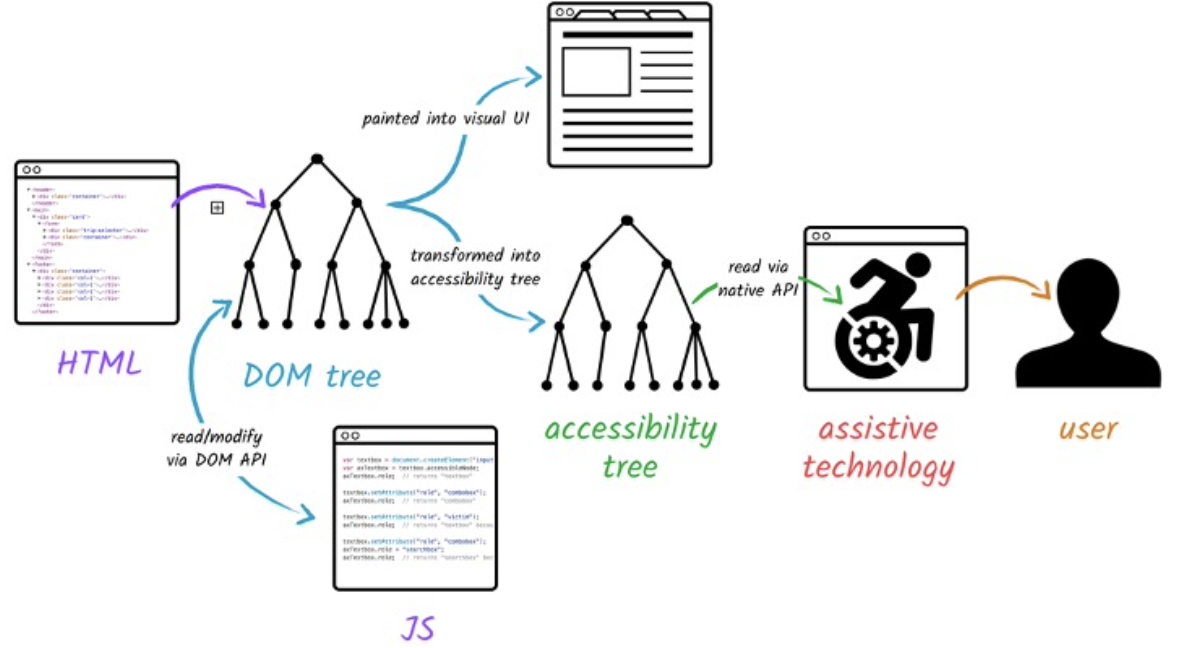
DevTools Accessibility Tab
- CMD-SHIFT-P ans search for “Accessibility”
- Enable Accessibility tab
- can view accessibility tree (and other features)
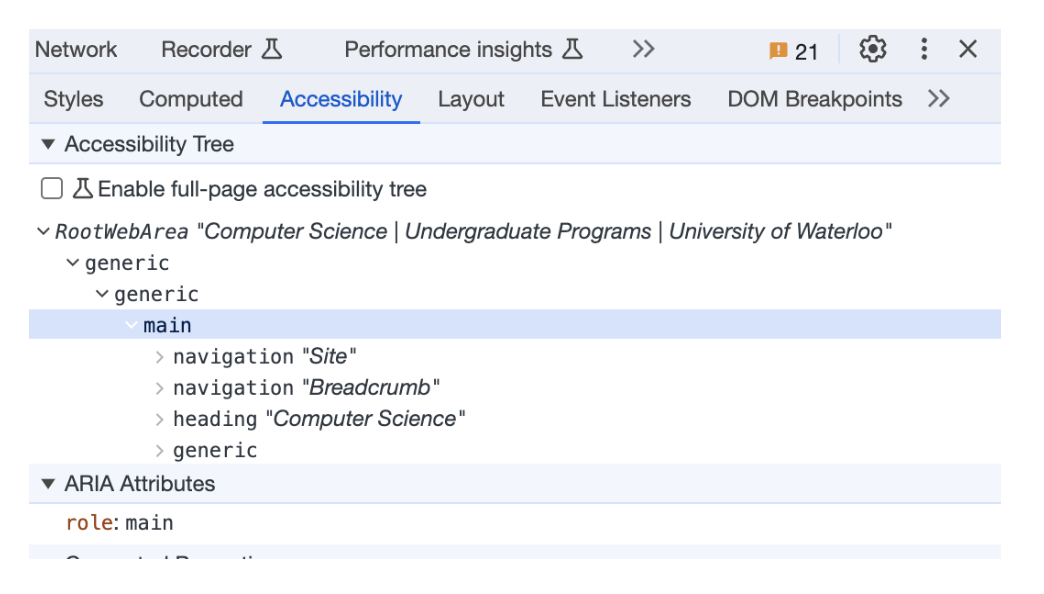
Implementing for Web Accessibility
Web Content Accessibility Guidelines (WCAG): https://www.w3.org/WAI/standards-guidelines/wcag/
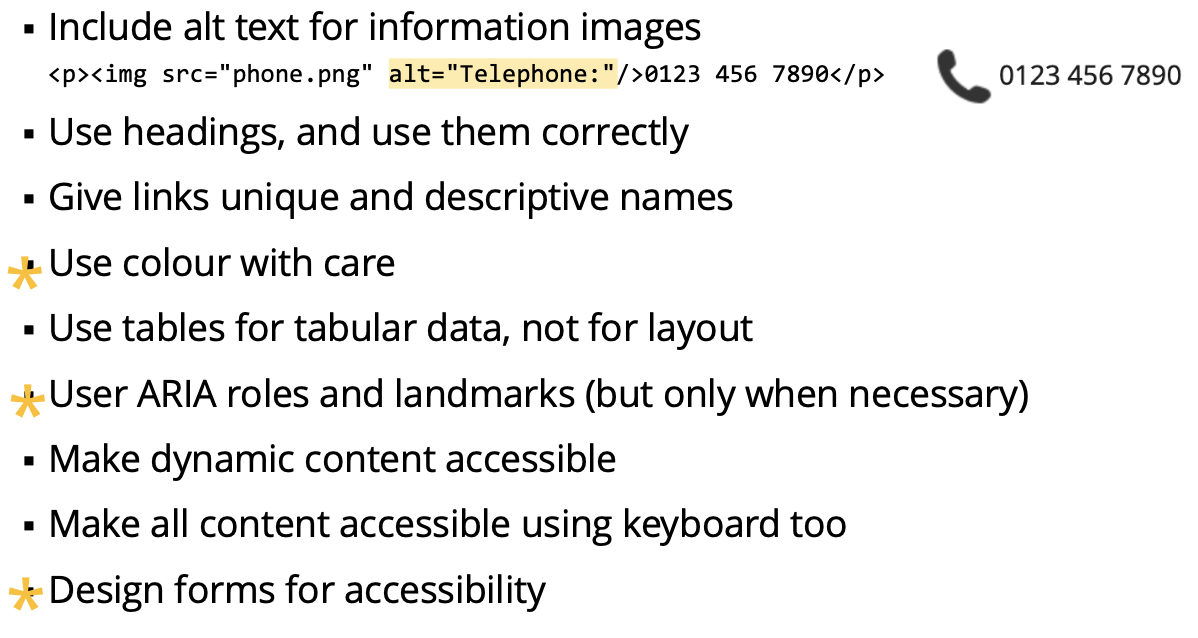
Semantic HTML
- Also called “POSH, or Plain Old Semantic HTML”
- Don’t use
<div>and<span>for everything - Semantic elements clearly describes the content meaning
- semantic is just descriptive
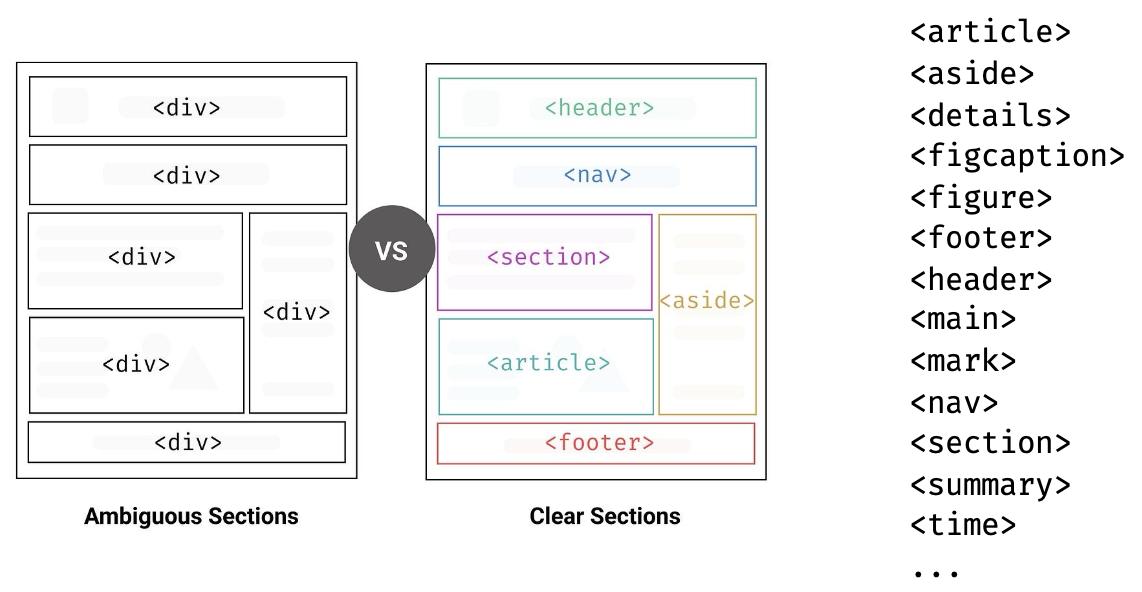
https://www.w3schools.com/html/html5_semantic_elements.asp
Demo: html/semantic-good.html
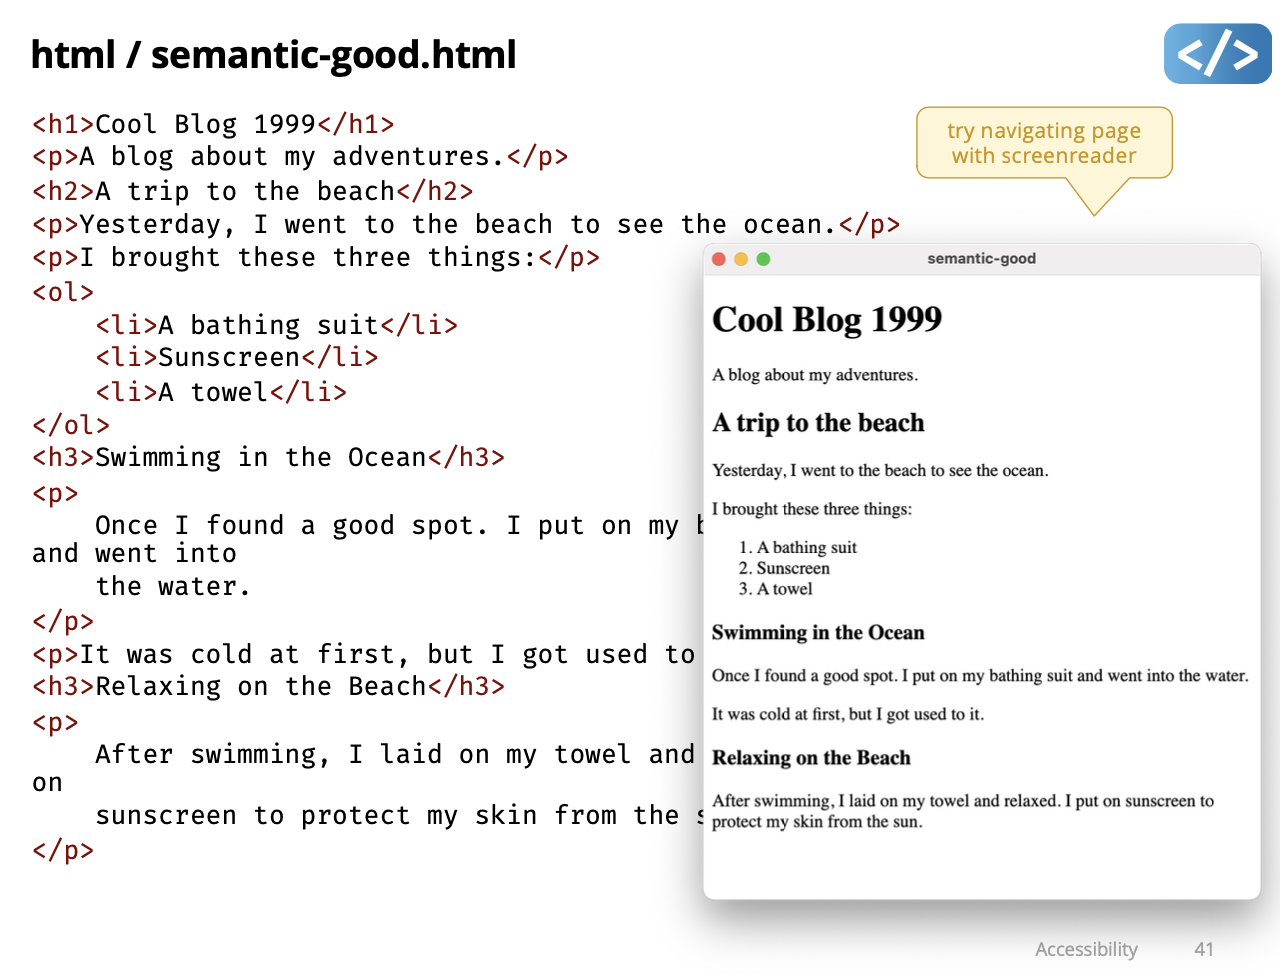
Demo: html/semantic-bad.html
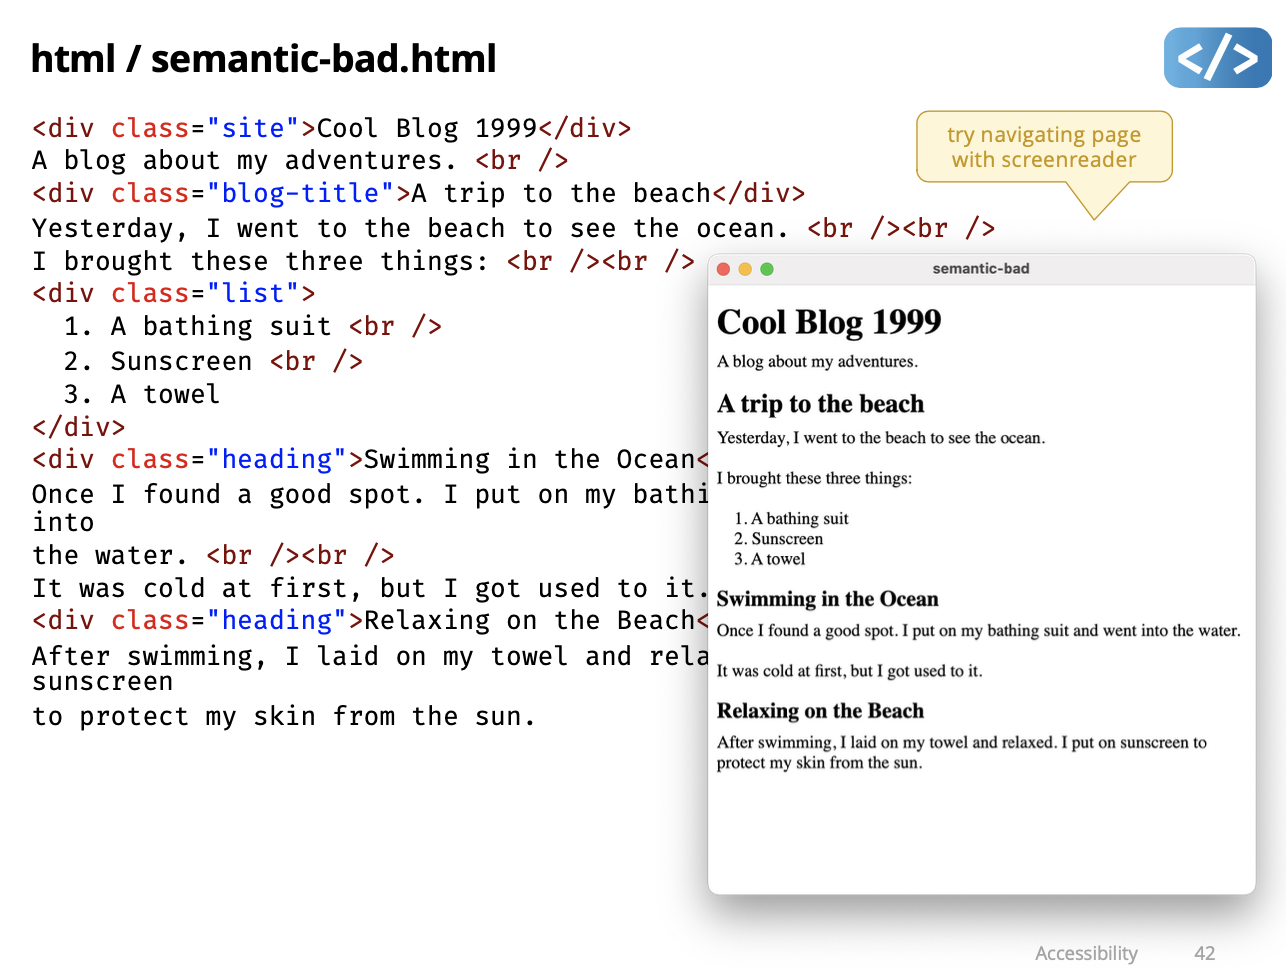
Both demo failed…
Semantic HTML with Preact Components
- Avoid
<div>for component root if semantic element possible - Use
<Fragment>instead of<div>if root has no semantic purpose - Some components could have different semantic roles
- Use “as Element” pattern to set component root element…
Demo: as-element

- a bit confused about as = “aside”…
Demo: Skip Link
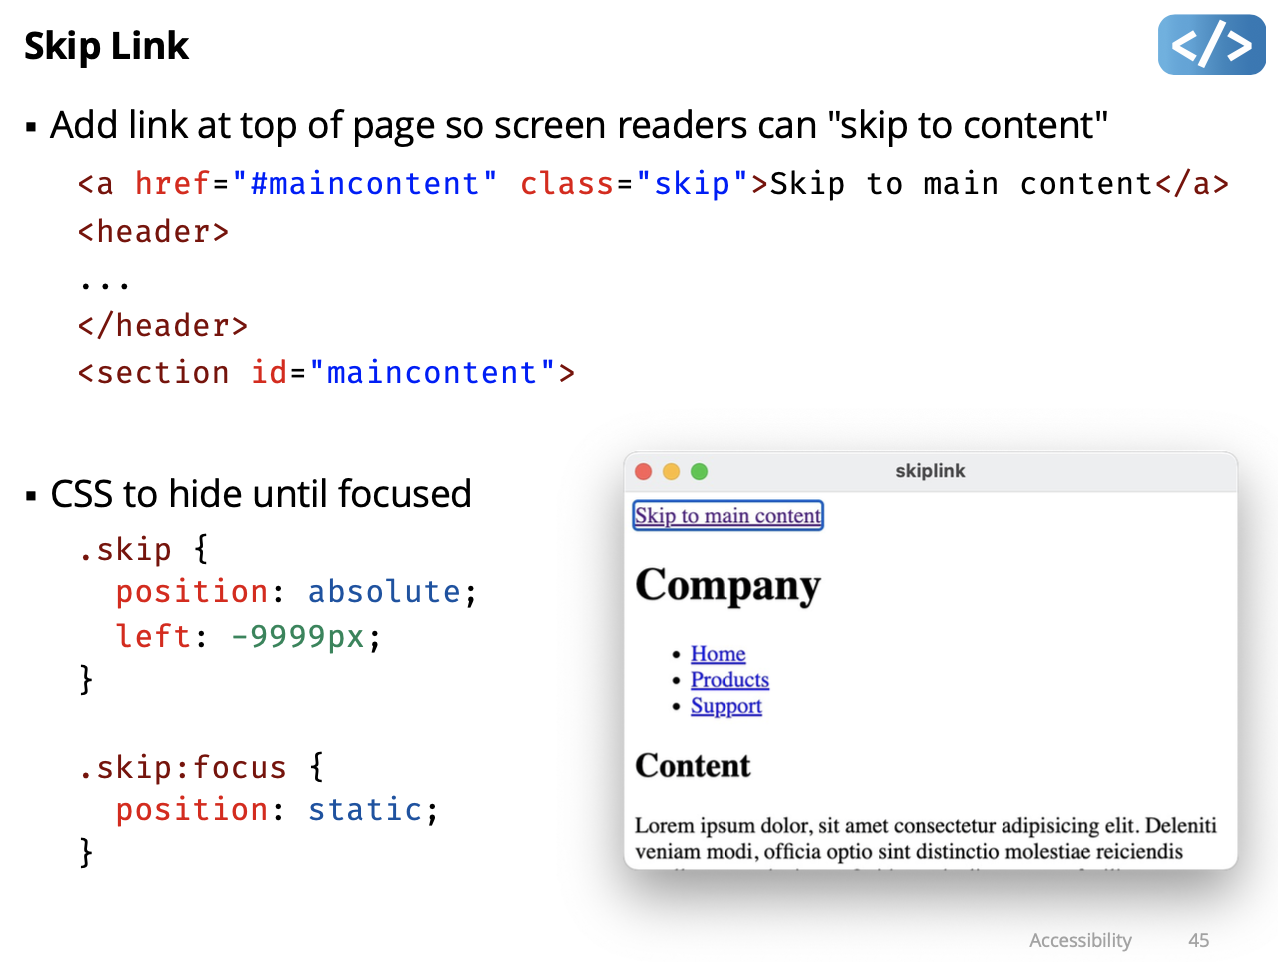
ARIA Attributes
- ARIA (Accessible Rich Internet Applications)
- a specification to add semantics to elements
- ARIA Roles
- Use ONLY if not possible to use an HTML semantic element
- examples of ARIA roles without HTML equivalent: toolbar, tooltip, feed, math, presentation, note
- ARIA States and Properties
- Use ONLY for attributes not supported on HTML element - examples: aria-required, aria-checked, aria-disabled
- ARIA attributes only change the accessibility tree
Demo: forms
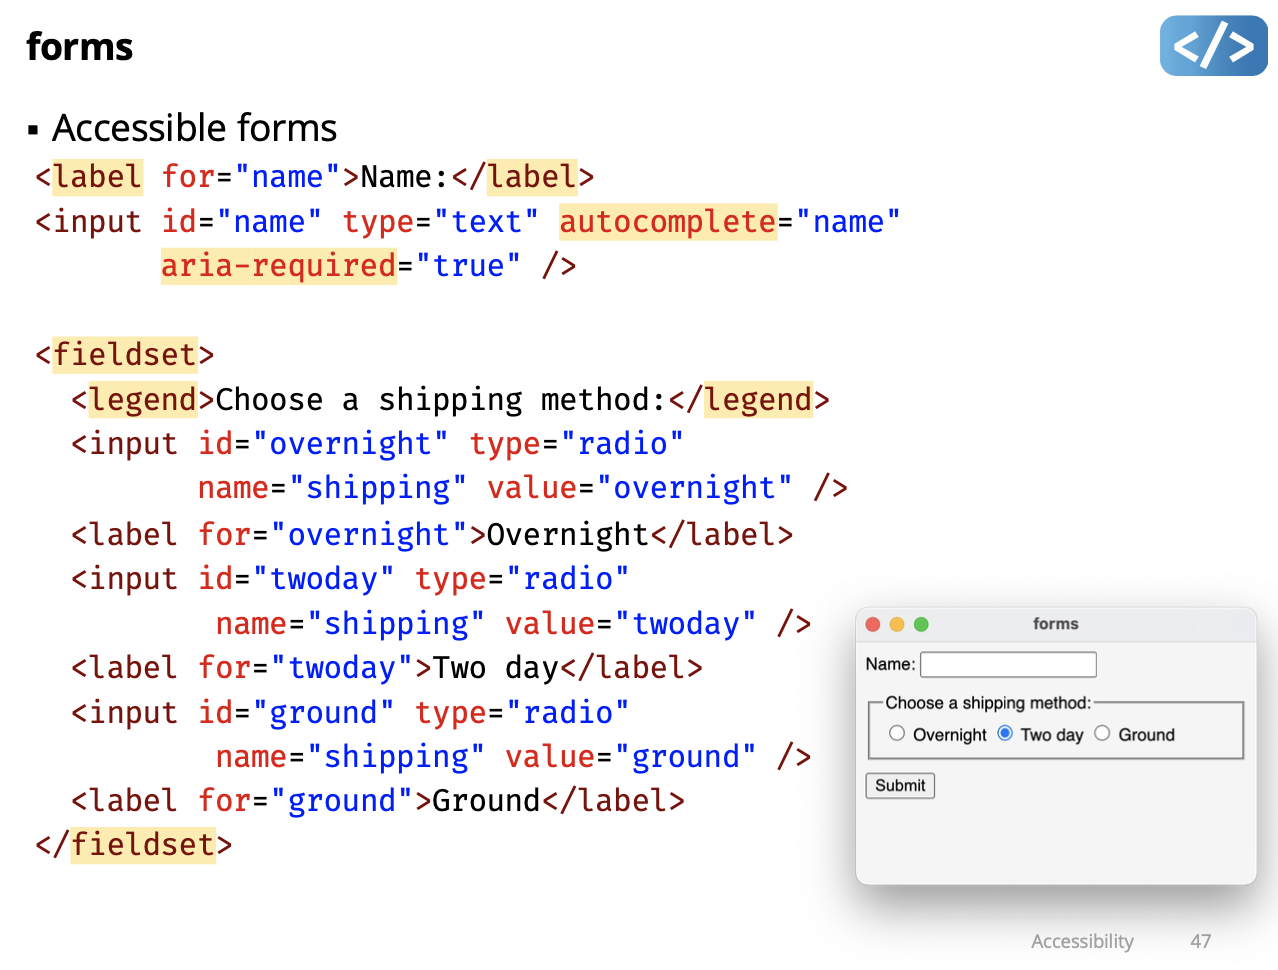
Colour Blindness
- Dichromacy: 1 type of cone missing
- Protanopia: missing red cones (~1% of males)
- Deuteranopia: missing green cones (~1% of males)
- Tritanopia: missing blue cones, (and blue sensitive rods) (rare)
- Monochromacity: 2 or 3 types of cones missing

Render webpage to simulate colour blindness: https://www.toptal.com/designers/colorfilter
Colour Perception
- Human ability to discriminate colours depends on context
- It’s harder to tell two colours apart when
- the colours are pale
- the object is small or thin
- the colour patches are far apart
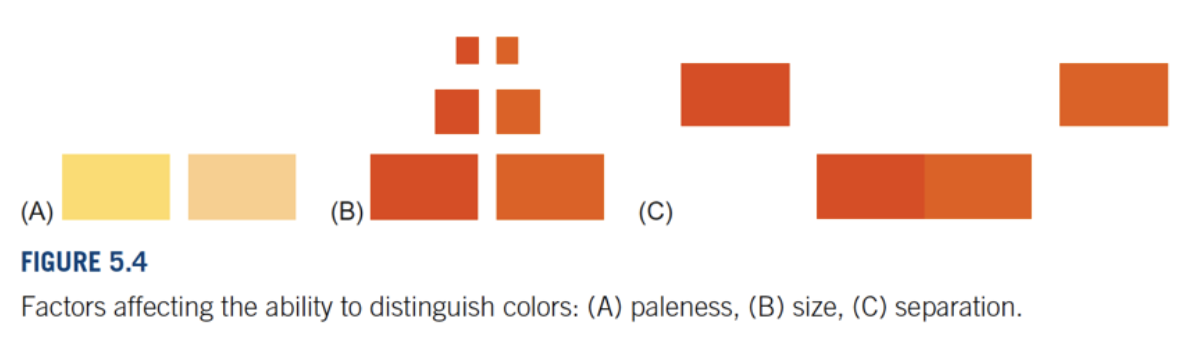
Colour Contrast
Ratio of perceived luminance for two colours (e.g. foreground text and background), examples:
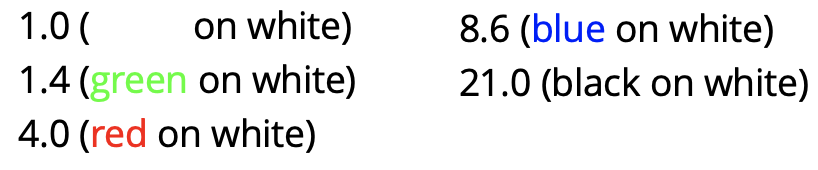
- WCAG Colour Contrast Guidelines (most cases, some specific contrast for logos, larger text, etc.)
- Minimum (Level AA) at least 4.5
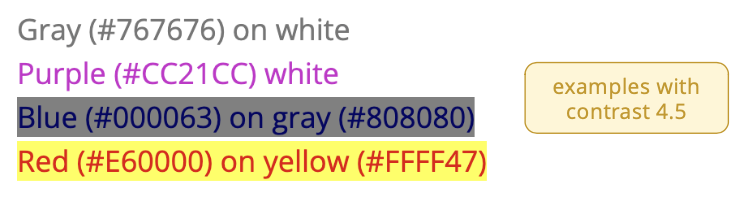
- Enhanced (Level AAA) at least 7.0
- Minimum (Level AA) at least 4.5
DevTools Colour Contrast Tool
- Find contrast value in DevTools
- Inspect element
- Click style colour swatch
- Click ”Contrast ratio X.XX” to display contrast thresholdlines in colourspace
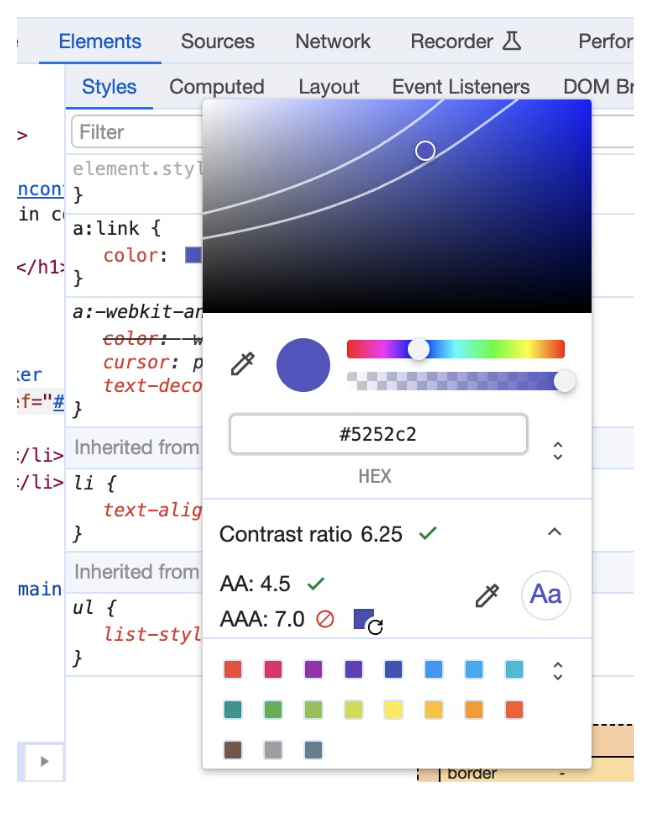
Basic A11y Testing Methods
Disconnect your mouse and try to use your app
- Tab and Shift+Tab to focus element
- Enter to activate element
- Arrow keys when needed (e.g. menu, dropdown)
- Test with a screenreader
- e.g. VoiceOver on MacOS, Narrator in Windows
- A11y linters/checkers

Course evaluation
- Make sure to do the course evaluation!!!!!
Next week is last lectures… So sad
Mon April 1
Is a fun lecture.
Lecture 22 - Computer Vision
p5.js is good for quick prototyping, fast developing
p5.js Architecture
- Runs in either global or instance mode:
- global: all properties and methods are attached to the window
- instance: all properties and methods are bound to a p5 object
- ”Implied” callback functions:
setup()runs once when program startsdraw()executed 60 times per second (by default)
- “Implied” event functions like:
keyPressed()called when a key is pressed
- Global variables like:
mouseX,mouseYfor current mouse position
https://github.com/processing/p5.js/blob/main/src/core/main.js
p5.js ⇒ imperative
Final exam question
Computer Vision
Is a broad class of algorithms that allow computers to make intelligent assertions about digital images and video (Levin, 2006)
Computer Vision for Human Computer Interaction
Is when a computer is controlled using a video camera.
A (very) simple Computer Vision Algorithm
for each video frame:
	identify a "special" pixel based on some criteria
	use that pixel's location to control the computer
Demo: camera-test
for each video frame:
	most_special = pixel[0,0]
	for each pixel:
		if pixel[x,y] is more special
			most_special = pixel[x,y]
	use most_special's location to control the computer
goes through all the pixels, and compare to your ideal pink.
for each video frame:
	count = 0
	for each pixel:
		if pixel[x,y] is pinkish
			count = count + 1
	use count of special pixels to control the computer
for each video frame:
	subtract this fram from last frame
	use differences to estimate how far each pixel moved
	use total pixel movement to control the computer
using https://github.com/anvaka/oflow
for each video frame:
	subtract out "background pixels"
	find "blobs" of connected pixels
	use blob position and/or shape to control the computer
Failed demo.
More advanced model (more special kind of pixel)
for each video frame:
	send frame to deep learning model to recognize "features"
	use features to control the computer
Demo: facemesh
https://github.com/tensorflow/tfjs-models/blob/master/face-landmarks-detection/mesh_map.jpg
ml5.js - Friendly Machine Learning for the Web
cs383: pop up exibhition. tuesday and thursday. 4:30 -6:30 ech 1237